Showing 59 Result(s)
Main dish

You Won’t Miss the Bread with This Delicious Low Carb Cauliflower Grilled Cheese

You Won't Miss the Bread with This Delicious Low Carb Cauliflower Grilled Cheese
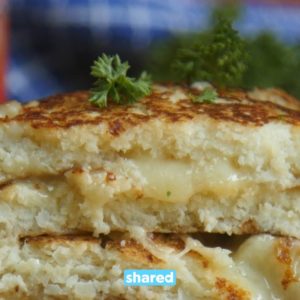
Grilled cheese is one of those classic dishes that pretty much everyone can love because it’s so customizable - but have you ever heard of Cauliflower Grilled Cheese?! Yes, it’s true, grilled cheese sandwiches can be low carb, and still taste absolutely delicious! Cauliflower is a surprising substitute for bread, but the taste and texture are spot on. Go on and give it a try - you might just make grilled cheeses with cauliflower from now on!
Author:
Cuisine: American
Recipe type: Main dish
Ingredients
  • 1 head cauliflower, (to make about 4 cups processed cauliflower)
  • 2 eggs, lightly beaten
  • ½ cup Parmesan, finely grated
  • ½ teaspoon oregano
  • 1½ cups white Cheddar, shredded
Instructions
  1. Cut cauliflower into florets. Process cauliflower florets in a food processor until the texture resembles rice. Alternatively, you can grate the cauliflower.
  2. In a medium bowl, combine processed cauliflower, eggs, Parmesan and oregano. Mix until evenly combined then season with salt and pepper.
  3. Heat a large nonstick skillet over medium heat. Spray with cooking spray then scoop the cauliflower mixture into a small patty on one side of the pan. Repeat to form a second patty on the other side. These act as your “bread” slices. Press down on both pieces with a spatula and cook until golden underneath, about 5 minutes. Flip and cook until the other sides are golden, about 3 minutes more.
  4. Top one cauliflower slice with cheese then place the other cauliflower slice on top. Cook until the cheese is melted, about 2 minutes more per side. Repeat with remaining ingredients.

Watch the recipe video here:

Cauliflower Grilled Cheese is a healthy alternative to a classic!Recipe: http://sha.red/t0QX1

Posted by Shared Food on Thursday, May 2, 2019

Main dish

Spicy Noodles Are A Much Needed Addition To Your Dinner Routine

Spicy Noodles Are A Much Needed Addition To Your Dinner Routine
Sometimes you just need a delicious bowl of noodles to feel satisfied. These spicy noodles check all the right boxes when it comes to making a delicious meal - they're quick, easy and super tasty so you can whip them up whenever the cravings strike. If you don't love things super spicy you can cut down on the amount of red pepper flakes and chili paste (or leave them out altogether).
Author:
Cuisine: American
Recipe type: Main dish
Ingredients
  • 1 lb spaghetti
  • 2 tbsp vegetable oil
  • 1½ tbsp red pepper flakes
  • 1½ tsp chili paste
  • 6 tbsp soy sauce
  • 6 tbsp honey
  • Green onions, peanuts, sesame seeds, cilantro (optional garnishes)
Instructions
  1. Cook your spaghetti according to the package instructions. Drain and set aside.
  2. In a large pan over medium heat add the oil and red pepper flakes and cook for 2 min.
  3. Add the chili paste, soy sauce and honey. Stir and bring to a simmer to thicken slightly.
  4. Add the cooked noodles to the sauce and toss to combine.
  5. Remove pan from the heat and add your garnishes of choice (green onion, peanuts, sesame seeds and cilantro).
  6. Serve immediately and enjoy!

Watch the recipe video here:

https://www.facebook.com/1000605023309848/posts/2184924478211224/

Main dish

Whip up All the Fixings for the Ultimate in Comfort Food with This Amazing One Pan Meatloaf Dinner!

Whip up All the Fixings for the Ultimate in Comfort Food with This Amazing One Pan Meatloaf Dinner!
I’ve made many one pan dinners using my trusty baking sheets, but an entire classic Sunday dinner? This One Pan Meatloaf Dinner is perfect for a no-fuss delicious comfort food meal. You’ll be amazed at the fact that you can whip up everything from the mashed potatoes to the meatloaf to the green beans, all on one pan! Anything that leaves me with less dishes to clean is a winner in my book! You’ll love the flavors in this dish.
Author:
Cuisine: American
Recipe type: Main dish
Ingredients
For the mashed potatoes:
  • 1½ pounds russet potatoes, peeled and chopped into small pieces
  • ⅓ cup water
  • 1 tablespoon unsalted butter
  • ⅔ cup milk
  • 1 packet gravy mix and water, optional
For the mini meatloaves:
  • 17-20 saltine crackers, crushed fine (about ⅔ cup)
  • ¼ cup whole milk
  • ⅓ cup minced fresh parsley
  • 3 tablespoons Worcestershire sauce
  • 1 large egg
  • 1½ tablespoons Dijon mustard
  • 1 teaspoon onion powder
  • 1 teaspoon garlic powder
  • 1 teaspoon salt
  • ½ teaspoon pepper
  • 1½ pounds ground beef
For the meatloaf glaze:
  • ½ cup ketchup
  • ¼ cup packed light brown sugar
  • 4 teaspoons cider vinegar
For the roasted green beans:
  • 1 pound fresh green beans, trimmed
  • 1½ tablespoons olive oil
  • Salt and pepper, to taste
Instructions
  1. Start by preheating the oven to 425 degrees. Place a large sheet of regular foil on a large (13x18) sheet pan. Spray both the sheet pan and the foil generously with nonstick cooking spray.
  2. Place the peeled and chopped (into small pieces) potatoes along with a generous pinch of salt and pepper in the center of the foil.
  3. Fold the foil up around the potatoes and add in the water. Seal the potatoes into a packet. Do not use heavy duty foil or more than one piece of foil or the potatoes won't cook properly.
  4. Place in the oven for 10 minutes. Meanwhile, prepare the mini meatloaves.
  5. Stir cracker crumbs, milk, parsley, Worcestershire sauce, egg, mustard, onion powder, garlic powder, 1 teaspoon salt, and ½ teaspoon pepper together in a large bowl. Add ground beef and combine until well-mixed. Shape mixture into 6 oval loaves. Add to the tray with the potatoes. Mix the glaze ingredients and spread evenly over the top of the meatloaves.
  6. Place in the oven for 20-25 minutes. Remove from the oven, and add the trimmed green beans in the last section of the sheet pan. Drizzle with olive oil and about ½ teaspoon salt and ¼ teaspoon pepper. Toss and place in the oven for another 15-20 minutes or until the beans are roasted and the meatloaf is cooked to an internal temperature of 160 degrees.
  7. Remove from the oven, and carefully open the foil pack of potatoes. Transfer the potatoes to a large mixing bowl and add in the butter, milk, and salt and pepper to taste. Use a potato masher to mash the potatoes.
  8. If desired, prepare the gravy packet according to package directions to serve with the potatoes.
  9. Enjoy immediately.

Watch the recipe video here:

https://www.facebook.com/1000605023309848/posts/2185051284865210/

Dessert

This Single-Serving Mason Jar Monkey Bread Will Be Loved by the Whole Family

This Single-Serving Mason Jar Monkey Bread Will Be Loved by the Whole Family
Monkey bread is one of my family’s treats - you can mix it up to make just about any kind you like. But...have you ever made Mason Jar Monkey Bread? Yes, single-serving sized monkey bread is now available in a portable mason jar! Clean out those mini mason jars in the cupboard, bake up some biscuits and top it off with yummy frosting...this is the perfect treat for a party!
Author:
Cuisine: American
Recipe type: Dessert
Ingredients
  • 2 tubes refrigerated biscuit dough
  • ½ cup sugar
  • 1 tablespoon cinnamon
  • ½ cup butter, melted
  • Frosting
Instructions
  1. Preheat oven to 400 degrees.
  2. Begin by cleaning out 8 small oven-safe mason jars. Prepare each with a generous spritz of nonstick spray.
  3. Separate the biscuits and cut each into four pieces, placing the pieces in a medium mixing bowl.
  4. Add sugar, cinnamon, and melted butter to the mixing bowl and stir together until the pieces of dough are evenly coated.
  5. Divide the coated biscuit pieces among the prepared mason jars.
  6. Bake 18-20 minutes, or until biscuit pieces are fully cooked and tops are golden brown.
  7. Allow to cool slightly, then top with frosting. Serve warm and enjoy!

Watch the recipe video here:

This is the perfect treat for a partyRecipe: http://sha.red/GXQyQ

Posted by Shared Food on Tuesday, April 23, 2019

Main dish

A Fresh Lemony Take on the On-Going Poke Cake Phenomenon with Lemon Burst Poke Cake

A Fresh Lemony Take on the On-Going Poke Cake Phenomenon with Lemon Burst Poke Cake
Following the poke cake phenomenon, I wanted to try a recipe by Melissa's Southern Style Kitchen that adds fresh flavors to this yummy trend! Lemon meringue being my all time favorite pie, I knew this would inspire me to create delicious poke cake! This Lemon Burst Poke Cake has all the fresh flavor that comes with lemons, especially the addition of the zest which really gives it that burst. Laying on top is another level of lemony indulgence, lemon white chocolate cream cheese frosting!
Author:
Cuisine: American
Recipe type: Main dish
Ingredients
Cake:
  • 1 box Golden Vanilla cake mix, plus water, oil, eggs.
  • 1 tablespoon lemon zest
  • 1 (3.4-oz) box instant lemon pudding
  • 2 cups milk
Frosting:
  • 8-oz cream cheese, softened
  • 2 cups powdered sugar
  • 2 tablespoons fresh lemon juice
  • 1 teaspoon pure lemon extract
  • 1 pint heavy cream
  • 3 tablespoons lemon zest, divided
Instructions
  1. Prepare the cake mix per the package instructions using the amounts of water, oil and eggs called for. Add 1 Tbsp fresh lemon zest. Bake in a 9 x 13-inch cake until a toothpick inserted into the center comes back clean.
  2. Remove from the oven and immediately poke holes using the back of a wooden spoon or similar over the cake.
  3. In a medium size mixing bowl whip the pudding mix and milk until thickened but still pourable.
  4. Spread over the cake gently pushing into the holes. Cool completely.
  5. To make the frosting, in a medium size mixing bowl using an electric mixer cream together the cream cheese, powdered sugar, lemon juice and lemon extract.
  6. Add the cream continuing to beat until fluffy and fully combined. Mix in 2 Tbsp lemon zest by hand.
  7. Frost the top of the cake and garnish with the remaining lemon zest.

Watch the recipe video here:

Lemon Burst Poke Cake is packed with delicious lemon flavorRecipe: http://sha.red/cyKsz

Posted by Shared Food on Monday, April 22, 2019

Dessert

These Easter Brownie Bites Have a Cream Egg Center You Don’t Need to Hunt For!

These Easter Brownie Bites Have a Cream Egg Center You Don't Need to Hunt For!
The time has come and Cadbury Creme eggs will be here only for a short while. So buy as many as possible and try to think of all the ways you can bake with them! This recipe is a sure winner to get you going! A simple brownie is a perfect canvas to add your favorite toppings to, but why not try stuffing them!? Chocolatey and chewy one bite brownies + addictive Cadbury Creme eggs, equals the treat that will have you counting the days until next Easter!
Author:
Cuisine: American
Recipe type: Dessert
Ingredients
For Mini Brownie Bites
  • 1 box brownie mix
  • 2 Cadbury Creme Mini Eggs 12-Pack
For Vanilla Buttercream Frosting
  • 1 cup butter, softened
  • 4 cups powdered sugar, sifted
  • ¼ teaspoon salt
  • 1 tablespoon vanilla
  • 2 tablespoons milk
  • 4 drops of yellow food coloring
  • sprinkles
Instructions
For Mini Brownie Bites
  1. Mix the box brownie mix according to the package directions. Spray a mini muffin tin with nonstick spray. Fill each tin with 1 teaspoon brownie batter. Bake at 350F degrees for 11 minutes.
  2. Remove from the oven and let cool 2 minutes. Press an unwrapped creme egg into the center of each brownie bite.
  3. Let cool another 2 minutes. Place on a wire rack and let cool completely.
For Vanilla Buttercream Frosting
  1. Mix the softened butter on medium speed with an electric or stand mixer. Beat for about 3 minutes until smooth and creamy.
  2. Add powdered sugar, milk, vanilla extract, and salt. Increase to high-speed and beat for 3 minutes.
  3. Add 4 drops of yellow food coloring and stir until fully colored.
  4. Frost cooled brownie bites and sprinkle sugar sprinkles on top.

Watch the recipe video here:

Easter Brownie Bites with a sweet surprise middle! ?Recipe Here: http://sha.red/xdJAK

Posted by Shared Food on Monday, April 15, 2019

Main dish

Butternut Squash Pasta Carbonara Is a Dinnertime Sensation

Butternut Squash Pasta Carbonara Is a Dinnertime Sensation
I'm a sucker for any pasta dish. With the versatility of a tomato sauce, creamy sauce, or even a casserole, there's something for every day of the week! This Butternut Squash Pasta Carbonara is ultra creamy with yummy butternut squash and salty bacon. Best of all, most of the ingredients cook in the same pan! You'll love this dinnertime sensation.
Author:
Cuisine: American
Recipe type: Main dish
Ingredients
  • 6 slices bacon, chopped
  • 1 tablespoon nely chopped fresh rosemary
  • 1 small yellow onion, chopped
  • 1 (1¾ lb) butternut squash, peeled, seeded and diced
  • into ½-inch cubes
  • Salt and freshly ground black pepper
  • 3 cloves garlic, minced
  • 1 (14.5 ounces) can low-sodium chicken broth
  • 1 pinch ground nutmeg
  • ¼ cup heavy cream
  • 14 ounces dry linguine
  • ⅓ cup nely shredded Parmesan cheese, plus more
  • for serving
Instructions
  1. Cook bacon in a non-stick skillet over medium-high heat (reducing heat slightly if needed) until browned and crisp. Remove
  2. bacon from skillet while leaving 2 tablespoons rendered bacon fat in skillet, transfer bacon to a plate lined with paper towels
  3. and set aside
  4. Add onions and rosemary to drippings in skillet and saute over medium-high heat 2 minutes, then add squash, season with
  5. salt and pepper and cook, tossing occasionally 7 minutes (onions should be beginning to brown lightly). Pour in chicken
  6. broth, and bring to a boil, cover and cook until squash is soft and broth has reduced, about 15 minutes. Add garlic and
  7. nutmeg.
  8. Meanwhile, cook linguine to al dente in a large pot of salted water according to directions on package. Drain and reserve 1
  9. cup pasta water.
  10. Let simmered squash mixture cool for a few minutes then transfer mixture to a blender (reserve skillet) and add cream to
  11. blender (with hot liquids your blender should be no more than half full so if you have a smaller blender work in two batches),
  12. cover with lid then remove the center insert. While holding a folded kitchen towel over lid blend mixture until smooth.
  13. In reserved skillet combine drained pasta, pureed squash mixture, and ¼ cup reserved pasta water. Cook over medium heat,
  14. tossing and adding in more pasta water to thin as needed, until sauce coats pasta, about 2 minutes. Toss in ⅓ cup Parmesan,
  15. season with salt and pepper to taste. Plate and serve pasta topped with Parmesan, bacon, sage and more pepper

Watch the recipe video here:

This new spin on carbonara is ooey gooey and absolutely delicious!Recipe: http://sha.red/FFYPs

Posted by Shared Food on Sunday, April 7, 2019

Main dish

Enlist the Kids in Welcoming Spring and Make These Pretty M&Ms Spring Flower Pops!

Enlist the Kids in Welcoming Spring and Make These Pretty M&Ms Spring Flower Pops!
Easter is coming, which means spring is also fast on its way! Why not make these adorable M&Ms Spring Flower Pops with the kids to celebrate?! It’s so simple to whip these up, and they’re so fun once they’re done! Made with easy Rice Krispie treats cut into circles with cookie cutters, candy melts and spring chocolate candies, you’ll love decorating and customizing these with your favorite colors! Use your finished flowers to dress up an Easter basket, or eat ‘em up right away!
Author:
Cuisine: American
Recipe type: Main dish
Ingredients
  • 3 tablespoons butter
  • 5½ cups mini marshmallows
  • 6 cups crispy rice cereal
  • 4-6 ounces white chocolate candy melts
  • M&Ms spring candies, in varying sizes if possible
Instructions
  1. Spray a 9 x 13 pan with non-stick cooking spray. Set aside.
  2. In a large microwave safe bowl, melt the butter in the microwave for 45-60 seconds. Add the marshmallows and toss gently in the melted butter. Microwave the marshmallows for 1 minute and 30 seconds. Stop to stir. Melt for another 30-60 seconds until marshmallows are completely melted. Add the rice cereal to the melted marshmallows, and combine completely. Pour mixture into the prepared pan, and press evenly. Let the cereal treats set to cool completely, for at least 1 hour.
  3. Once cereal treats have cooled, begin cutting out round cereal treat shapes with round cookie or biscuit cutters. Use any size desired.
  4. Melt the white chocolate candy melts according to package directions. Using paper straws and/or lollipop sticks, dip the end into the melted chocolate, and then insert into the round cereal treat, about half way into the side of the treat.
  5. Use the remainder of the melted chocolate, coat the top sides of the pops, and decorate with the M&M’s using a variety of color combinations. Let cereal treats cool completely, at least 1 hour, before moving. Store in an airtight container for up to one week.

Watch the recipe video here:

M&Ms Spring Flower Pops are the perfect way to get ready for Spring! Directions: http://sha.red/hftZl

Posted by Shared Food on Monday, March 18, 2019

Dessert

Marshmallow in the Middle Cupcakes Are the Ultimate Surprise Treat

Marshmallow in the Middle Cupcakes Are the Ultimate Surprise Treat
Who doesn't love cupcakes? What if I told you there's something even better than cupcakes? Introducing Marshmallow in the Middle Cupcakes. You heard right - there's a marshmallow in the middle! For a treat that your friends and family won't be able to resist, bake up a batch (or two) of these! These cupcakes are the ultimate surprise - just wait until everyone discovers the gooey middle! It's so easy to whip these up from a boxed cake mix, pop a marshmallow or two in the middle, ice and eat!
Author:
Cuisine: American
Recipe type: Dessert
Ingredients
  • 1 box chocolate cake mix plus ingredients listed on the box
  • 1 tablespoon vanilla
  • 24 regular marshmallows, divided
  • Chocolate frosting
Instructions
  1. Prepare the cake mix according to directions on the box. Add vanilla to batter and mix.
  2. Fill cupcake liners halfway with batter, then add a marshmallow to the center. Bake cupcakes according to directions on the box.
  3. Once cupcakes are done in the oven, add another marshmallow to the center of each, then pop them back into the oven for about 2 minutes, or until marshmallows have melted and filled the middle.
  4. Gently remove cupcakes from the pan, then place on a cooling rack to cool.
  5. Once cupcakes have cooled, frost them with chocolate frosting, and serve!

Watch the recipe video here:

Bite into these cupcakes for a delicious marshmallow surprise!Full Recipe: http://sha.red/vb2h9

Posted by Shared Food on Monday, March 18, 2019

Dessert

If You Thought It’s Boozy Brother Was Good, Check out These Mudslide Cheesecake Bars!

If You Thought It's Boozy Brother Was Good, Check out These Mudslide Cheesecake Bars!
No matter what time of the year a mudslide is my go-to drink so I thought why not combine these flavors with my favorite dessert, cheesecake! The creamy baileys pairs perfectly with the smooth cheesecake. The espresso and chocolate combine for a warm mocha explosion! All on top of a crisp chocolate cookie crust. This is a dessert bar worth remembering!
Author:
Cuisine: American
Recipe type: Dessert
Ingredients
  • 30 Oreo cookies (3 cups crumbs)
  • ¼ cup butter, melted
  • 3 packages (8 oz each) cream cheese, softened
  • 1 ⅓ cups granulated sugar
  • ¼ cup cornstarch
  • 2 tablespoons instant espresso powder
  • 2 eggs
  • 1 teaspoon vanilla
  • ½ cup Irish cream liqueur
  • 8 oz semisweet chocolate chips (1⅓ cups)
  • 1 cup heavy whipping cream
  • 2 tablespoons butter
Instructions
  1. Heat oven to 325°F. Line 13x9-inch pan with foil, leaving 2 inches of overhang on each side for handles.
  2. In food processor, crush cookies to fine crumbs. Transfer to medium bowl, and stir in ¼ cup melted butter until combined. Press mixture firmly in bottom of pan. Bake 8 to 10 minutes or until crust is just set.
  3. In large bowl, beat cream cheese and sugar with electric mixer on medium speed about 1 minute or until smooth. Add cornstarch and espresso powder; beat until combined. Reduce speed to low, and beat in eggs, one at a time. Beat in vanilla and Irish cream liqueur until just combined. Spread mixture evenly over crust in pan.
  4. Bake 30 to 35 minutes or until cheesecake is set around edges but still jiggles slightly in center. Cool 1 hour on cooling rack. Refrigerate 2 hours to set.
  5. Place chocolate chips in medium bowl. In 1-quart saucepan, heat whipping cream and 2 tablespoons butter just to boiling over high heat. Remove from heat; pour mixture over chocolate chips. Stir until chocolate is completely melted and mixture is smooth. Cool 10 minutes; pour and spread chocolate mixture evenly over chilled cheesecake. Refrigerate 1 hour to set.
  6. Use foil handles to carefully remove bars from pan. Cut into 9 rows by 4 rows.

Watch the recipe video here:

Mudslide Cheesecake Bars will be your new favorite treat! Full Recipe: http://sha.red/OxKqe

Posted by Shared Food on Thursday, March 7, 2019