Showing 59 Result(s)
Main dish

Pineapple Pina Colada Dump Cake Is the Quickest Way to a Vacation at Home!

Pineapple Pina Colada Dump Cake Is the Quickest Way to a Vacation at Home!
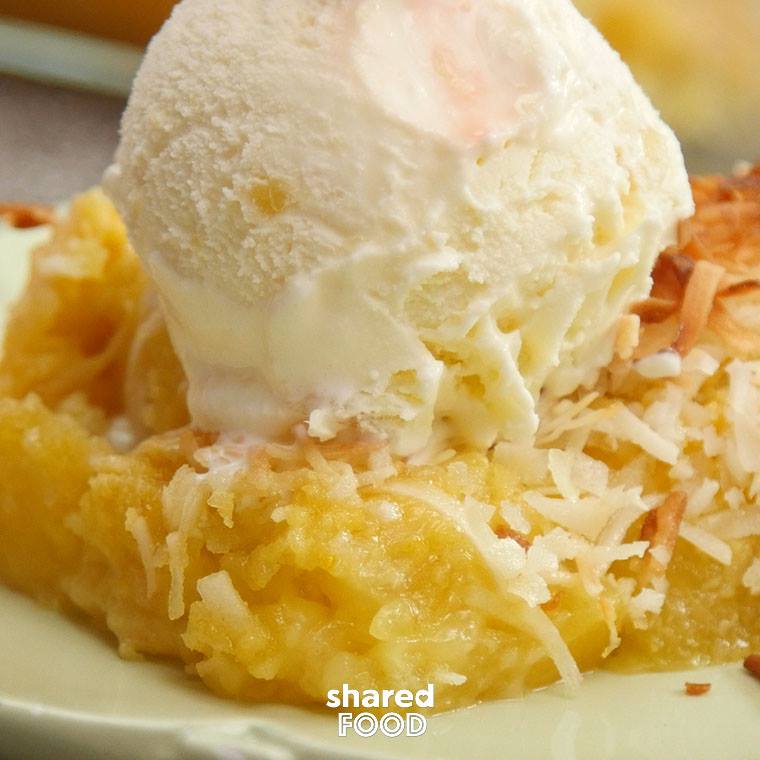
With summer coming to an end there's no reason for the summer flavor to go. Super simple dump cake with complex pina colada flavor! This cake mix hack will change the way cakes are made for ever! Simply toss all your ingredients in a 9 by 13 baking dish, mix it up and pop it in the oven! Your tropical inspired cake will be ready in minutes!
Author:
Cuisine: American
Recipe type: Main dish
Ingredients
  • ½ cup unsalted butter, melted
  • ⅓ cup spiced rum
  • 2 pounds frozen pineapple chunks
  • 1 (15.25-ounce) box yellow cake mix
  • 2 cups sweetened coconut flakes
  • ½ cup unsalted butter, cubed small
  • Vanilla ice cream, optional
  • Whipped cream, optional
  • Maraschino cherries, optional
  • Toasted coconut, optional
Instructions
  1. Preheat oven to 350 degrees.
  2. In a 9x13-inch baking dish, mix together melted butter, rum, and frozen pineapple until well-combined.
  3. Scoop the dry cake mix evenly over the pineapple mixture, then sprinkle coconut on top.
  4. Sprinkle the remaining butter cubes evenly over the cake mix, then bake in the middle of the oven 50-60 minutes, or until batter is cooked through and coconut is toasted but not burnt. If the coconut begins to burn before end of cook time, cover with aluminum foil.
  5. Serve warm or cool with desired toppings. Enjoy!

Watch the recipe video here:

Main dish

French Onion Chicken & Rice Casserole Needs to Be on Every Family Dinner Table!

French Onion Chicken & Rice Casserole Needs to Be on Every Family Dinner Table!
Casseroles take the pressure off making dinner every night for a large family. Casseroles that have most if not all food groups are even better and we have one right here with French Onion Chicken & Rice Casserole. Chicken and rice and a classic combo, all it needed is cheese of course! Now that we have a ooey gooey casserole, we also need texture that’s where covering the whole thing in crunchy, salty French’s fried onions really is the cherry on top of this soon to be family favorite!
Author:
Cuisine: American
Recipe type: Main dish
Ingredients
  • 2 cups instant white rice
  • 2 cups water
  • 2 cups chicken, cooked and chopped
  • 8 ounces French onion dip
  • 1 can cream of chicken soup
  • ½ cup chicken broth
  • 1 cup cheddar cheese, shredded
  • 1 cup French’s fried onions
Instructions
  1. Preheat oven to 350 degrees. Prepare a 9x13-inch pan with nonstick spray. Set aside.
  2. In a medium saucepan, bring water to a boil. Add instant rice, cover and turn off heat. Allow to stand for 5 minutes, until all water is absorbed.
  3. In a large bowl, combine chicken, chicken soup, French onion dip, cheddar cheese, chicken broth and cooked rice. Spread into prepared pan. Top with French’s fried onions.
  4. Bake for 20-25 minutes, until cheese is melted and bubbly.

Watch the recipe video here:

Main dish

Delightfully Colorful Flower Pretzel Bites

Delightfully Colorful Flower Pretzel Bites
Flower Pretzel Bites are colorful, reminiscent of spring and absolutely delicious with the salty/sweet flavor of pretzels with chocolate. Get the kids involved with decorating, and you’ll have even more fun eating these up! With the option to microwave these or pop them in the oven, preparing these tasty treats is a breeze!
Author:
Cuisine: American
Recipe type: Main dish
Ingredients
  • Pretzels
  • White Wilton candy melts
  • Easter/pastel M&M's
Instructions
  1. Arrange pretzels on a baking sheet or paper plate. Place a candy melt in the center of each pretzel.
  2. Microwave until soft, but not runny (if using paper plate) OR if placing on a baking sheet and bake at 200 degrees for 4-5 minutes or until the chocolate is soft.
  3. Immediately place one M&M into the center, then six more M&M's around the center for the flower petals. Work quickly. Refrigerate/freeze pretzel bites until solidified. Eat or package treats as gifts.
  4. TIP: Keep the "M" side of the M&M's down for better looking flowers. You may also need to overlap them slightly on a regular shaped pretzel.

Watch the recipe video here:

Main dish

Oreo White Chocolate Peanut Butter Cups Are the Best 4 Ingredient Treat

Oreo White Chocolate Peanut Butter Cups Are the Best 4 Ingredient Treat
I always wondered why their was only 3 reese’s cups a package, when I want a giant bag of them! Out of necessity I had to make my own with a twist to keep my tummy happy! There are so many recipes you can do with them! These Oreo White Chocolate Peanut Butter Cups have everything required for the ultimate snack. Velvety whipped peanut butter frosting, a chocolatey oreo cookie enrobed in sweet white chocolate. This recipe will satisfy any sweet tooth, just make sure to make more than 3!
Author:
Cuisine: American
Recipe type: Main dish
Ingredients
  • 16 ounces white chocolate chips
  • ½ cup creamy peanut butter
  • ½ cup confectioners’ sugar
  • 4 tablespoons unsalted butter, softened
  • 16 Oreos
Instructions
  1. Line a standard sized muffin tin with six liners.
  2. Melt half the chocolate (8 ounces) in the top half of a double boiler set over barely simmering water. Divide evenly among the liners, spreading on the bottoms and slightly up the sides. Pop in the freezer to set.
  3. While the chocolate is setting make the peanut butter filling: Beat the peanut butter, confectioners’ sugar and butter till light and fluffy. Divide evenly among the tops of 12of the Oreos (reserve the remaining four). Use a spoon, offset spatula or clean damp fingers to press into a smooth and even layer.
  4. When the chocolate has hardened, place the Oreos inside each liner – return to the freezer. Crush the remaining two Oreos and set aside.

Watch the recipe video here:

Dessert

Summer Birthdays Need Ice Cream Cakes and What Better Than an Oreo Cookies & Cream!

Summer Birthdays Need Ice Cream Cakes and What Better Than an Oreo Cookies & Cream!
Finding the perfect ice cream cake has only been a problem for myself. I always thought I could make one way better than the grocery stores generic flavors. So I made the ultimate Oreo cake and it was actually pretty easy! This simple yet over the top ice cream cake starts with a light and chocolatey devil's food cake and then layers of smooth vanilla ice cream, crunchy oreos and chocolate fudge! Make any summer party into an occasion by trying this Oreo Ice Cream Cake!
Author:
Cuisine: American
Recipe type: Dessert
Ingredients
  • 1 box devils food cake mix + eggs, oil, water
  • 2 Bags Original Oreos
  • 2L tub Vanilla ice cream
  • 2 cups chocolate fudge sauce
  • 8 oz cool whip
  • 1 cup milk
Instructions
  1. Line 10 inch spring mold pan with parchment.
  2. In a large bowl mix cake mix, eggs, oil and water.
  3. Pour into spring mold and bake as per box instructions and allow to cool before continuing. Soak 1 bag of oreos in milk and line rim of pan in a single file(a few at a time, for no more than 30 sec).Spread half the ice cream in an even layer.
  4. Crush 1 bag of oreos, reserve ¼ of the oreos and place the rest in a medium bowl, add 1 cup of fudge sauce and mix until combined.
  5. Spread mixture on top of the ice cream.
  6. Spread in the rest of the ice cream on top.
  7. Spread whip topping and sprinkle remaining crumbled cookies and drizzle the remaining fudge sauce on top.
  8. Place back in freezer for 1 hour to set up.

Watch the recipe video here:

Main dish

Enlist the Microwave for Easy Corn on the Cob – Say Bye Bye to Silk!

Enlist the Microwave for Easy Corn on the Cob - Say Bye Bye to Silk!
Corn on the Cob is so easy to make, but I always hate peeling back the husks to reveal tons of corn silk still stuck to the cob. This simple hack requires only a microwave, and it works perfectly every time! Simply follow the directions below for some scrumptious corn that you can eat right out of the husk with some butter, or try throwing it on the BBQ and brushing it with butter for even more decadence! You’ll never go back once you try this!
Author:
Cuisine: American
Recipe type: Main dish
Ingredients
  • Corn on the cob, fully in the husk
  • Microwave-safe plate
  • Oven mitt or kitchen towel
Instructions
  1. Feel free to trim the fuzzy end of corn, however leave the corn with the husks intact as much as possible.
  2. Place the corn on a microwave-safe plate and microwave for 2 minutes per corn on the cob, (ie, if you have 2 cobs, microwave time will be 4 minutes; if you have 3 cobs, microwave time will be 6 minutes; and so on).
  3. Once the microwave time has elapsed, let the corn sit in the husks for 5 or so minutes. Be very careful - the corn will be very hot once done in the microwave.
  4. Once the corn has sat for a few minutes, cut about an inch from the end of the corn with a stub (do not cut the end with the silk showing).
  5. Carefully (it might still be hot - if so use an oven mitt or kitchen towel), grab the end of the corn with the silk and pull it away.
  6. Enjoy your delicious corn on the cob with no silk! Serve with a pat of butter, or pop on the BBQ and baste generously with melted butter until slightly charred.

Watch the recipe video here:

Main dish

Enjoy Chocolate Turtle Poke Cake All Year Round

Enjoy Chocolate Turtle Poke Cake All Year Round
Two things are for sure everybody loves turtles and everybody loves poke cakes! Obviously I had to put these together!
Author:
Cuisine: American
Recipe type: Main dish
Ingredients
  • 1 package chocolate cake mix, plus ingredients listed on the box.
  • 12 ounces caramel sauce
  • ½ cup mini chocolate chips
  • ¾ cup pecan pieces
  • 1 tub(16 ounces) chocolate frosting
Instructions
  1. Prepare cake mix according to package directions, and bake in 9 x 13 pan. Let cool for 10 minutes.
  2. Using the handle of a wooden spoon, make small holes all over the surface of the cake. Pour 8 ounces of the caramel ice cream topping over the cake, spreading to cover. Let sit until cooled.
  3. Mix 4 oz of caramel with the chocolate icing.
  4. Spread the frosting over the cooled cake.
  5. Sprinkle with pecans and chocolate chips.
  6. Drizzle with the remaining caramel sauce, and sprinkle with the mini chocolate chips and pecans.

Watch the recipe video here:

Breakfast

Ruffles Krispie Treats Are the Latest Salty-Sweet Spin on Rice Krispie Treats the Whole Family Will Love!

Ruffles Krispie Treats Are the Latest Salty-Sweet Spin on Rice Krispie Treats the Whole Family Will Love!
My whole family can’t get enough of Rice Krispie treats, so when we thought up Ruffles Krispie Treats, it just brought things to a whole new level of deliciousness. Replace your usual Rice Krispies with Ruffles chips for a salty-sweet factor that you won’t be able to get enough of. This treat is so easy to throw together in no time for lunch treats or those last minute bake sales!
Author:
Cuisine: American
Recipe type: Breakfast
Ingredients
  • ¼ cup butter
  • 4 cups mini marshmallows
  • ½ teaspoon vanilla extract
  • 5 cups Ruffles chips, crushed to coarse pieces
Instructions
  1. Prepare an 8x8-inch baking dish with nonstick spray.
  2. Melt down butter and marshmallows in a microwave-safe bowl until everything has melted down fully, about 1 minute.
  3. Add in the vanilla extract and potato chips, folding together until chips are evenly coated.
  4. Press the mixture firmly and evenly into the prepared baking dish, then let set on the counter or in the refrigerator.
  5. Once set, cut into squares and serve. Enjoy!

Watch the recipe video here:

Check out this latest salty-sweet spin on Rice Krispie treats Recipe: http://sha.red/6uNLl

Posted by Shared Food on Monday, May 6, 2019

Breakfast

Deep Dish Pizza Bread Bowl, the Easiest Pizza You’ll Ever Make!

Deep Dish Pizza Bread Bowl, the Easiest Pizza You'll Ever Make!
Deep dish pizza is not the easiest way to make pizza but can be extremely delicious. I had to figure out a way to make one at home but on the other hand be super easy and I think I figured it out! Pizza dough from scratch, no thank you. I don’t have the time or the know how to do it. Instead grab a large french bowl and hollow it out. Now it’s as simple as filing your giant deep dish crust with all your favorite pizza toppings! But in this case pizza Fillings!
Author:
Cuisine: American
Recipe type: Breakfast
Ingredients
  • 3 cups mozzarella cheese (grated)
  • ½ cup pepperoni
  • 1 cups canned plum tomatoes, drained well
  • 1 teaspoon oregano
  • 2 garlic cloves, peeled and crushed
  • ½ cup grated parmesan cheese, for topping
  • 3 tablespoons olive oil
Instructions
  1. Preheat oven to 350.
  2. Slice top off of bread and remove most of the insides.
  3. Layer ¼ of the cheese on the bottom of bread bowl and a pinch of oregano, then a single layer of pepperoni, then ⅔ cup crushed tomatoes and garlic. Repeat 3 times with mozzarella being the top layer.
  4. Sprinkle with parmesan and drizzle with olive oil, wrap in tinfoil.
  5. Bake for 30 minutes, remove tin foil and bake for an additional 20-30 minutes.
  6. Cool for 10 minutes, slice and serve.

Watch the recipe video here:

Doesn't this look amazing?Recipe: http://sha.red/KvsYO

Posted by Shared Food on Sunday, May 5, 2019

Main dish

Spicy, Smokey, Cheesy and Just Amazing! Jalapeno Popper Potato Bombs!

Spicy, Smokey, Cheesy and Just Amazing! Jalapeno Popper Potato Bombs!
Potato skins are not a new idea but what you put in them can be. Jalapeno popper is the first place my mind goes when making recipes so here we go again! Let’s get poppin! The potato skin is the perfect vessel to put your favorite flavor in! Crispy potato stuffed with creamy and gooey cheese. Salty and smoky bacon. Topped off with the star of the show, Jalapenos! Every bite is as good as the last!
Author:
Cuisine: American
Recipe type: Main dish
Ingredients
  • 4 russet potatoes
  • 6 tablespoons cream cheese
  • 24 pickled jalapeno slices
  • 1½ cups Mexican cheese, shredded
  • 6 slices bacon, cooked and crumbled
Instructions
  1. Bake your potatoes for an hour at 400 degrees and cool completely.
  2. Slice them in half and scoop out most of the insides, leaving about a ¼ inch of potato in the skin. Brush each side of the potato skin with oil and bake for another 10 minutes at 400 degrees.
  3. Spread a small amount of cream cheese in the bottom of each potato skin. Top with crumbled bacon, jalapeño slices, and cheese. Bake for an additional 5 minutes until the cheese is melted. Serve immediately.

Watch the recipe video here:

Spicy, smoky, cheesy amazing-ness!Recipe: http://sha.red/9FWBd

Posted by Shared Food on Sunday, May 5, 2019