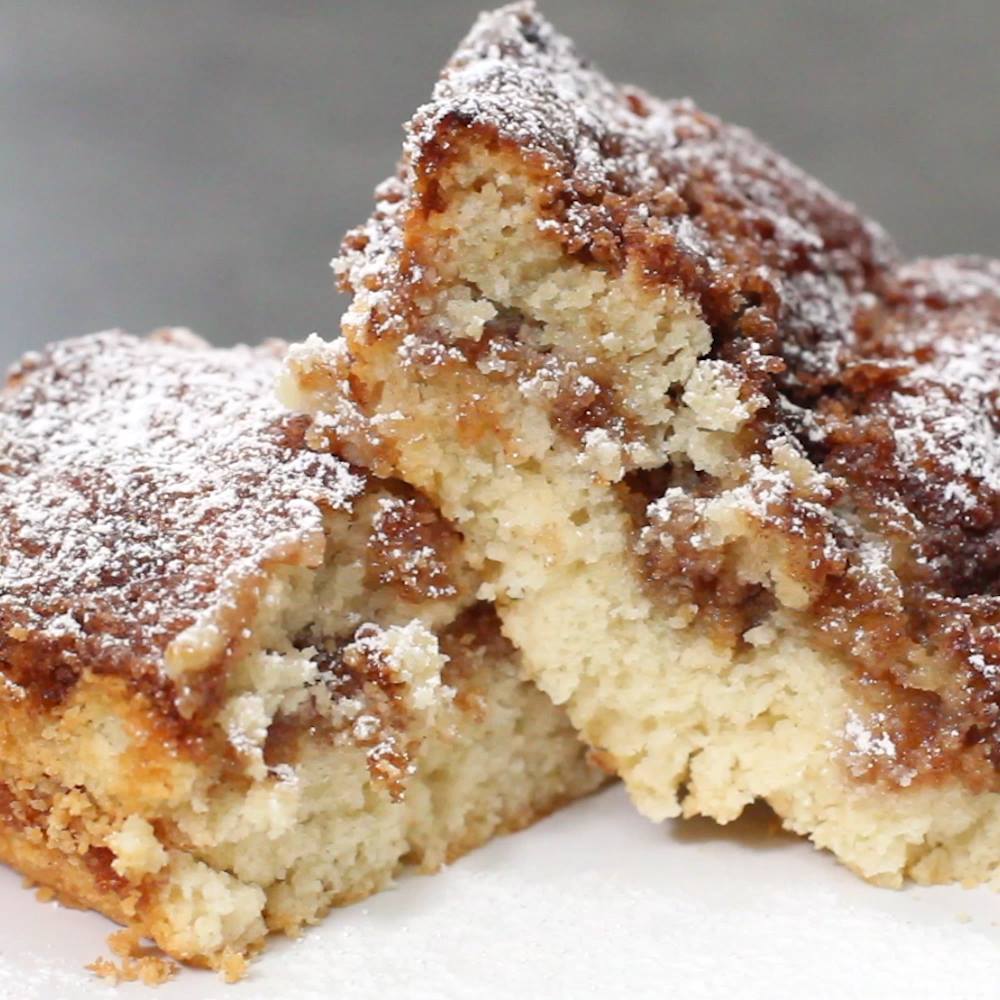
Showing 3,071 Result(s)
Dessert

Classic Coffee Cake

Classic Coffee Cake
You guys, I have FINALLY found the most delicious coffee cake recipe and can’t wait to share it! Seriously, I’ve tried to make coffee cake before, and I have had problems with it coming out either too dry or not flavorful enough. Well, this coffee cake has ALL the flavors and is super moist! It also feeds plenty so it’s great to bring to any brunch event! Starbucks has nothing on this!
Author:
Cuisine: American
Recipe type: Dessert
Ingredients
  • 1 CUP Oil
  • 2 Eggs, beaten
  • 1 tsp Vanilla
  • 1 CUP Milk
  • 1 CUP Sugar
  • 3 CUP Flour
  • 3 tsp Baking powder
  • ½ tsp Salt
  • 1½ CUP Brown sugar
  • 2 tsp Cinnamon
  • ½ CUP Margarine, melted
Instructions
  1. In a large mixing bowl. combine oil, eggs, vanilla and milk together.
  2. In a medium bowl, blend together sugar, flour, baking powder and salt.
  3. Combine egg mixture with flour mixture. Pour half the batter into a 9×13 pan.
  4. In a medium bowl, prepare streusel by combining brown sugar and cinnamon.
  5. Sprinkle half of streusel on top of the batter. Top with remaining batter and then sprinkle the remaining streusel on top.
  6. Drizzle with melted margarine.
  7. Bake, uncovered at 350°F for 25-30 minutes.

Watch the recipe video here:

Classic Coffee CakeFULL RECIPE: http://chopsecrets.com/classic-coffee-cake/

Posted by Chop Secrets on Monday, December 24, 2018

Main dish

Oreo Bombe

Oreo Bombe
Oreo Bombe
Author:
Cuisine: American
Recipe type: Main dish
Ingredients
  • 1 pound cream cheese, at room temperature
  • 2 cups confectioners' sugar
  • 1 tablespoon vanilla extract
  • 3 cups heavy cream
  • 106 cream-filled chocolate sandwich cookies (from about three 14.3-ounce packages), such as Oreos
  • 1 cup milk
Instructions
Special equipment: a large bowl that is 10 inches wide at the top, 5½ inches wide at the bottom and 4 inches tall
  1. Line a large glass bowl (10 inches wide at the top, 5½ inches wide at the bottom and 4 inches tall) with plastic wrap, allowing there to be at least 1 inch of overhang on all sides of the bowl. Set aside.
  2. Put the cream cheese, confectioners' sugar and vanilla extract in a large bowl and use an electric mixer to blend until completely smooth. Add the heavy cream and whip until stiff peaks form. Set aside.
  3. Quickly submerge 1 chocolate sandwich cookie into the milk, then place the cookie in the bottom of the prepared glass bowl. Continue to dip cookies and line the bowl until you reach the very top of the bowl, about 48 to 50 cookies total. Cut the cookies at the top as needed so that they do not go over the edge of the bowl.
  4. Scoop 2 cups of the cream over the cookies in the bowl, then use the back of a large spoon to gently spread the cream over all of the cookies, making sure to go all the way to the top of the bowl. Spoon ½ cup of the cream into the bottom of the bowl and spread it out into a flat layer. Dip 9 cookies and arrange in 1 flat layer on top of the cream. Continue adding flat layers in this order: 1 cup cream, 13 milk-dipped cookies, 2 cups cream, 15 milk-dipped cookies, all of the remaining cream then 19 milk-dipped cookies.
  5. Fold over the plastic wrap, then cover completely with another sheet of plastic wrap and refrigerate until completely chilled and the cookies have softened, at least 6 hours and up to overnight.
  6. When ready to serve, carefully invert the bowl onto a large serving platter or cutting board, then use the plastic wrap lining to ease the bombe out of the bowl. Cut into wedges and serve immediately.

Watch the recipe video here:

@ an Oreo lover to change their WORLD! Save the recipe: https://foodtv.com/2R5sB9O.

Posted by Food Network on Tuesday, December 25, 2018

Dessert

Baked Oatmeal

Baked Oatmeal
Want to eat healthier but don’t want to break the bank? Oatmeal is a great way to get both of these worlds to collide. Among many great health benefits, it’s also a great time saver. Microwave for just a few minutes, add your toppings of choice and voila. This recipe bumps it up a couple notches by taking a bit more time to prepare but lasting all week for you to indulge in. Say goodbye to showing up at work hungry, at least for this week.
Author:
Cuisine: American
Recipe type: Dessert
Ingredients
Dry Ingredients
  • 3 Cups Old Fashioned Rolled Oats
  • ¾ Cup Brown Sugar
  • 1½ tsp Baking Powder
  • ¾ tsp Ground Cinnamon
  • ½ tsp Salt
Wet Ingredients
  • 2 Eggs, beaten
  • 2½ Cups Milk
  • 1 tsp Pure Vanilla Extract
  • 4 Tbsp Unsalted Butter or Coconut Oil, melted
Toppings
  • ½ Cup Blueberries
  • ½ Cup Blackberries
  • ½ Cup Raspberries
  • ½ Cup Strawberries, chopped
Instructions
  1. Preheat oven to 350°F / 180°C.
  2. Combine all dry ingredients and stir to mix well.
  3. Spray 9×13 inch pan with non-stick cooking spray.
  4. Pour half the oat mixture in the baking dish.
  5. Sprinkle some of each berry on top of the oats.
  6. Pour rest of the oat mixture on top of berries.
  7. Whisk the wet ingredients together then pour over the oats.
  8. Top the oats with the remaining berries and some more brown sugar.
  9. Gently shake the baking dish back and forth to spread liquid evenly.
  10. Bake uncovered for 40 minutes.
  11. Serve immediately.

Watch the recipe video here:

Baked OatmealFULL RECIPE: http://chopsecrets.com/baked-oatmeal/

Posted by Chop Secrets on Tuesday, December 25, 2018

Main dish

Instant Pot Homemade Applesauce

Instant Pot Homemade Applesauce
Simple, wholesome ingredients that combine to make an easy treat.
Author:
Cuisine: American
Recipe type: Main dish
Ingredients
  • 12 apples, peeled, cored and quartered (Fuji apples are delicious)
  • 2 tbsp butter
  • 1 tbsp cinnamon
  • 1 tbsp honey
  • 3 tbsp lemon juice
  • ¼ tsp kosher salt
  • ¾ water
  • Additional cinnamon and/or cinnamon sticks for garnish (optional)
Instructions
  1. Put peeled and quartered apples in the Instant Pot. Add all remaining ingredients, then secure the lid, making sure the vent is closed.
  2. Using the display panel select the MANUAL function*. Use the +/- keys and program the Instant Pot for 3 minutes.
  3. When the time is up, let the pressure naturally release for 15 minutes, then quick-release the remaining pressure.
  4. Use a slotted spoon to transfer cooked apples to a large-capacity blender or food processor.
  5. Process until smooth and uniform. Add additional pot juices ¼ cup at a time to achieve desired consistency.
  6. Serve warm or cold with additional cinnamon and/or cinnamon sticks for garnish.

Watch the recipe video here:

Simple, wholesome ingredients that combine to make an easy treat.FULL RECIPE: http://chopsecrets.com/instant-pot-homemade-applesauce/

Posted by Chop Secrets on Tuesday, December 25, 2018

Main dish

3-Ingredient Cherry-Almond Pie Cups

3-Ingredient Cherry-Almond Pie Cups
You raved about our 2-Ingredient Apple Pie Cups—this cherry version is just as easy (and praiseworthy), thanks to Pillsbury™ cinnamon rolls and a killer almond-spiked filling.
Author:
Cuisine: American
Recipe type: Main dish
Ingredients
  • 1 can (13 oz) Pillsbury™ refrigerated flaky cinnamon rolls with buttercream icing SAVE $
  • ¾ cup more fruit cherry pie filling (from 21-oz can)
  • 2 tablespoons sliced almonds
Instructions
  1. Heat oven to 375°F. Spray 8 regular-size muffin cups with cooking spray. Set icing aside. Separate dough into 8 rolls. Press into and up sides of muffin cups, making sure seams of dough are pressed together.
  2. Spoon heaping tablespoon pie filling into each dough-lined cup. Bake 14 to 18 minutes or until golden brown; cool in pan 5 minutes.
  3. Transfer icing to small microwavable bowl. Microwave uncovered on High 5 to 10 seconds or until thin enough to drizzle. Loosen rolls carefully, and transfer to serving plate; drizzle icing over rolls, and garnish with almonds. Serve warm.

Watch the recipe video here:

Three ingredients. Five stars. Endless praise. 3-Ingredient Cherry Almond Pie Cups recipe:…

Posted by Pillsbury on Tuesday, December 25, 2018

Dessert

Layered Christmas Lasagna Is for Dessert, Your Kids Are Going to Freak Out!

Layered Christmas Lasagna Is for Dessert, Your Kids Are Going to Freak Out!
After doing a countless amount of dessert lasagnas I knew I had to make one for christmas! Layered Christmas Lasagna is one delicious layer after the other! Crunchy cookie base, a creamy peppermint cheesecake layer right on top, white chocolate pudding goes on next and last but not least, light and fluffy cool whip goes on last. Decorate with mini marshmallows and m&m’s and you are done!
Author:
Cuisine: American
Recipe type: Dessert
Ingredients
For the cookie layer:
  • ¾ cup unsalted butter, softened
  • ½ cup powdered sugar
  • 1 ½ cups flour
  • 1 tablespoon cocoa powder
  • ¼ teaspoon salt
  • Red food coloring
For the cheesecake layer:
  • 8 ounces cream cheese, softened
  • 1 cup powdered sugar
  • 1 ½ cups Cool Whip, thawed
  • 1 teaspoon peppermint extract
For the pudding layer:
  • 2 (3.9-ounce) boxes white chocolate instant pudding
  • 3 cups cold milk
  • Green food coloring
For topping:
  • 1 ½ cups Cool Whip, thawed
  • 2 cups mini marshmallows
  • Festive sprinkles
  • Red and green M&Ms
Instructions
  1. Preheat oven to 350 degrees. Prepare a 9x13-inch baking dish with butter.
  2. Stir together the flour, salt, and cocoa powder in a small bowl. Set aside.
  3. Using a hand mixer, beat together the butter and sugar in a large mixing bowl until fluffy. Add in a few drops of red food coloring, then mix well, adding more coloring as needed to get a bright red color. Turn your mixer to low, then gradually add in the flour mixture until well-combined.
  4. Scoop the mixture into the prepared baking dish, pressing in well, then bake 18-20 minutes. Cool completely on a wire rack.
  5. To make the cream cheese layer, using a hand mixer beat the cream cheese and powdered sugar until smooth in a large bowl. Add in the 1 ½ cups Cool Whip and peppermint extract, beating until well-combined. Spread evenly over the cooled cookie layer, then place in the freezer to set while you make the next layer.
  6. To make the pudding layer, whisk together the instant pudding with the milk until smooth. Drop in some green food coloring, whisking until you reach the desired shade of green. Spread evenly over the chilled cream cheese layer, then place back in the freezer another 5 minutes to set.
  7. To top the lasagna, spread 1 ½ cups Cool Whip evenly over the pudding layer, then top with mini marshmallows, sprinkles, and M&M's. Place in the refrigerator 3 hours up to overnight to set, then slice and serve!

Watch the recipe video here:

This is the type of lasagna everyone will want to eat!Recipe: http://sha.red/A9Pg8

Posted by Shared Food on Monday, December 24, 2018

Main dish

Cheesy Potato Waffles

Cheesy Potato Waffles
What is something that you have never thought to put in a waffle iron? I feel like a lot of people these days are trying ANYTHING to see how it turns out. And I can’t say that I blame them. These potato waffles are so delicious and creative. You can make them for brunch, a side for dinner, they go well with so many options! The waffle iron makes them the perfect amount of crispiness. And It only takes 3 minutes to cook them to perfection!
Author:
Cuisine: American
Recipe type: Main dish
Ingredients
  • 4 TBSP Unsalted butter
  • ¼ CUP Buttermilk
  • 2 Large eggs
  • 2 CUPS Mashed potatoes
  • 3 TBSP Chopped chives
  • ½ CUP All-purpose flour
  • ½ TSP Baking powder
  • ¼ TSP Baking soda
  • ½ TSP Salt
  • ½ TSP Fresh ground black pepper
  • ¼ TSP Garlic powder
  • CUP Grated cheddar cheese
  • Bacon bits
Instructions
  1. Melt butter in a small saucepan over medium-low heat.
  2. Continue to cook the butter until the butter begins to brown a bit.
  3. Immediately transfer the browned butter into a medium bowl.
  4. Whisk in buttermilk and eggs until thoroughly combined.
  5. Add the mashed potatoes and 2 tablespoons chives and gently stir to combine.
  6. In a small bowl, whisk together flour, baking powder, baking soda, salt, pepper, and garlic powder.
  7. Add the dry ingredients to the wet ingredients.
  8. Heat a waffle iron and grease if necessary.
  9. Dollop batter (about ¼ cup per waffle) into the waffle iron. Cook until golden on each side.
  10. Turn oven to the broiler setting.
  11. Place waffles on a baking sheet and top with cheddar cheese and bacon.
  12. Place waffles under the broiler until cheese is melted, about 30 seconds to 1 minute.

Watch the recipe video here:

Cheesy Potato WafflesFULL RECIPE: http://chopsecrets.com/cheesy-potato-waffles/

Posted by Chop Secrets on Monday, December 24, 2018

Main dish

Instant Pot Broccoli Cheddar Soup

Instant Pot Broccoli Cheddar Soup
You will never want to stop eating this creamy, cheesy comfort food!
Author:
Cuisine: American
Recipe type: Main dish
Ingredients
Pot Mixture:
  • 5 tbsp butter
  • 1.5 lbs broccoli, cut into florets
  • 2 cups chicken broth (or vegetable broth)
  • 1 onion, finely diced
  • 12-15 baby carrots, diced (or 2 whole carrots, diced)
  • 2 ribs celery, diced
  • 2 cloves garlic, minced
  • 1½ tsp kosher salt
  • 1 tsp pepper
  • 1 tsp ground mustard
  • ¼ tsp ground nutmeg
  • 2 cups heavy cream
Finishing Mixture:
  • 10-12 oz sharp cheddar cheese, shredded
  • Hot sauce to taste (optional
Instructions
  1. Add butter to the Instant Pot. Using the display panel select the SAUTE function.
  2. When butter has melted, add broccoli florets in an even layer and cook without stirring for 5-7 minutes or until browned on the bottom.
  3. Add broth to the pot and deglaze by using a wooden spoon to scrape the brown bits from the bottom of the pot.
  4. Add the remainder of the Pot Mixture ingredients and stir to combine.
  5. Turn the pot off by selecting CANCEL, then secure the lid, making sure the vent is closed.
  6. Using the display panel select the MANUAL function*. Use the +/- keys and program the Instant Pot for 2 minutes.
  7. When the time is up, let the pressure naturally release for 10 minutes, then quick-release the remaining pressure.
  8. Use an immersion blender to process until smooth (we love this immersion blender: https://amzn.to/2yBqLSB)
  9. Add cheese in ½ cup increments stirring between each addition until melted.
  10. Add hot sauce to taste (optional). Serve warm.

Watch the recipe video here:

You will never want to stop eating this creamy, cheesy comfort food!FULL RECIPE: http://chopsecrets.com/instant-pot-broccoli-cheddar-soup/

Posted by Chop Secrets on Monday, December 24, 2018

Main dish

Roast Beef Tenderloin with Garlic and Rosemary

Roast Beef Tenderloin with Garlic and Rosemary
This recipe method combines high-heat searing for a crusty, well-seasoned exterior, with low-temperature roasting for a perfectly even and very tender interior. Truly the best of both worlds.
Author:
Cuisine: American
Recipe type: Main dish
Ingredients
  • 2 garlic cloves
  • 2 tablespoons rosemary leaves, plus sprigs
  • 1 4-pound trimmed center-cut beef tenderloin
  • Kosher salt, freshly ground pepper
  • 1 tablespoon vegetable oil
  • 1 cup plain whole-milk Greek yogurt
  • ⅓ cup sour cream
  • 2 tablespoons prepared horseradish
  • ½ teaspoon finely grated lemon zest
  • 3 tablespoons unsalted butter
  • Flaky sea salt (for serving)
Instructions
  1. Thinly slice garlic, then mash into a paste using the side of a chef’s knife. Scatter rosemary leaves over garlic; finely chop and mix into garlic. Slice tenderloin in half crosswise to create 2 smaller roasts. Season generously with salt and pepper; rub with garlic-rosemary paste. If your butcher didn’t already tie the roast for you, this is the time to do it: Place tenderloin onto lengths of precut kitchen twine spaced about 1" apart and tie closed snugly. Place on a rimmed baking sheet and chill uncovered 12 hours.
  2. Let tenderloin sit at room temperature at least 1 hour and up to 2 hours before cooking.
  3. Preheat oven to 250°. Heat oil in a large ovenproof skillet over medium-high. Add tenderloin and cook, turning occasionally, until well browned all over, 8–10 minutes. Transfer skillet to oven and roast tenderloin, turning every 10 minutes or so, until an instant-read thermometer inserted into the thickest part registers 120°, 25–30 minutes. Transfer tenderloin to a cutting board and let rest 15 minutes before removing kitchen twine and slicing. Reserve skillet.
  4. Meanwhile, mix yogurt, sour cream, horseradish, and lemon zest in a small bowl to combine; season with salt and pepper.
  5. Cook butter and rosemary sprigs in reserved skillet over medium heat, scraping up browned bi ts on the bottom, until butter is melted and very fragrant, about 4 minutes. Transfer sliced tenderloin to a platter; drizzle with rosemary-infused butter and sprinkle with sea salt. Serve with horseradish yogurt.
Do Ahead: Tenderloin can be seasoned and chilled 2 days ahead; wrap in plastic wrap after 12 hours. Horseradish yogurt can be made 1 day ahead; cover and chill.

Watch the recipe video here:

You know what your holiday table needs? This crowd-pleasing tenderloin.GET THE RECIPE: http://bonap.it/psDPxve

Posted by Bon Appétit Magazine on Monday, December 24, 2018

Main dish

Instant Pot Curried Rice with Shrimp and Basil

Instant Pot Curried Rice with Shrimp and Basil
There’s so much delicious flavor here, your family will think you spent hours over the stove.
Author:
Cuisine: American
Recipe type: Main dish
Ingredients
  • 1 tbsp olive oil
  • 1 large onion, finely chopped
  • 1 cup coarsely shredded carrots
  • 2 cloves garlic, minced
  • 2 tsp curry powder
  • 1 cup long-grain white rice, rinsed
  • 1½ cups water
  • 1 tsp kosher salt
  • ⅛ tsp pepper
  • 1½ pound medium shrimp, peeled and deveined, frozen
  • ½ cup fresh basil, cut into ribbons
Instructions
  1. Add olive oil to the Instant Pot. Using the display panel select the SAUTE function.
  2. When the oil is hot, add carrots and onion. Cook and stir 4 minutes until onion is beginning to soften.
  3. Add garlic and curry powder. Cook and stir for 1-2 minutes until fragrant.
  4. Add rinsed rice, water, salt, pepper, and frozen shrimp. Stir to combine.
  5. Secure the lid, making sure the vent is closed.
  6. Using the display panel select the MANUAL function*. Use the +/- buttons and program the Instant Pot for 10 minutes.
  7. When the time is up, let the pressure naturally release for 5 minutes, then quick-release the remaining pressure.
  8. Fold in basil and serve hot.

Watch the recipe video here:

Instant Pot Curried Rice with Shrimp and BasilFULL RECIPE: http://chopsecrets.com/instant-pot-curried-rice-with-shrimp-and-basil/

Posted by Chop Secrets on Monday, December 24, 2018