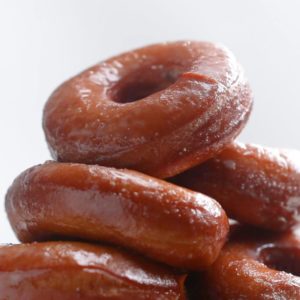
Classic Glazed Donuts
Classic Glazed Donuts
Classic Glazed Donuts
Author: The Chef
Cuisine: American
Recipe type: Dessert
Ingredients
DONUT
- 1 ½ cups milk, warm to the touch (360 mL)
- 1 cup sugar (200 g)
- ½ oz yeast (15 g)
- 1 stick unsalted butter, soft
- 3 eggs
- 1 tablespoon vanilla extract
- 5 cups flour, sifted (625 g)
- 1 tablespoon vegetable oil
- shortening, for frying
GLAZE
- 3 cups powdered sugar (480 g)
- 1 cup dry milk powder (70 g)
- 1 tablespoon vanilla extract
- ½ cup water, hot (120 mL)
Instructions
- In a medium bowl, add the milk, sugar, and yeast, stirring to combine.
- In a separate medium bowl, add the butter, eggs, and vanilla extract, stirring to combine.
- Add the milk mixture to the egg mixture and whisk to combine. Transfer to a large bowl and add the flour in thirds, stirring between each addition.
- Dump the dough onto a lightly floured surface and knead for 5 minutes, until smooth. Gently poke the dough with a finger--the dough should bounce back up from the indentation.
- Place the dough in a large bowl, and lightly coat the dough with oil. Cover the bowl with plastic wrap.
- Let the dough rise in a warm place for an hour, or until doubled in size.
- Take the dough out and knead on a floured surface for 5 minutes until smooth. Place the dough in an oiled bowl and repeat with rise overnight in refrigerator.
- Roll out the dough on a floured surface until ¼ inch (6 mm) thick.
- Cut out the doughnuts and donut holes with a cookie cutter and piping tip.
- Melt enough shortening over medium heat to come up just 2 inches (5 cm) up on the side of a heavy frying pan. Heat the shortening to 375°F (190°C)
- Fry the donuts and donut holes for 45 seconds on each side, or until golden brown.
- In a bowl, combine the powdered sugar, dry milk powder, vanilla extract and hot water until smooth.
- Strain the glaze through a fine-mesh sieve to remove any lumps.
- Dunk the donuts in the glaze or drizzle the glaze on top.
- Enjoy!
- Tips
Watch the recipe video here:
Need these NOW! ?FULL RECIPE: https://tasty.co/recipe/classic-glazed-donuts
Posted by Proper Tasty on Sunday, March 17, 2019