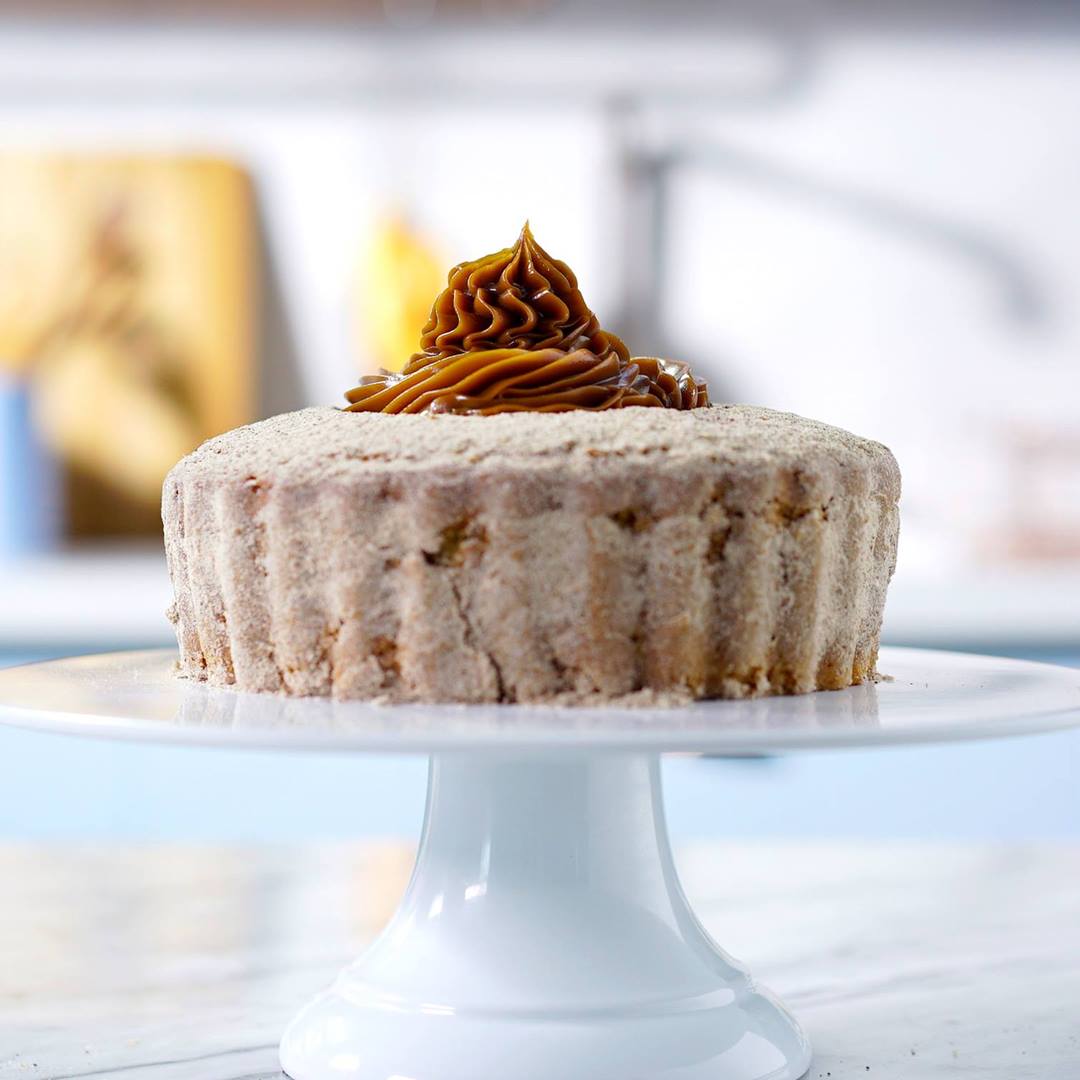
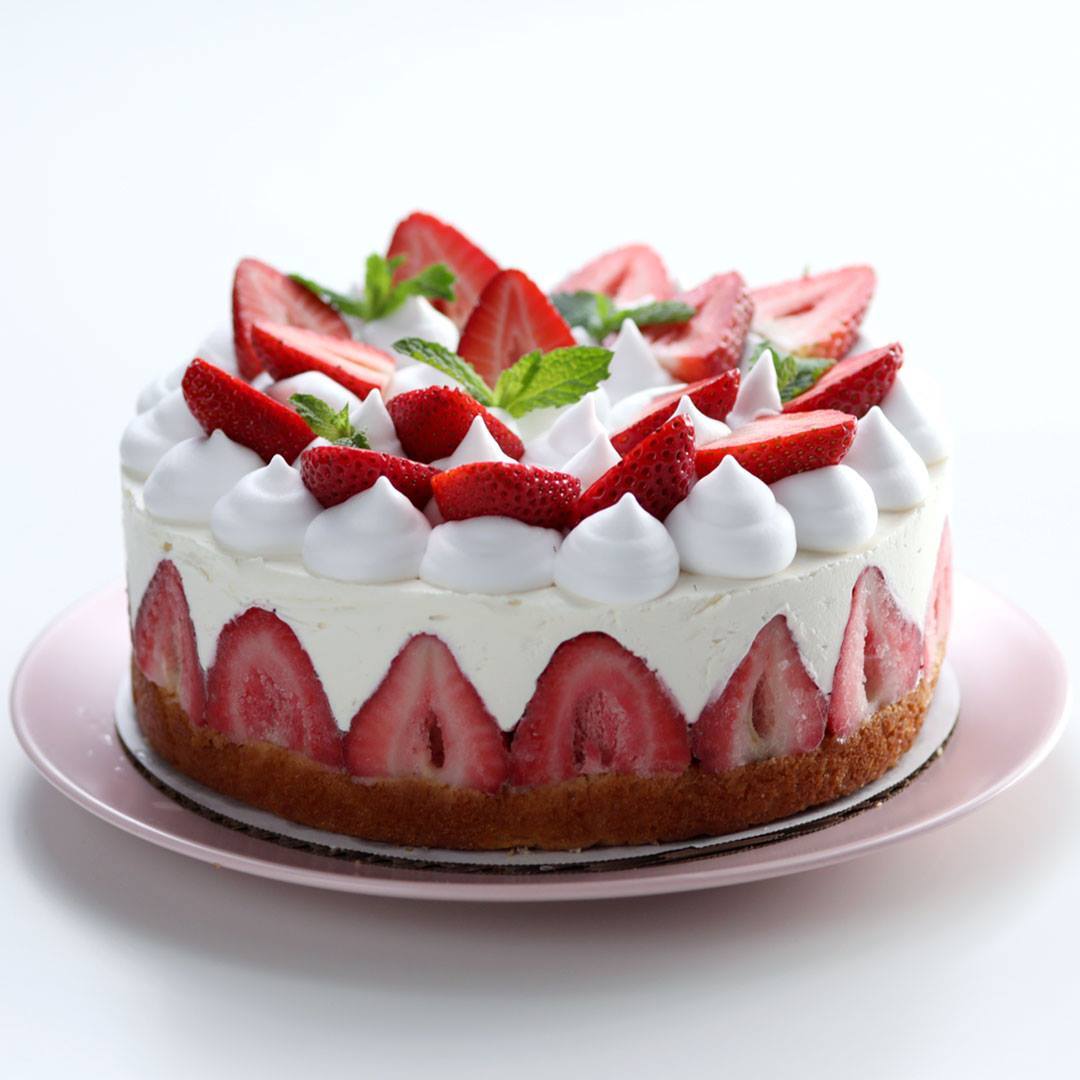
Showing 339 Result(s)
Breakfast

Easy Fraisier

Easy Fraisier
"I'll just have a small piece," meant no one ever.
Author:
Cuisine: American
Recipe type: Breakfast
Ingredients
  • 1 box white cake mix, prepared
  • 2 pints strawberries, trimmed
  • 4 (8-ounce) packages cream cheese, softened
  • 1 (14-ounce) can sweetened condensed milk
  • 1 teaspoon vanilla extract
  • ¼ cup lemon juice
  • 1 cup whipped topping, thawed
  • Mint leaves, for garnish
  • Strawberry jam, for garnish
Instructions
  1. Bake the box cake mix in two 8-inch round pans and allow to cool completely.
  2. Slice about 10 strawberries in half lengthwise and set aside. Place a piece of acetate around an 8-inch cake board and tape it closed. Place a ¾-inch slice of cake at the bottom of the acetate. Place the strawberries around the edge of the acetate and set aside.
  3. In a large bowl, use a hand mixer to cream the cream cheese. Slowly add in condensed milk, vanilla and lemon juice. Pour over the cake and the strawberries and level the top. Pipe large dollops of filling in concentric circles around the top of the cake. Place the cake in the freezer and allow to set for 3 hours.
  4. Pipe on some whipped cream in between the dollops of filling and top with fresh strawberries and mint leaves. Serve immediately, with strawberry jam if desired.

Watch the recipe video here:

Easy Fraisier

"I'll just have a small piece," meant no one ever.Taste for Yourself: taste.md/2s8o9sZTry Tastemade TV, Free for 7 days: https://taste.md/2zcId3s

Posted by Tastemade on Sunday, July 8, 2018

Breakfast

Garlic Bread With Shredded Beef

Garlic Bread With Shredded Beef
Um, why aren't all sandwiches made with garlic bread?
Author:
Cuisine: American
Recipe type: Breakfast
Ingredients
  • ½ pound shredded beef
  • 2 tomatoes, skinned, seeded and chopped
  • ½ onion, cut into rings
  • ½ red bell pepper, chopped
  • ½ yellow bell pepper, chopped
  • ¼ bunch of parsley, chopped
  • ¼ cup red wine vinegar
  • ½ cup olive oil
  • Salt
  • Black pepper
  • 10 garlic bread rolls
Instructions
  1. Preheat oven to 350 degrees.
  2. In a mixing bowl, combine the beef, tomatoes, onion, red pepper, yellow pepper and parsley. Season with the vinegar, olive oil, salt and pepper.
  3. Cut the garlic bread in half, fill it with the meat, then bake for about 25 minutes. Slice and serve.

Watch the recipe video here:

Garlic Bread Beef Sandwich

Um, why aren't all sandwiches made with garlic bread?Taste for Yourself: taste.md/2tOdG62Try Tastemade TV, Free for 7 days: https://taste.md/2zcId3s

Posted by Tastemade on Friday, July 6, 2018

Breakfast

Candy Wafer Pie

Candy Wafer Pie
Skinny people are easier to kidnap. Stay safe, eat cake.
Author:
Cuisine: American
Recipe type: Breakfast
Ingredients
  • 2 packages cookies 'n' cream Hershey's Mais (cookie wafers)
  • 2 packages milk chocolate Hershey's Mais (cookie wafers)
  • 2 cans condensed milk
  • 1½ cups milk
  • 2 egg yolks
  • 1 teaspoon vanilla extract
  • 1¼ cups heavy cream
  • Chocolate topping:
  • ½ cup heavy cream
  • 1 cup chopped bittersweet chocolate
Instructions
  1. In a saucepan, add the condensed milk, milk and eggs. Simmer over low heat until it's the consistency of a thick cream. Remove from heat and add the vanilla extract. Transfer to a mixing bowl and stir in the heavy cream. Set aside.
  2. In a springform pan, line the outer edges with the chocolate wafers, alternating colors. Use remaining wafers (about half a package each) to crush into crumbs and press into the bottom of the pan. Pour the condensed milk mixture into the mold, then freeze for 6 hours.
  3. Heat the ½ cup heavy cream, then add to a bowl with the chopped chocolate and stir until the chocolate has melted completely. Pour this over the cake before serving.

Watch the recipe video here:

Candy Wafer Pie

Sweet tooth? HA – more like sweet teeth. Taste for Yourself: taste.md/2Kunr0B?: Tastemade BrasilTry Tastemade TV, Free for 7 days: https://taste.md/2zcId3s

Posted by Tastemade on Saturday, July 7, 2018

Breakfast

Potato Meatball Bake

Potato Meatball Bake
Meat and potatoes - the remix!
Author:
Cuisine: American
Recipe type: Breakfast
Ingredients
For the meatballs:
  • 1 pound ground beef
  • ½ cup yellow onion, finely diced
  • 1 large egg
  • ¼ cup panko
  • 1 teaspoon salt
  • 1 teaspoon chopped parsley
  • 1 teaspoon oregano
  • ¼ teaspoon black pepper
  • Lemon juice
For the cream sauce:
  • 3 tablespoons butter
  • 4 tablespoons all-purpose flour
  • 2 cups whole milk
  • Salt and pepper, to taste
For the bake:
  • 5 medium-sized Yukon gold potatoes, sliced into ¼-inch rounds
  • 1 cup tomato puree
  • 2 tablespoons chopped parsley
  • 2 tablespoons chopped basil
  • ½ cup shredded mozzarella
Instructions
Make the meatballs:
  1. Preheat oven to 350 degrees, and line a baking sheet with parchment paper.
  2. In a medium-sized bowl, combine beef, onions, panko and egg. Mix to combine. Add salt, herbs and spices. Finish with lemon, and gently mix to combine. Divide into approximately 22 one-inch balls, and bake for 12 to 15 minutes until golden. Allow to cool.
Make the sauce:
  1. In a small saucepan, melt butter and add flour. Continue to stir until flour darkens slightly. Slowly pour in milk and continue to stir on medium-low heat until mixture thickens. Season with salt and pepper and allow to cool slightly while bake is assembled.
Assemble the bake:
  1. Preheat the oven to 375 degrees. Line the bottom of a cast-iron or round casserole dish with 4 sliced potatoes. Place meatballs on top. Alternating between potato and meatball, place around the outside edge of the casserole dish. They should fit pretty tightly around. Carefully spoon tomato sauce over meatballs. Top with chopped herbs. Carefully spoon cream sauce over meatballs and potatoes and top with shredded cheese. Bake for 45 to 50 minutes until cheese and sauce are bubbling and the potatoes feel tender to the touch. Allow to cool for 15 minutes and serve immediately.

Watch the recipe video here:

Potato Meatball Bake

Forget what you thought you knew about meat & potatoes.Taste for Yourself: taste.md/2IOQ5smTry Tastemade TV, Free for 7 days: https://taste.md/2zcId3s

Posted by Tastemade on Saturday, July 7, 2018

Dessert

Giant Peanut Butter Cup Cheesecake

Giant Peanut Butter Cup Cheesecake
Make your sweet dreams a reality with a cake made with cream cheese peanut butter filling and topped with chocolate ganache.
Author:
Cuisine: American
Recipe type: Dessert
Ingredients
For the crust:
  • 5 cups chocolate wafer cookies
  • 1 cup peanuts, roasted and salted
  • ½ cup butter, melted and slightly cooled
For the filling:
  • 2 pounds cream cheese, softened
  • 5 eggs, room temperature
  • 1 cup dark brown sugar, packed
  • ¼ cup granulated sugar
  • 1¼ cups smooth peanut butter
  • ½ cup heavy cream
  • 1 vanilla bean, scraped
  • 12 peanut butter cups, chopped
  • ½ cup milk chocolate chips
For the ganache topping:
  • 2 cups heavy cream
  • 16 ounces chocolate, chopped
  • 1 pinch salt
  • 1 cup mini peanut butter cups
  • ½ cup peanuts, roasted, salted and roughly chopped
Instructions
For the crust:
  1. Mix all ingredients in a food processor and pulse until crumbly. Press into a 9½-inch deep-dish tart pan with removable bottom. Place in the refrigerator to chill.
For the filling:
  1. Preheat oven to 275 degrees. In the bowl of a stand mixer, cream the softened cream cheese until fluffy. Add eggs, one at a time, until well incorporated. Add sugars, peanut butter, cream and vanilla bean and mix well.
  2. Gently stir in the peanut butter cups and chocolate chips, then pour the filling into the prepared and chilled crust. Level the top gently. Place the tart pan on a large sheet of aluminum foil in a large baking pan. Pour water around the outside of the cheesecake, taking care not to allow the water to seep into the tart pan. Bake for about 1½ hours or until just firm.
  3. Allow to cool for 20 minutes, then place the cheesecake in the refrigerator for at least 4 hours.
For the ganache:
  1. In a heavy bottomed saucepan, bring cream just to boiling. Place the chopped chocolate and salt into a heatproof bowl and pour the cream over. Allow to sit without mixing for about 5 minutes. Whisk until shiny and smooth then pour over chilled cheesecake. Garnish with mini peanut butter cups and chopped peanuts. Serve immediately.

Watch the recipe video here:

https://www.facebook.com/tastemade/videos/1708245745929252/

Breakfast

Jalapeño Popper Chicken Wings

Jalapeño Popper Chicken Wings
These wings wanna be jalapeño your business.
Author:
Cuisine: American
Recipe type: Breakfast
Ingredients
  • 8 chicken wings (paddle and tip)
  • 2 tablespoons garlic powder, divided
  • 3 tablespoons soy sauce
  • 4 ounces whipped cream cheese
  • 2 ounces shredded sharp cheddar cheese
  • 3 slices bacon, fried and chopped into bits
  • ¼ cup chopped chives
  • 8 small jalapeños
  • 1 cup all-purpose flour
  • 2 teaspoons kosher salt
  • 2 large eggs
  • 1 cup unseasoned breadcrumbs
  • 1 teaspoon cayenne
For the spicy mayo:
  • ½ cup mayonnaise
  • 1 tablespoon lime juice
  • 2 tablespoons Sriracha
Instructions
  1. Remove the bones from the paddle section of the wing using a paring knife. Insert your knife between the bone and the meat and work your way around until the bones are free and can be removed, leaving a cavity for stuffing.
  2. Place the cleaned wings in a medium glass bowl with 1 tablespoon of garlic powder and soy sauce. Let marinate for 30 minutes.
  3. Preheat oven to 350 degrees.
  4. In a small bowl, mix cream cheese, cheddar cheese, chives and bacon. Wearing gloves, remove the core and stem from the jalapeños and make a slit down on side. Fill the jalapeños with the cream cheese mixture.
  5. Stuff the filled jalapeños into the wings, open side first, and seal using toothpicks. Place on a foiled baking sheet and bake for 20 minutes. Let cool.
  6. In a small bowl, combine spicy mayo ingredients. Set aside.
  7. In 3 small bowls, create your breading station. In one bowl, mix the flour with the remaining garlic powder and salt. In another, the eggs and in the last, the breadcrumbs and cayenne. Dredge the wings first in the flour, then the egg, then the breadcrumbs and place on a wire rack.
  8. Deep-fry in oil heated to 350 degrees until golden brown. Season with more salt. Serve with spicy mayo.

Watch the recipe video here:

Jalapeño Popper Chicken Wings

These wings wanna be jalapeño business.Taste for Yourself: taste.md/2s91rRK

Posted by Tastemade on Tuesday, July 3, 2018

Dessert

“Fruit” Pies

"Fruit" Pies
How to describe these "fruit" pies in three words: uh dor able!
Author:
Cuisine: American
Recipe type: Dessert
Ingredients
  • 1 (16-ounce) package sugar cookie dough
  • 2 tablespoons concentrated red cherry juice
  • 1 tablespoon freeze-dried cherries
  • ¼ cup all-purpose flour
  • 3 cups pitted red cherries
  • ¾ cup white sugar
  • 3 tablespoons cornstarch
  • 1 tablespoon fresh lemon juice
  • 1 vanilla bean, split
  • ½ cup chocolate chips, melted
  • Melted white chocolate, tinted green, piped into stems
  • Mint, for garnish
Instructions
  1. In a mixing bowl, combine the cookie dough, cherry juice, freeze-dried cherries and flour until well incorporated. Roll out to about ¼ inch thick. Chill the dough. Cut into 2½-inch rounds and place over the back of a mini muffin pan, staggering the cookies to make sure they don’t bake into one another. Chill the dough on the muffin pan for about 30 minutes.
  2. Preheat oven to 350 degrees. Bake the chilled cookies on the back of the tin for 8 to 10 minutes. Remove from the oven and allow them to cool completely on the back of the muffin tin, trimming any edges if necessary.
  3. While the cookies are cooling make the filling. Place the cherries in a medium saucepan over medium heat. Cover and cook, stirring occasionally, for about 10 minutes, then add the sugar, cornstarch, lemon juice and vanilla bean. Cook until all ingredients are incorporated and the juice has thickened. Set aside to cool.
  4. Fill the cookie crusts with cooled cherry pie filling. Pipe a bit of melted chocolate around the top of each mini pie and top with another cookie crust on top. Attach a piped stem and mint spring if desired. Serve immediately.

Watch the recipe video here:

Churro Cake

Skinny people are easier to kidnap. Stay safe, eat cake.Taste for Yourself: taste.md/2yQFhte?: Tastemade Brasil

Posted by Tastemade on Wednesday, July 4, 2018

Dessert

“Fruit” Pies

"Fruit" Pies
How to describe these "fruit" pies in three words: uh dor able!
Author:
Cuisine: American
Recipe type: Dessert
Ingredients
  • 1 (16-ounce) package sugar cookie dough
  • 2 tablespoons concentrated red cherry juice
  • 1 tablespoon freeze-dried cherries
  • ¼ cup all-purpose flour
  • 3 cups pitted red cherries
  • ¾ cup white sugar
  • 3 tablespoons cornstarch
  • 1 tablespoon fresh lemon juice
  • 1 vanilla bean, split
  • ½ cup chocolate chips, melted
  • Melted white chocolate, tinted green, piped into stems
  • Mint, for garnish
Instructions
  1. In a mixing bowl, combine the cookie dough, cherry juice, freeze-dried cherries and flour until well incorporated. Roll out to about ¼ inch thick. Chill the dough. Cut into 2½-inch rounds and place over the back of a mini muffin pan, staggering the cookies to make sure they don’t bake into one another. Chill the dough on the muffin pan for about 30 minutes.
  2. Preheat oven to 350 degrees. Bake the chilled cookies on the back of the tin for 8 to 10 minutes. Remove from the oven and allow them to cool completely on the back of the muffin tin, trimming any edges if necessary.
  3. While the cookies are cooling make the filling. Place the cherries in a medium saucepan over medium heat. Cover and cook, stirring occasionally, for about 10 minutes, then add the sugar, cornstarch, lemon juice and vanilla bean. Cook until all ingredients are incorporated and the juice has thickened. Set aside to cool.
  4. Fill the cookie crusts with cooled cherry pie filling. Pipe a bit of melted chocolate around the top of each mini pie and top with another cookie crust on top. Attach a piped stem and mint spring if desired. Serve immediately.

Watch the recipe video here:

"Fruit" Pies

That ending though ??Taste for Yourself: taste.md/2lER0Sn

Posted by Tastemade on Wednesday, July 4, 2018

Breakfast

Peach Cookies

Peach Cookies
Be a peach and try these perfectly ripe cream-filled cookies made to resemble your favorite emoji.
Author:
Cuisine: American
Recipe type: Breakfast
Ingredients
For the pastry cream:
  • 1¾ cups whole milk
  • Rind of one lemon, cut in strips
  • 4 large egg yolks
  • ¾ cup sugar
  • ¼ cup all-purpose flour
  • 1 teaspoon Luxardo liqueur
For the cookies:
  • 4 cups all-purpose flour
  • 1 tablespoon baking powder
  • 3 large eggs
  • ¾ cup sugar, plus more for decoration
  • 2 tablespoons peach schnapps
  • ¾ cup whole milk
  • 1 stick unsalted butter, melted
  • Food coloring, yellow and peach colored, for decoration
  • 1½ cups Luxardo liqueur, for decoration
  • Mint leaves, for decoration
Instructions
Prepare the pastry cream:
  1. In a small saucepan over low heat, add milk and lemon rind. Warm until the milk is infused with lemon flavor, then remove lemon rind.
  2. In a large bowl, whisk together the egg yolks and sugar, then whisk in the flour. Slowly incorporate the warm milk, then pour back into the saucepan and cook, stirring constantly, until mixture is bubbling and thick. Remove from heat and whisk in Luxardo. Pour into a heatproof bowl, cover the cream with a layer of plastic wrap touching the surface to keep a skin from forming, and refrigerate until chilled.
Make the cookies:
  1. Preheat oven to 350 degrees, and line a baking sheet with parchment paper.
  2. In a medium bowl, sift flour and baking powder together.
  3. In a large bowl, whisk eggs and sugar together until combined, then add peach schnapps, milk and butter. Whisk until incorporated, then carefully mix in the flour and baking powder mixture. The dough will be thick; mix with a fork until the dough is smooth, then let rest for 10 minutes. Form into smooth balls about a tablespoon in size and place on the prepared baking sheet.
  4. Bake for about 15 minutes until just golden. Let cool slightly, then while still warm use a paring knife to cut a teaspoon-sized indentation into the flat side of each cookie. Set aside to cool completely.
Assemble the cookies:
  1. Sort cooled cookies into halves that match one another, then fill each side with pastry cream and sandwich the two sides together. Run a finger along the seam of the peach to seal the two cookies together. Put aside to set.
  2. Place about 1 cup of sugar in a small bowl. Fill two ramekins with ¾ cup of Luxardo each. Add yellow food coloring to one and peach food coloring to the other, then mix well. Dip one side of the filled cookie in the yellow-tinted liqueur, then dip the rest of the cookie in the peach-tinted liqueur. Roll the dipped cookie in the sugar bowl, coating all sides with sugar. Refrigerate until ready to serve. These cookies taste even better after a few hours, after the liqueur flavor infuses.

Watch the recipe video here:

Peach Cookies

Can we just ap-peach-iate how adorable these cookies are? ?Taste for Yourself: taste.md/2uuez5D

Posted by Tastemade on Saturday, June 23, 2018

Dessert

Flag Cake

Flag Cake
Serve up patriotism by the slice.
Author:
Cuisine: American
Recipe type: Dessert
Ingredients
For the blue and white cakes:
  • 5 cups cake flour
  • 1 tablespoon baking powder
  • 1 teaspoon baking soda
  • 2 teaspoon salt
  • 6 large eggs
  • 2 teaspoon vanilla
  • 1½ cups butter, softened at room temperature
  • 3 cups sugar
  • 2 cup buttermilk
  • Blue food coloring
For the red velvet cake:
  • ½ cup butter, softened at room temperature
  • 2 tablespoons cocoa powder
  • 1½ cups sugar
  • 2 large eggs
  • 2 teaspoons vanilla extract
  • 2 tablespoons red food coloring
  • 1 teaspoon salt
  • 2½ cups all-purpose flour, sifted
  • 1 cup buttermilk
  • 1 tablespoon vinegar
For the frosting:
  • 2 cups butter
  • 8 cups powdered sugar, sifted
  • ¼ cup milk
  • 1 teaspoon vanilla extract
Instructions
For the blue and white cakes:
  1. Preheat the oven to 350 degrees and line 3 9-inch pans with baking spray and parchment paper. In a medium bowl, sift together the flour, baking powder, baking soda and salt. Set aside. In a small bowl, whisk together eggs and vanilla. In a large bowl, cream butter and sugar. Add egg mixture. Alternate adding in the flour mixture and the buttermilk until completely combined. Divide batter into two bowls and dye one bowl with the blue food coloring. Pour the blue into one pan and pour the white into the two remaining pans and bake for 25 to 30 minutes until a toothpick comes out clean from the center. Set aside to cool.
For the red velvet cakes:
  1. Preheat the oven to 350 degrees and line a 9” pan and 6” pan with baking spray and parchment paper. In a small bowl, combine cocoa and red food coloring to a paste consistency. Set aside. Combine flour and salt and set aside. In a large bowl of a stand mixer fitted with the paddle attachment, cream butter and sugar. Once smooth, add in eggs one at a time. Add in vanilla and the red paste. Alternate between adding the flour mixture and the buttermilk, making sure to combine thoroughly after each addition. Add vinegar and mix until batter is smooth. Divide batter between the two prepared pans and bake for 25 to 30 minutes until a toothpick comes out clean from the center. Set aside to cool.
For the frosting:
  1. With a hand mixer, beat butter until light and fluffy. Gradually add in powdered sugar one cup at a time, scraping down the bowl as necessary. Finally, add the milk slowly until desired consistency is reached. Add in the vanilla and set aside until the cake is cool.
Assemble the cakes:
  1. Divide the 9” red and white cakes in half lengthwise. Cut a 4” circle out of the 6” red velvet cake. Repeat with the one of the white cake layers and the blue cake. The cake layers should be 2-9” red velvet layers, 1-4” red velvet layer, 1-9” white layer, 1-4” white layer and 1-9” blue layer that is double the thickness of the red and white layers.
  2. Place an 9” red velvet layer on a serving platter. Frost the top of the layer with a thin layer of frosting and place an 9” white cake layer on top, frost that, place a red velvet layer on top of that and frost the top. Place the blue cake layer on top of the cake. Next, frost the 4” white cake layer and lower it into the middle of the blue velvet layer. Lower the 4” red velvet layer onto the top of the white layer in the blue velvet circle and frost the cake with the half of the remaining white frosting. Place in the fridge to chill and set for up to 2 hours. Remove and cover the entire cake with swirls of frosting. Cut and serve to reveal the flag!

Watch the recipe video here:

Flag Cake

You're not celebrating the 4th right unless you have a flag IN your cake.Taste for Yourself: taste.md/2s8nnMB

Posted by Tastemade on Tuesday, July 3, 2018