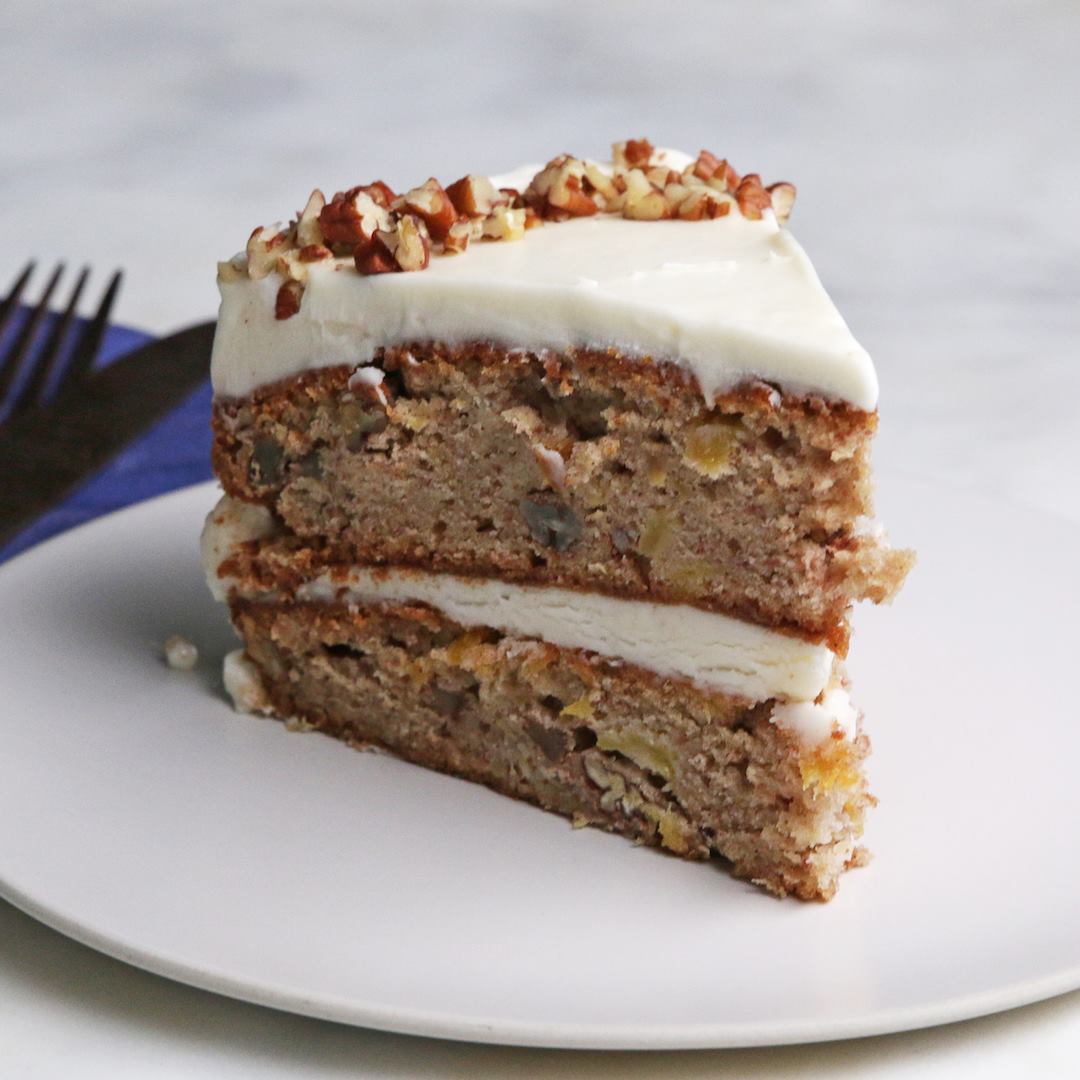
Dessert

Hummingbird Cake

Hummingbird Cake
What a sweet way to enjoy a Southern dessert classic for the Fall! ?
Author:
Cuisine: American
Recipe type: Dessert
Ingredients
CAKE
  • 3 cups all purpose flour (375 g)
  • 1 teaspoon nutmeg
  • 1 teaspoon ground ginger
  • 2 teaspoons cinnamon
  • 1 teaspoon baking soda
  • 1 teaspoon salt
  • 1 cup pecan, chopped (125 g)
  • 3 ripe bananas
  • 2 cups granulated sugar (400 g)
  • 20 oz diced pineapple, 1 can, drained (565 g)
  • 1 cup canola oil (240 mL)
  • 3 large eggs
FROSTING
  • 16 oz cream cheese (455 g)
  • 4 oz unsalted butter (115 g)
  • 1 teaspoon vanilla extract
  • ½ teaspoon salt
  • 6 cups powdered sugar (720 g)
  • ½ cup pecan, chopped, for decorating (60 g)
Instructions
  1. Preheat the oven to 350°F (180°C). Grease and line two 10-inch (25 cm) spring form pans with parchment paper.
  2. In a large bowl, combine the flour, nutmeg, ginger, cinnamon, baking soda, salt, and pecan. Whisk well.
  3. In a separate large bowl, mash the bananas until smooth. Add the sugar, pineapple, oil, and eggs, and whisk until smooth.
  4. Add the dry ingredients to the wet ingredients in two additions. Whisk to combine.
  5. Divide the cake batter between the prepared cake pans.
  6. Bake for 50 minutes, or until toothpick inserted in the middle of the cakes comes out clean.
  7. Make the frosting: In a medium bowl, beat the cream cheese until smooth. Add the butter, vanilla, salt and salt and whisk to combine. Add the powdered sugar and stir until smooth.
  8. Release the cakes from the springform pans and remove the parchment paper.
  9. Add a dollop of frosting to the center of cake stand and line with parchment paper.
  10. Place a layer of Hummingbird Cake on the cake stand. Spread ⅓ of the frosting over the top of the cake. Top with the other cake layer and spread with another layer of frosting. Use the remaining frosting to cover the sides of the cake, then run a bench scraper around the sides to clean off excess frosting.
  11. Decorate the border of the cake with chopped pecans.
  12. Slice and serve.
  13. Enjoy!

Watch the recipe video here:

Hummingbird Cake

What a sweet way to enjoy a Southern dessert classic for the Fall! ?Full Recipe: https://tasty.co/recipe/hummingbird-cake

Posted by Tasty on Saturday, September 29, 2018

Dessert

Strawberry Lemon Love Cake

Strawberry Lemon Love Cake
Strawberry Lemon Love Cake, we love you so much. ???
Author:
Cuisine: American
Recipe type: Dessert
Ingredients
  • Nonstick cooking spray, for the baking pan
  • One 16.5-ounce box strawberry cake mix (plus required ingredients)
  • 32 ounces part-skim ricotta cheese
  • ¾ cup sugar
  • 1 teaspoon vanilla extract
  • 4 large eggs
  • 16 ounces mascarpone cheese
  • 1 cup milk
  • One 3.4-ounce box instant lemon pudding mix
  • Diced fresh strawberries, for topping
  • Lemon zest, for topping
Instructions
  1. Preheat the oven to 350 degrees F. Spray a 9-by-13-inch baking pan with cooking spray.
  2. Prepare the cake batter according to the package directions and pour it into the prepared pan. Set aside.
  3. Combine the ricotta, sugar, vanilla, eggs and 4 ounces (1/2 cup) of the mascarpone in the bowl of a stand mixer fitted with a paddle attachment. Beat on medium speed until smooth, scraping down the sides of the bowl with a rubber spatula as needed. Gently scoop the filling onto the cake batter, covering it completely.
  4. Bake until a skewer inserted in the center of the cake comes out clean and the strawberry layer has risen to the top, 50 to 60 minutes. Cool completely on a rack.
  5. Meanwhile, beat the remaining 12 ounces mascarpone in a medium bowl with an electric mixer on medium speed until smooth. Gradually add the milk, beating until smooth. Add the pudding mix and beat until smooth. Let stand until thickened, about 5 minutes. Spread the frosting over the cooled cake.
  6. Mix the diced strawberries and lemon zest together in a bowl. Top each slice of cake with a spoonful of the strawberries.

Watch the recipe video here:

Strawberry Lemon Love Cake

Strawberry Lemon Love Cake, we love you so much. ??? #TheKitchen > All-New Today @ 11a|10c

Posted by Food Network on Saturday, April 21, 2018

Main dish

Chili-cheese Garlic Bread Rolls

Chili-cheese Garlic Bread Rolls
A whole new way to eat garlic bread ?!
Author:
Cuisine: American
Recipe type: Main dish
Ingredients
  • CHILI
  • 1 onion, diced
  • 3 cloves garlic, minced
  • 1 lb ground beef (455 g)
  • 1 teaspoon salt
  • ½ teaspoon pepper
  • 15 oz tomato sauce, 1 can (425 g)
  • 1 teaspoon cumin
  • 1 teaspoon dried oregano
  • 1 teaspoon chili powder
  • 15 oz kidney bean, 1 can, drained and rinsed (425 g)
  • GARLIC BUTTER
  • ¼ cup butter, melted (55 g)
  • 2 cloves garlic, minced
  • 1 tablespoon fresh parsley, chopped
  • 1 tablespoon grated parmesan cheese
  • 12 dinner rolls
  • ½ cup shredded cheddar cheese (50 g)
  • sour cream, to serve
  • green onion, sliced, to serve
Instructions
  1. Heat oil in a large pot or Dutch oven over medium heat. Add the onion and cook until translucent.
  2. Add the garlic and cook for two minutes.
  3. Add the ground beef and season with salt and pepper. Break up the beef with a wooden spoon, cooking until browned.
  4. Add in the tomato sauce, cumin, oregano, and chili powder. Stir until combined.
  5. Reduce the heat to low, cover and simmer for 1 hour.
  6. Remove lid and stir in kidney beans.
  7. Preheat the oven to 400°F (200°C).
  8. In a bowl, add the butter, garlic, parsley, and Parmesan. Stir until combined.
  9. Place the dinner rolls in a baking dish. Use a knife to carve a circle in the top of each roll. Press down the bottom of the bun to create a denser bottom layer.
  10. Brush the rolls with the garlic butter and bake for 5 minutes, or until lightly toasted.
  11. Spoon the chilli into the holes of the toasted rolls.
  12. Sprinkle with cheddar cheese and bake for another 5 minutes, or until cheese has melted.
  13. Serve topped with sour cream and green onions.
  14. Enjoy!

Watch the recipe video here:

Chili-Cheese Garlic Bread Rolls

A whole new way to eat garlic bread ?!Full Recipe: https://tasty.co/recipe/chili-cheese-garlic-bread-rolls

Posted by Tasty on Thursday, September 27, 2018

Main dish

Slow Cooker Vegan Butternut Squash Mac

Slow Cooker Vegan Butternut Squash Mac
Your new favorite fall comfort food ?
Author:
Cuisine: American
Recipe type: Main dish
Ingredients
  • 1 butternut squash, peeled and cubed
  • 1 medium white onion, quartered
  • ½ cup raw cashews (65 g)
  • ¼ cup nutritional yeast (35 g)
  • 1 clove garlic
  • 1 teaspoon dried rosemary
  • ½ teaspoon nutmeg
  • 2 tablespoons olive oil
  • 1 teaspoon mustard
  • 1 tablespoon salt
  • 2 cups vegetable stock (480 mL)
  • 1 lb elbow macaroni, cooked according to package instructions (455 g)
  • fresh parlsey, for garnish
Instructions
  1. Cut off both ends of the butternut squash and poke all over with a fork. Microwave on high for 3-4 minutes.
  2. Peel the skin off of the squash. The skin should peel right off! Once peeled, slice the squash in half lengthwise, scoop out seeds, and cut into 1-inch (2-cm) cubes. You should have about 5 cups (1 kg).
  3. In a slow cooker, combine the squash, onion, cashews, nutritional yeast, garlic, rosemary, nutmeg, olive oil, mustard, salt, and vegetable stock. Stir to combine.
  4. Cover and cook on high for 4 hours or low for 8 hours, until the vegetables are soft enough to be easily mashed with a fork.
  5. Transfer the squash mixture to a blender, or use an immersion blender, and puree for 5 minutes, until there are no chunks and the sauce develops a creamy texture.
  6. Pour the sauce over the macaroni and stir well.
  7. Serve garnished with parsley.
  8. Enjoy!

Watch the recipe video here:

Slow Cooker Butternut Squash Mac N Cheese

Your new favorite fall comfort food ?Get the recipe: https://tasty.co/recipe/slow-cooker-vegan-butternut-squash-mac

Posted by Tasty on Thursday, September 27, 2018

Main dish

Pasteles De Queso

Pasteles De Queso
Did somebody say QUESO?! Watch Yolanda and Noé make Pasteles De Queso ?
Author:
Cuisine: American
Recipe type: Main dish
Ingredients
  • 5 cups all-purpose flour, plus more for dusting (625 g)
  • 1 teaspoon salt
  • 2 teaspoons baking powder
  • 3 teaspoons granulated sugar
  • 2 tablespoons corn oil
  • 5 large eggs
  • 1 cup warm milk (240 mL)
  • 1 ½ cups shredded mozzarella cheese, or Oaxaca cheese (150 g)
  • water, or beaten egg white, for sealing
  • canola oil, for frying
  • powdered sugar, for dusting
  • api, for serving
Instructions
  1. In a large bowl, sift together the flour, salt, baking powder, and sugar and whisk to combine.
  2. Add the corn oil and whisk until well combined.
  3. In a liquid measuring cup or small bowl, lightly beat together the eggs. Add the milk.
  4. Gradually add the egg mixture to the dry ingredients. Mix until the dough begins to come together in a ball.
  5. Transfer the dough to a lightly floured surface and knead for 10 minutes, until smooth.
  6. Place the dough in a floured bowl. Cover with a kitchen towel or plastic wrap and let it rest for 45 minutes, or until dough has nearly doubled in size.
  7. Roll the dough into about 25 smaller balls, or fewer if you prefer larger pasteles. Transfer to a baking sheet and cover with a kitchen towel so the dough balls don’t dry out as you roll them out.
  8. Working 1 at a time, roll each dough ball out into ⅛-inch (3 mm) thick ovals. Use an inverted bowl to cut out circles about 4-5 inches (10-13 cm) in diameter. Discard the dough scraps.
  9. Add about a tablespoon of Oaxaca cheese to the center of each circle. Lightly wet the edge of the dough with water, then fold in half and seal using the repulgue technique or an empanada mold cutter.
  10. Fill a large pot with canola oil and heat to 360°F (182°C).
  11. Add several pasteles at a time to the hot oil and fry for about 5 minutes, or until crisp and golden brown. Drain on paper towels.
  12. Dust the hot pasteles with powdered sugar. Serve with api, if desired.
  13. Enjoy!

Watch the recipe video here:

Yolanda And Noé's Pasteles De Queso

Did somebody say QUESO?! Watch Yolanda and Noé make Pasteles De Queso ?FULL RECIPE: https://tasty.co/recipe/pasteles-de-queso

Posted by Tasty on Thursday, September 27, 2018

Dessert

Oreo Lover’s Cheesecake

Oreo Lover's Cheesecake
Almost every square inch of this cheesecake contains an over-the-top bite of your favorite sandwich cookie. Not only are they in the crust and filling, we even make Oreo truffle balls to decorate the top.
Author:
Cuisine: American
Recipe type: Dessert
Ingredients
Crust:
  • One 14.3-ounce package chocolate sandwich cookies, such as Oreos®
  • 1 stick (8 tablespoons) unsalted butter, melted
Filling:
  • Four 8-ounce packages cream cheese, at room temperature
  • 1 cup sugar
  • 1 cup sour cream
  • 4 large eggs, at room temperature
  • 1 teaspoon pure vanilla extract
  • 2 cups chocolate sandwich cookies, such as Oreos® (about 18 cookies), roughly chopped
Topping:
  • 14 chocolate sandwich cookies, such as Oreos®
  • 2 ounces cream cheese, at room temperature
  • ½ cup chocolate sprinkles
  • ½ cup hot fudge sauce, warmed
Instructions
For the crust: P
  1. osition an oven rack in the middle of the oven and preheat to 325 degrees F.
  2. Place the cookies in a large resealable plastic bag and crush until fine crumbs form but there are still a few larger chunks. Pour in the butter, reseal the bag and shake until the cookies are well coated.
  3. Firmly press the cookie mixture into the bottom of a 9-inch springform pan (use the bottom of a measuring cup to help pack it in and make it even). Bake until crisp and set, 10 to 12 minutes. Let cool completely, about 30 minutes. Wrap the bottom and sides of the pan with a large piece of foil and put it in a large roasting pan.
For the filling:
  1. Beat the cream cheese and sugar together in a large bowl with an electric mixer on medium speed for 1 minute. Add the sour cream and beat until just combined. Mix in the eggs by hand, one at a time. Mix in the vanilla by hand until just combined. (Take care not to overmix or the cheesecake will puff up and crack).
  2. Pour half of the batter into the springform pan. Sprinkle the chopped cookies over the top and gently press down on them so some sink into the batter. Pour the remaining batter on top. Add enough hot water to the roasting pan to come about halfway up the side of the springform pan.
  3. Bake until the outside of the cake is set but the center is still slightly loose, about 1 hour. Turn the oven off and leave the cheesecake in the oven for another hour. Remove the cheesecake from the roasting pan to a cooling rack. Run a knife around the edge and cool to room temperature. Cover and refrigerate at least 8 hours.
For the topping:
  1. Pulse 9 of the cookies in a food processor until fine crumbs form. Add the cream cheese and pulse until incorporated and sticky enough to form a ball. Scoop out 1 tablespoon and form into a ball, then roll the ball in the sprinkles until completely covered. Place on a baking sheet and repeat with the remaining cookie mixture and sprinkles for 9 balls total. Refrigerate until ready to use. Cut the remaining 5 cookies in half.
  2. Run a knife around the edge of the pan once more and open the clasp to unmold the cheesecake. Transfer to a serving plate or cake stand and smooth the edges with a knife. Drizzle the hot fudge sauce all over the top and sides of the cake, and use an offset spatula to spread it evenly, letting some drip over the sides. Make a decorative ring around the edge of the cheesecake with the cookie balls. Place a cookie half cut-side down in between each ball. Serve cold.

Watch the recipe video here:

How to Make an Oreo Lover's Cheesecake

This is the cheesecake of our Oreo-obsessed dreams! ? Save the recipe: http://bit.ly/2sEHanr.

Posted by Food Network on Sunday, June 10, 2018

Main dish

Strawberry Lemon Love Cake

Strawberry Lemon Love Cake
Strawberry Lemon Love Cake, we love you so much. ???
Author:
Cuisine: American
Recipe type: Main dish
Ingredients
  • Nonstick cooking spray, for the baking pan
  • One 16.5-ounce box strawberry cake mix (plus required ingredients)
  • 32 ounces part-skim ricotta cheese
  • ¾ cup sugar
  • 1 teaspoon vanilla extract
  • 4 large eggs
  • 16 ounces mascarpone cheese
  • 1 cup milk
  • One 3.4-ounce box instant lemon pudding mix
  • Diced fresh strawberries, for topping
  • Lemon zest, for topping
Instructions
  1. Preheat the oven to 350 degrees F. Spray a 9-by-13-inch baking pan with cooking spray.
  2. Prepare the cake batter according to the package directions and pour it into the prepared pan. Set aside.
  3. Combine the ricotta, sugar, vanilla, eggs and 4 ounces (1/2 cup) of the mascarpone in the bowl of a stand mixer fitted with a paddle attachment. Beat on medium speed until smooth, scraping down the sides of the bowl with a rubber spatula as needed. Gently scoop the filling onto the cake batter, covering it completely.
  4. Bake until a skewer inserted in the center of the cake comes out clean and the strawberry layer has risen to the top, 50 to 60 minutes. Cool completely on a rack.
  5. Meanwhile, beat the remaining 12 ounces mascarpone in a medium bowl with an electric mixer on medium speed until smooth. Gradually add the milk, beating until smooth. Add the pudding mix and beat until smooth. Let stand until thickened, about 5 minutes. Spread the frosting over the cooled cake.
  6. Mix the diced strawberries and lemon zest together in a bowl. Top each slice of cake with a spoonful of the strawberries.

Watch the recipe video here:

Strawberry Lemon Love Cake

Strawberry Lemon Love Cake, we love you so much. ??? #TheKitchen > All-New Today @ 11a|10c

Posted by Food Network on Saturday, June 16, 2018

Main dish

Crispy Chili Beef

Crispy Chili Beef
Treat yourself to a little weekday spice with this crispy chili beef ?
Author:
Cuisine: American
Recipe type: Main dish
Ingredients
  • ¾ lb frying steak (300 g)
  • ⅔ cup cornflour (100 g)
  • 1 tablespoon chinese 5 spice
  • 1 teaspoon salt
  • 1 teaspoon pepper
  • 4 cups oil, for frying (1 L)
  • 2 red chilis
  • 1 spring onion, thinly sliced
  • 1 oz ginger, thinly sliced (25 g)
  • 1 red bell pepper, thinly sliced
  • 1 tablespoon garlic paste
  • 1 tablespoon soy sauce
  • 2 tablespoons sweet chilli sauce
  • 1 tablespoon red wine vinegar
  • 1 tablespoon tomato ketchup
  • spring onion, to garnish
  • red chilli, to garnish
Instructions
  1. Slice the steaks into thin strips and place into a small bowl.
  2. Add the cornflour, 5 spice, salt, and pepper. Mix until evenly coated.
  3. Carefully heat the oil in a deep saucepan until it reaches 190°C (375°F).
  4. Carefully place the beef strips into the oil and fry for about 4-5 minutes, until golden brown.
  5. Place on some tissue to soak up the excess oil and set a aside.
  6. Meanwhile, prepare the sauce by adding a tablespoon of oil to a frying pan. Frying the chilies, spring onion, and ginger over a medium heat for a few minutes. Add garlic paste and fry for another minute.
  7. Stir in the soy sauce, sweet chili sauce, red wine vinegar, and tomato ketchup until thick.
  8. Stir in the beef steaks until evenly coated.
  9. Garnish with spring onion and red chilies.
  10. Enjoy!

Watch the recipe video here:

Crispy Chili Beef

Treat yourself to a little weekday spice with this crispy chili beef ?FULL RECIPE: https://tasty.co/recipe/crispy-chili-beef

Posted by Proper Tasty on Thursday, September 27, 2018

Main dish

BAILEYS CINNAMON SWIRL CARAMEL APPLE PIE

BAILEYS CINNAMON SWIRL CARAMEL APPLE PIE
We’ve rolled back the years to bring a classic comfort food bang up to date. Our latest collaboration with Baileys, this pie is the perfect comfort food for shorter days and colder nights. If combining apples, Baileys and cinnamon swirls sounds like a match made in heaven, then this is the recipe for you.
Author:
Cuisine: American
Recipe type: Main dish
Ingredients
Pie:
  • 2 refrigerated pie crusts
  • 30g unsalted butter,
  • melted
  • 4 tsp ground cinnamon
  • 55g butter
  • 150g brown sugar
  • 5g cinnamon
  • 25g flour
  • 120ml Baileys
  • 8 cups Granny Smith
  • apples peeled, cored,
  • thinly sliced
  • Egg wash
Caramel Sauce:
  • 225g caramel
  • 50ml Baileys
Instructions
  1. Pre-heat oven to 180ºC (350ºF).
  2. Roll out one pie crust. Brush with melted butter and sprinkle evenly
  3. with cinnamon. Roll tightly into a log. Cut into ¼" rounds. Repeat with
  4. second pie crust.
  5. Place half of the rounds in a greased pie dish and press to adhere and
  6. attach to form a crust right to the edges of the pie dish. Brush with egg
  7. wash and set aside.
  8. In a pan, butter, brown sugar and cinnamon until a caramel is formed.
  9. Remove from heat and cool down. Stir through Baileys until combined.
  10. Add apples and stir to coat completely.
  11. Place apples into prepared crust and ladle about 1-2 small ladles over top.
  12. Place remaining cinnamon swirl rounds in a circle in-between two
  13. pieces parchment paper. Roll out to ¼" thick and place on top of the
  14. apples. Press edges to seal and cut any excess pie crust. Brush the top
  15. evenly with egg wash and cut a small X in the center of the pie.
  16. Bake for 45 minutes until apples are cooked through and crust is golden
  17. brown.
  18. Meanwhile, heat caramel in a pot. Let cool slightly, Stir through Baileys.
  19. Sliced, Serve with Baileys caramel sauce and vanilla ice cream. Enjoy!

Watch the recipe video here:

Baileys Cinnamon Swirl Caramel Apple Pie

Baileys Cinnamon Swirl Caramel Apple Pie

Posted by Twisted on Thursday, September 27, 2018

Uncategorized

Whole30 Coconut-Crusted Shrimp with Pineapple-Chili Sauce

Whole30 Coconut-Crusted Shrimp with Pineapple-Chili Sauce
Think just because you're in Whole30 mode, indulgent dishes like coconut-crusted shrimp are off limits? In this ingenious rendition, you can dig right in, all the way down to the delectable sweet-and-sour dipping sauce.
Author:
Cuisine: American
Recipe type: Main dish
Ingredients
  • 1 pound peeled and deveined large shrimp, tails removed
  • 1 cup unsweetened shredded coconut
  • Zest and juice of 1 lime
  • Kosher salt and freshly ground black pepper
  • 2 large egg whites
  • ¼ cup chopped fresh cilantro
  • ¼ teaspoon red pepper flakes
  • 1 small clove garlic
  • ½ small fresh pineapple, peeled, cored and roughly chopped
Instructions
  1. Special equipment: seven 6-inch skewers, soaked for 30 minutes if wood or bamboo
  2. Preheat the broiler and line a baking sheet with a wire rack. Thread 3 shrimp onto each of seven 6-inch skewers and set aside.
  3. Combine the coconut, lime zest, 1 teaspoon salt and a few grinds of black pepper in a shallow bowl. Brush the shrimp with the egg whites, then press into the coconut mixture until completely coated. Transfer to the prepared baking sheet and broil, flipping halfway through, until the coconut is crispy and golden brown and the shrimp are pink and no longer opaque in the middle, 3 to 4 minutes.
  4. Meanwhile, blend the cilantro, red pepper flakes, garlic, pineapple and lime juice in a blender until smooth and vibrant green. Serve alongside the shrimp.

Watch the recipe video here:

Coconut-Crusted Shrimp

Bring tropical flavors and spice to a cold winter day with these Coconut-Crusted Shrimp with Pineapple-Chili Sauce. (Bonus: they're Whole30-approved!) (Via You (Better))

Posted by Food Network on Friday, January 12, 2018