Showing 3,071 Result(s)
Main dish

INSTANT POT CHEESECAKE

INSTANT POT CHEESECAKE
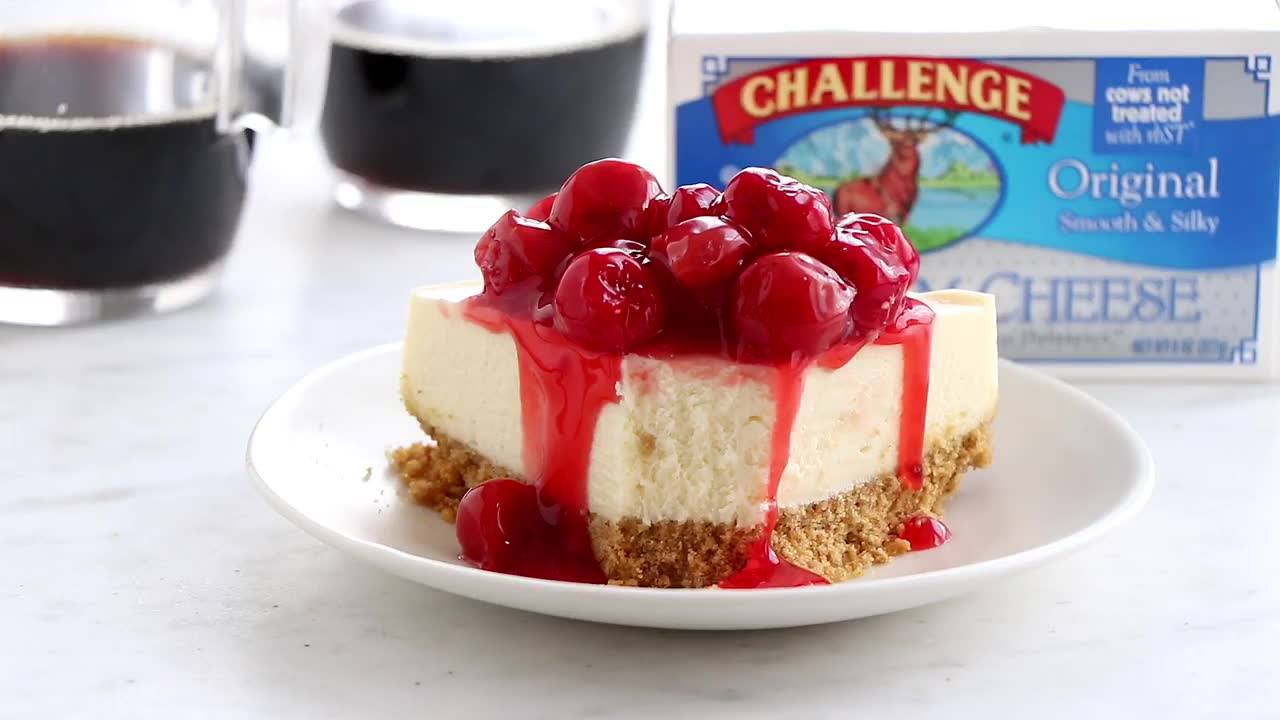
Instant Pot Cheesecake couldn’t be easier or more delicious. Serve it up with pie filling, fresh fruit, or chocolate ganache for the perfect dessert.
Author:
Cuisine: American
Recipe type: Main dish
Ingredients
  • 1 cup graham cracker crumbs
  • 2 tablespoons granulated sugar
  • 3 tablespoons Challenge Dairy Unsalted Butter, melted
  • 16 ounces Challenge Dairy Cream Cheese, room temperature
  • ½ cup granulated sugar
  • 2 large eggs, room temperature
  • 1 tablespoon all-purpose flour
  • ¼ cup heavy cream
  • 2 teaspoons pure vanilla extract
  • cherry pie filling, optional
Instructions
  1. Tightly wrap the bottom of 7-inch springform pan in foil and spray the inside of the pan with non-stick cooking spray.
  2. In a small mixing bowl, stir together the graham cracker crumbs, sugar, and melted butter. Press the crumbs into the bottom of the prepared pan.
  3. Place pan in freezer for 10-15 minutes.
  4. In the bowl of your stand mixer fitted with the paddle attachment, or in a large bowl with an electric mixer, beat the cream cheese until smooth. Add sugar and mix until combined. Add eggs, one at a time, fully incorporating each before adding the next. Making sure to scrape down the bowl in between each egg. Add in the flour, heavy cream, and vanilla and mix until smooth. Pour batter into prepared pan.
  5. Cover the top of the pan with a piece of foil.
  6. Pour 1½ cups of water into the Instant Pot and place the trivet in the bottom of the pot.
  7. Create a “foil sling” by folding a 20-inch long piece of foil in half lengthwise two times. This “sling” will allow you place and remove the springform pan with ease.
  8. Place the cheesecake pan in the center of the sling and carefully lower the pan into the Instant Pot. Fold down the excess foil from the sling to ensure the pot closes properly.
  9. Lock the lid into place and make sure the vent is closed “sealing”. Press the “Manual” button and cook on high pressure for 35 minutes.
  10. When the Instant Pot beeps, hit the “Keep Warm/Cancel” button to turn off the pressure cooker. Allow the pressure to release naturally for 10 minutes and then do a quick release to release any pressure remaining in the pot.
  11. Carefully unfold the foil sling and remove the cheesecake from the pot to a cooling rack using the foil sling “handles”.
  12. Uncover the cheesecake and allow it to cool to room temperature.
  13. Once the cheesecake has cooled, refrigerate it for at least 8 hours, or overnight.
  14. Before serving, top with pie filling and whipped cream if desired.

Watch the recipe video here:

INSTANT POT CHEESECAKE ✨ couldn’t be easier or more delicious!RECIPE HERE >> https://www.mybakingaddiction.com/instant-pot-cheesecake/

Posted by My Baking Addiction on Sunday, May 26, 2019

Main dish

Instant Pot Cheesy Creamy Ziti

Instant Pot Cheesy Creamy Ziti
It’s weekend taste on a weeknight schedule!
Author:
Cuisine: American
Recipe type: Main dish
Ingredients
  • 1¼ cups chicken (or vegetable) broth
  • 1 cup heavy cream
  • 2 tsp garlic, minced
  • 1 tsp kosher salt
  • ½ tsp pepper
  • 12 oz dried ziti pasta
  • 1½ cups pasta sauce
  • 1 cup parmesan cheese, shredded
  • 1 cup mozzarella cheese, shredded
  • 1½ cups fresh spinach, finely chopped (optional)
Instructions
  1. Layer broth, cream, garlic, salt, pepper and pasta, in that order, in the pot–do not stir. Ensure all pasta is submerged.
  2. Secure the lid, making sure the vent is closed.
  3. Using the display panel select the MANUAL function*. Use the +/- keys and program the Instant Pot for 6 minutes.
  4. When the time is up, let the pressure naturally release for 6 minutes, then quick-release the remaining pressure.
  5. Stir in the pasta sauce.
  6. Add the cheeses, ⅓ cup at a time, stirring after each additional until fully melted and incorporated.
  7. Serve hot garnished with finely chopped spinach (optional).

Watch the recipe video here:

It’s weekend taste on a weeknight schedule!RECIPE: http://chopsecrets.com/instant-pot-cheesy-creamy-ziti/

Posted by Chop Secrets on Sunday, May 26, 2019

Main dish

GRILLED LOBSTER TAILS WITH HERB GARLIC BUTTER

GRILLED LOBSTER TAILS WITH HERB GARLIC BUTTER
Grilled Lobster Tails topped with Herb Garlic Butter are a delicious delicacy, and grilling them is super quick and easy!
Author:
Cuisine: American
Recipe type: Main dish
Ingredients
  • 4 medium lobster tails, if frozen thawed
  • olive oil spray
  • pinch salt and pepper, to taste
  • lemon wedges, for serving
  • 2 tablespoons Herb Garlic Butter, see below
Compound Butter:
  • 8 tablespoons unsalted butter, 1 stick, at room temperature
  • ¼ cup not packed minced fresh herbs (Italian parsley, chives or basil)
  • 2 tablespoons minced garlic
  • ½ teaspoon kosher salt
  • 1 teaspoon lemon zest
  • 1 teaspoon lemon juice
  • Reynolds Kitchens Quick Cut Plastic Wrap
Instructions
For the butter:
  1. Place butter in a mixing bowl and use a rubber spatula to soften until it is very spreadable. Add remaining ingredients, and mix until thoroughly combined.
  2. Place compound butter on the center a sheet of a sheet of plastic wrap or parchment paper. Shape into a round log, and twist the ends to seal. Place butter in the refrigerator to harden, at least 30 to 60 minutes. Once solid, it will be easy to slice.
For the Lobster:
  1. Place each tail, shell side up, on a cutting board. Using a large sharp knife, cut through the shell directly down the center, beginning at the tail and down to where the body use to be.
  2. Season the exposed meat with pinch of salt and fresh cracked black pepper, to taste and spritz with olive oil.
  3. Preheat grill to medium high, clean and oil the grates. To cook, place each tail half directly on the grate flesh side down and close the hood. Cook about 1½ minutes, then turn 45 degrees (to cross-hatch), close the hood and grill for another 1½ minutes.
  4. Remove the tails to a pan and spread each one with ½ tablespoon of butter.
  5. Return the tails to the grill, flesh side up. Close the hood and allow them to grill for another 3 to 5 minutes depending on the size, until the tail meat is opaque and firm to the touch.
  6. Remove the tails, serve with lemon wedges.

Watch the recipe video here:

Add some steaks and make it Surf and Turf! 2 Freestyle Points 177 Calorieshttps://www.skinnytaste.com/grilled-lobster-tails-with-herb-garlic-butter/

Posted by Skinnytaste on Sunday, May 26, 2019

Dessert

Chocolate Ripple Cheesecake

Chocolate Ripple Cheesecake
Learn how Kiano mastered her ripple chocolate cheesecake, then try it yourself!
Author:
Cuisine: American
Recipe type: Dessert
Ingredients
  • 24 chocolate sandwich cookies
  • 4 tablespoons unsalted butter, melted
  • 32 oz cream cheese (900 g), 4 packages
  • ¾ cup sugar (150 g)
  • 1 teaspoon vanilla extract
  • 4 cups heavy cream (960 mL)
  • 1 ½ tablespoons gelatin powder
  • 2 cups semi sweet chocolate (340 g), melted, divided
Instructions
  1. Place cookies into a ziplock bag and crush using a rolling pin until fine crumbs form.
  2. Pour cookie crumbs into a bowl with melted butter and mix until well combined.
  3. Pour crust mixture into a 9-inch (23 cm) springform cake pan. Use a measuring up to press the cookies to form an even base. Cover and chill in the refrigerator for at least 20 minutes.
  4. In a large bowl, whisk together cream cheese, sugar and vanilla until smooth.
  5. Heat the heavy cream until hot, then add the gelatin and let it rest for 1 minute.
  6. Slowly whisk in the heavy cream into the cream cheese until smooth.
  7. Working quickly, divide the cheesecake batter in 4 bowls with 3 cups (720 ml) in one bowl, 2 cups (480 ml) in a second, 2½ cups (600 ml) in the third, and 1 cup (240 ml) in the fourth.
  8. In the second bowl, whisk in 1 tablespoon of melted chocolate. In the third bowl, whisk in 3 tablespoons of melted chocolate, and in the fourth bowl, whisk in 2 tablespoons of chocolate. Each bowl should vary in color from one another.
  9. To assemble the cheesecake, slowly pour the contents of bowl 1 into the center of the pan. Once batter has spread repeat with the remaining bowls in numerical order. If your bowls have sat out too long, and aren't liquidy, microwave for 30 seconds before pouring.
  10. Cover the top of the pan tightly with plastic wrap and chill for 4 hours or overnight in the fridge before serving.
  11. Enjoy!

Watch the recipe video here:

Learn how Kiano mastered her ripple chocolate cheesecake, then try it yourself! Get the recipe: https://tasty.co/recipe/chocolate-ripple-cheesecake

Posted by Tasty on Thursday, June 20, 2019

Dessert

Fudgiest Dairy-Free Chocolate Cake

Fudgiest Dairy-Free Chocolate Cake
Fudgiest Dairy-Free Chocolate Cake recipe.
Author:
Cuisine: American
Recipe type: Dessert
Ingredients
FROSTING
  • 30 oz full-fat coconut milk (880 mL), 2 cans
  • 3 cups dairy-free chocolate chunk (510 g)
  • ¼ cup coconut oil (60 g), melted
  • 2 cups powdered sugar (240 g)
CAKE
  • 3 cups whole wheat flour (390 g)
  • 1 ½ cups dark cocoa powder (180 g)
  • 1 cup sugar (200 g)
  • 1 tablespoon baking soda
  • 1 ½ teaspoons baking powder
  • 1 pinch salt
  • 3 cups almond milk (710 mL)
  • 1 cup coconut oil (240 g), melted
  • 1 ½ cups applesauce (380 g)
  • 1 ½ cups maple syrup (505 g)
  • 1 tablespoon apple cider vinegar
  • 1 tablespoon vanilla extract
  • berry, of choice, for garnish
Instructions
  1. In a microwave-safe measuring cup, or in a small pot on the stove, heat the coconut milk until hot, but not boiling (about 2 minutes in the microwave).
  2. Place the dairy-free chocolate in a large bowl and pour the hot coconut milk over it, allowing the milk to melt the chocolate. Mix well to combine.
  3. Once the chocolate is melted, add the coconut oil and powdered sugar. Beat with a hand mixer or whisk until smooth.
  4. Cover and refrigerate overnight.
  5. Preheat the oven to 350°F (180°C). Grease 3 separate 8-inch (20-cm) round cake pans and set aside.
  6. In a large bowl, add the whole wheat flour, dark cocoa powder, sugar, baking soda, baking powder, and salt. Whisk to combine and set aside.
  7. In a separate large bowl, add the almond milk, coconut oil, applesauce, maple syrup, apple cider vinegar, and vanilla extract. Whisk to combine.
  8. In two batches, add the dry mixture to the wet mixture, folding with a spatula until combined. Some clumps are okay.
  9. Divide the batter evenly between the 3 pre-greased cake pans and bake for 35–45 minutes, or until a toothpick comes out almost entirely clean. Cool completely.
  10. Remove the frosting from the fridge and mix it up well.
  11. Choose which cake will be your bottom layer and cover evenly with about 1 cup (115 G) of frosting. Top with the second layer, frosting evenly again. Add the final layer and frost the top and the sides of the cake generously, topping with berries of choice for garnish.
  12. Enjoy!

Watch the recipe video here:

This is the FUDGIEST non-dairy chocolate cake ?FULL RECIPE: https://tasty.co/recipe/fudgiest-dairy-free-chocolate-cake

Posted by BuzzFeed Food on Thursday, June 20, 2019

Main dish

Egg Roll Noodle Bowl

Egg Roll Noodle Bowl
We love Asian egg rolls, but they can be challenging to make. Simplify everything with this deconstructed egg roll made on the stovetop and served in a bowl.
Author:
Cuisine: American
Recipe type: Main dish
Ingredients
  • 1 tablespoon sesame oil
  • ½ pound ground pork
  • 1 tablespoon soy sauce
  • 1 garlic clove, minced
  • 1 teaspoon ground ginger
  • ½ teaspoon salt
  • ¼ teaspoon ground turmeric
  • ¼ teaspoon pepper
  • 6 cups shredded cabbage (about 1 small head)
  • 2 large carrots, shredded (about 2 cups)
  • 4 ounces rice noodles
  • 3 green onions, thinly sliced
  • Additional soy sauce, optional
Instructions
  1. In a large cast-iron or other heavy skillet, heat oil over medium-high heat; cook and crumble pork until browned, 4-6 minutes. Stir in soy sauce, garlic and seasonings. Add cabbage and carrots; cook until vegetables are tender, stirring occasionally, 4-6 minutes longer.
  2. Cook rice noodles according to package directions; drain and immediately add to pork mixture, tossing to combine. Sprinkle with green onions. If desired, serve with additional soy sauce.

Watch the recipe video here:

Devour this for dinner tonight! Get the recipe for Egg Roll Noodle Bowl here–> https://trib.al/8nxd7bY

Posted by Taste of Home on Thursday, June 20, 2019

Dessert

Instant Pot Bourbon Sticky Toffee Pudding

Instant Pot Bourbon Sticky Toffee Pudding
Sophisticated enough to serve at your next dinner party.
Author:
Cuisine: American
Recipe type: Dessert
Ingredients
  • ¾ cup chopped Medjool dates (about 7 dates)
  • 6 tbsp hot water
  • 2 tbsp bourbon
  • ½ tsp baking soda
  • 3 tbsp butter
  • 2 tbsp milk
  • ⅔ cup flour
  • 1 tsp baking powder
  • ½ tsp cinnamon
  • ¼ tsp salt
  • Pinch of nutmeg
  • 1 egg, beaten
  • 1½ cups water
  • ¼ cup caramel sauce, warmed
Instructions
  1. In a small bowl, combine dates, hot water, bourbon and baking soda,. Set aside.
  2. In a medium bowl, combine butter and milk. Microwave on low until butter is melted.
  3. Add flour, baking powder, cinnamon, salt and nutmeg to the milk mixture. Stir until uniform.
  4. Stir in beaten egg and bourbon-date mixture.
  5. Coat the insides of four ramekins with nonstick spray and divide batter evenly amongst the ramekins.
  6. Cover each ramekin with foil coated in nonstick spray (sprayed-side down).
  7. Place the steam rack in the Instant Pot followed by 1½ cups water. Arrange the ramekins on the steam rack. You may have to stack three on the bottom and one on the top. Secure the lid, making sure the vent is closed.
  8. Using the display panel select the STEAM function*. Use the +/- keys and program the Instant Pot for 20 minutes.
  9. When the time is up, let the pressure naturally release for 10 minutes, then quick-release the remaining pressure.
  10. Carefully remove the ramekins from the pot. Run a knife around the edges to loosen, then invert onto a serving dish.
  11. Drizzle each pudding with caramel sauce. Serve warm.

Watch the recipe video here:

Sophisticated enough to serve at your next dinner party.RECIPE: http://chopsecrets.com/instant-pot-bourbon-sticky-toffee-pudding/

Posted by Chop Secrets on Thursday, June 20, 2019

Drink

BA’s Best Piña Colada

BA's Best Piña Colada
Freezing fresh pineapple definitely makes the best impact flavor-wise in this piña colada recipe, but you can use 8 oz. frozen pineapple if you wish. This is part of BA's Best, a collection of our essential recipes.
Author:
Cuisine: American
Recipe type: Drinks
Ingredients
  • ½ fresh pineapple, peeled, cut into 1½-inch pieces
  • 6 ounces sweetened cream of coconut (preferably Coco López)
  • 2 ounces unsweetened coconut milk
  • 8 ounces white rum
  • 2 tablespoons fresh lime juice
  • 2 ounces dark rum (optional)
  • Maraschino cherries and lime wedges (for serving)
Instructions
  1. Place pineapple pieces in a resealable plastic bag, laying them flat. Freeze until solid, at least 3 hours.
  2. Shake cream of coconut and coconut milk in their cans before measuring. Purée pineapple, cream of coconut, coconut milk, white rum, lime juice, and 3 cups ice (about 15 oz.) in a blender until smooth. Transfer blender cup to freezer and freeze until mixture is thickened (it should be the consistency of a milkshake), 25–35 minutes.
  3. Blend again until mixture is the perfect slushy frozen drink consistency. Divide among glasses. Top off each with ½ oz. dark rum, if using, and garnish each with a cherry and lime wedge.
Do Ahead:
  1. Pineapple can be chopped 3 months ahead. Keep frozen.

Watch the recipe video here:

If you like getting caught in the rain. Make em: http://bonap.it/EXqHFnT

Posted by Bon Appétit Magazine on Thursday, June 20, 2019

Main dish

Awesome Crispy Baked Chicken Wings

Awesome Crispy Baked Chicken Wings
Incredibly tasty variation of baked chicken wings with no marinade - just butter, garlic, and herbs. Great for the low-carb eater!
Author:
Cuisine: American
Recipe type: Main dish
Ingredients
  • 4 pounds chicken wings
  • ½ cup butter
  • 2 cloves garlic, minced
  • 1 cup grated Parmesan cheese
  • 1 tablespoon dried parsley
  • 1 tablespoon dried oregano
  • 2 teaspoons ground paprika
  • 1 teaspoon salt
  • ½ teaspoon ground black pepper
Instructions
  1. Preheat oven to 350 degrees F (175 degrees C). Line a shallow baking dish with aluminum foil and grease lightly.
  2. Cut tips from chicken wings and discard. Cut between the joint to separate each wing into 2 pieces.
  3. Combine butter and garlic in a small saucepan over low heat; heat until butter is melted and garlic is fragrant, 3 to 5 minutes.
  4. Mix Parmesan cheese, parsley, oregano, paprika, salt, and pepper together in a shallow bowl.
  5. Dip chicken wing pieces in melted butter mixture; coat with Parmesan cheese mixture in the bowl. Arrange in the prepared baking dish. Drizzle any remaining butter on top.
  6. Bake in the preheated oven until skin is browned and juices run clear, about 1 hour.

Watch the recipe video here:

Awesome Crispy Baked Chicken Wings: https://trib.al/dFWMYXS

Posted by Allrecipes on Thursday, June 20, 2019

Main dish

Seafood Casserole As Made By Betsy’s Gammy

Seafood Casserole As Made By Betsy’s Gammy
Take your taste buds on a trip to the East Coast with this creamy casserole from Betsy’s grandmother. Get creative by using your favorite seafood, but if you decide to stick with shrimp and scallops, keep an eye on them, as they cook quickly. For extra crunch, don’t over-pulse the bread crumbs. Serve the casserole with a light salad and watch as your guests gush over what’s sure to be your new summer staple.
Author:
Cuisine: American
Recipe type: Main dish
Ingredients
  • 1 lb sourdough bread (455 g), 1 medium load, roughly torn
  • 8 tablespoons unsalted butter, 1 stick, melted, divided
  • 1 cup shredded cheddar cheese (100 g)
  • 3 teaspoons kosher salt, divided, plus more to taste
  • 4 cups dry white wine (960 mL), plus 1 tablespoon, divided
  • 1 lb shrimp (455 g), 16/20 count, peeled and deveined
  • 1 lb large scallops (455 g)
  • 1 lb jumbo lump crabmeat (455 g)
  • 2 cups half & half (480 mL)
  • 3 tablespoons all-purpose flour
  • 1 teaspoon worcestershire sauce
  • 1 teaspoon paprika
  • 1 tablespoon lemon juice
  • 2 tablespoons ketchup
  • 28 oz artichoke heart (795 g), 2 cans, drained and chopped
  • fresh chive, chopped, for garnish
  • lemon wedge, for serving
Instructions
  1. Preheat the oven to 350˚F (180˚C).
  2. Spread the bread in a single layer on a rimmed baking sheet and bake for 10 minutes, until lightly toasted. Let cool to room temperature. Leave the oven on.
  3. Add the toasted bread to a food processor and pulse until finely ground. You should have about 4 cups (460 G) of bread crumbs.
  4. In a large bowl, combine the bread crumbs, 4 tablespoons of melted butter, the cheddar cheese, and 1 teaspoon of salt and toss to combine. Set aside.
  5. In a medium pot, combine 4 cups (960 ml) of white wine and a generous pinch of salt and bring to a boil over medium-high heat. Add the shrimp and cook until bright pink, about 1 minute. Use a spider or slotted spoon to transfer the shrimp to a colander to drain.
  6. Return the wine to a boil. Add the scallops and cook until just opaque, about 2 minutes. Transfer the scallops to a colander to drain.
  7. Chop the shrimp and scallops into bite-size pieces. Transfer to large bowl, along with the crab and 1 teaspoon of salt. Toss to combine.
  8. In a liquid measuring cup or medium bowl, whisk together the half-and-half, 3 tablespoons of melted butter, the flour, Worcestershire sauce, paprika, lemon juice, ketchup, remaining tablespoon of white wine, and remaining teaspoon of salt.
  9. Brush the remaining tablespoon of melted butter in a 9 x 13-inch (22 x 33 cm) baking dish.
  10. Scatter the artichokes in an even layer over the bottom of the baking dish. Scoop the seafood mixture over the artichokes. Pour the sauce over the seafood. Top with the bread crumb mixture.
  11. Bake the casserole for 20-25 minutes, or until bubbling and golden brown.
  12. Top with chives and serve with lemon wedges.
  13. Enjoy!

Watch the recipe video here:

Watch as Betsy shares her grandma's delicious seafood casserole recipe ?❤️Get the recipe: https://tasty.co/recipe/seafood-casserole-as-made-by-betsys-gammy

Posted by BuzzFeed Food on Friday, June 21, 2019