Showing 879 Result(s)
Dessert

Reese’s Pieces Espresso Poke Cake Is The Perfect Pick-Me-Up

Reese's Pieces Espresso Poke Cake Is The Perfect Pick-Me-Up
I couldn't wait any longer for Reese's to make a coffee flavor for one of their delicious treats! So I sprang into action with one of the easiest desserts ever......Poke cake!
Author:
Cuisine: American
Recipe type: Dessert
Ingredients
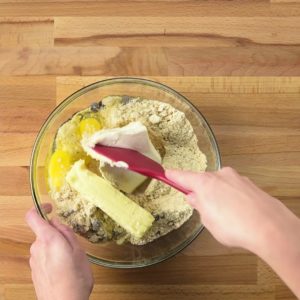
  • 1 box chocolate fudge cake mix, plus ingredients required on the box
  • 3 tablespoons instant espresso powder, divided
  • 2 cups milk
  • 1 cup creamy peanut butter
  • 1 box chocolate fudge instant pudding
  • 2 cups chocolate chips
  • ¾ cup heavy cream
  • 8 ounces Cool Whip
  • 12 Reese's peanut butter cups, quartered
  • Additional instant espresso powder, to garnish
Instructions
  1. Preheat oven to 350 degrees. Prepare a 9x13 baking pan with nonstick spray.
  2. Prepare the cake mix according to box directions, stirring in 2 tablespoons instant espresso powder until well-combined.
  3. Pour batter into prepared baking dish and bake 25-30 minutes, or until a toothpick inserted comes out with a few crumbs.
  4. Remove the cake from the oven, and using the handle of a wooden spoon, poke holes all over the top.
  5. Working quickly, in a medium mixing bowl, whisk together the milk, peanut butter, and instant pudding until just-combined. Pour pudding mixture evenly over the cake, smoothing it into all the holes. Chill the cake for 4 hours.
  6. Microwave 2 cups chocolate chips, heavy cream, and 1 tablespoon of instant espresso powder on 30-second intervals, stirring in between, until smooth and well-combined, about 1 minute total. Pour chocolate mixture evenly over the cake, then chill once more until set.
  7. Top with Cool Whip, Mini Reese's Pieces and lightly dust with instant espresso powder.

Watch the recipe video here:

Reese's Coffee Poke Cake is everything you need in one dessertRecipe: http://sha.red/zDZjv

Posted by Shared Food on Saturday, May 4, 2019

Dessert

Cookie Monster Brownies Are So Cute and Ready for Your Next Themed Party

Cookie Monster Brownies Are So Cute and Ready for Your Next Themed Party
Cookie Monster is all the rage this year, and these Cookie Monster Brownies are the perfect addition for a themed party, Halloween, or really, any old day when you're craving a novelty treat to take care of that sweet tooth.
Author:
Cuisine: American
Recipe type: Dessert
Ingredients
For the brownies:
  • 16 Oreo cookies
  • 1 box brownie mix + ingredients required on the box
  • 8 ounces refrigerated chocolate chip cookie dough
For the frosting:
  • ½ cup salted butter
  • ½ teaspoon vanilla extract
  • 2 tablespoons heavy cream
  • 2 cups powdered sugar
  • 6 Oreo cookies, crushed
  • Blue food coloring
For the chocolate layer:
  • ½ cup semisweet chocolate chips
  • ¼ cup heavy cream
  • 1 tablespoon light corn syrup
  • Mini chocolate chip cookies, for garnish
  • Mini Oreo cookies, for garnish
  • Candy eyeballs
Instructions
  1. Preheat oven to 350 degrees. Prepare an 8x8 baking dish with parchment paper and nonstick spray.
  2. To make the brownie layer, spread Oreo cookies in a single layer in the bottom of the prepared baking dish.
  3. Prepare brownie mix according to box instructions in a large mixing bowl, then pour the batter evenly over the Oreo cookies.
  4. Break the cookie dough off into pieces and press randomly into the brownie mix.
  5. Bake about 30 minutes, or until a toothpick inserted comes out with chocolatey crumbs. Cool completely on a wire rack.
  6. For the frosting, beat together the butter, cream, and vanilla extract until smooth. Add the powdered sugar in slowly, then beat another couple of minutes until well-combined. Fold in the crushed Oreos, then add the blue food coloring until frosting reaches your desired shade of blue. Spread the frosting evenly on top of the cooled brownie layer.
  7. To make the chocolate layer, microwave together the chocolate chips and heavy cream on 20-second intervals, stirring in between, until smooth.
  8. Add in the light corn syrup and allow to cool and thicken.
  9. Drizzle the chocolate sauce over the frosting layer, then press mini chocolate chip and Oreo cookies, then place 2 candy eyeballs in random spots on top.
  10. Slice into bars and serve. Enjoy!

Dessert

Instant Pot Blackberry Cobbler

Instant Pot Blackberry Cobbler
This tasty, easy recipe uses only five ingredients.
Author:
Cuisine: American
Recipe type: Dessert
Ingredients
  • 12 oz fresh blackberries, patted dry
  • 7 oz yellow cake mix (about half the package)
  • ¼ cup butter, softened and cut into pieces
  • 1 tsp lemon zest
  • Dash nutmeg
  • 1 cup water
Instructions
  1. Coat the inside of a 1.5 qt casserole (these fit perfectly: https://amzn.to/2DtfXM4) with non-stick spray. Place blackberries in the dish.
  2. In a medium bowl, combine cake mix, butter, lemon zest, and nutmeg. Use a pastry knife to cut the butter into the other ingredients until it resembles coarse crumbs.
  3. Spread the crumb mixture over the blackberries in an even layer. Cover the dish loosely with foil – do not seal.
  4. Pour one cup of water in the Instant Pot and insert the steam rack. Carefully lower the baking dish on to the steam rack.
  5. Secure the lid, making sure the vent is closed.
  6. Using the display panel select the MANUAL function*. Use the +/- keys and program the Instant Pot for 10 minutes.
  7. When the time is up, let the pressure naturally release for 10 minutes, then quick-release the remaining pressure.
  8. Carefully remove the dish and set it under the broiler, uncovered, until golden, 3-5 minutes.
  9. Serve warm with whipped cream or vanilla ice cream.

Watch the recipe video here:

This tasty, easy recipe uses only five ingredients.RECIPE: http://chopsecrets.com/instant-pot-blackberry-cobbler/

Posted by Chop Secrets on Saturday, August 24, 2019

Dessert

Giant Whoopie Pie

Giant Whoopie Pie
Your favorite chocolate cookie sandwich, now in giant form! When transferring the cake batter to the pans, spread a thinner layer toward the edges, keeping the center thicker. The domed tops will replicate the classic whoopie pie shape. After the pillowy cake rounds cool, sandwich with the fluffy marshmallow filling, then slice and serve!
Author:
Cuisine: American
Recipe type: Dessert
Ingredients
WHOOPIE PIE
  • nonstick cooking spray, for greasing
  • 4 ½ cups all purpose flour (560 g)
  • 1 cup cocoa powder (120 g)
  • 1 teaspoon espresso powder
  • 1 ½ teaspoons kosher salt
  • 1 tablespoon baking soda
  • 2 cups brown sugar (440 g)
  • 2 cups water (480 mL)
  • 1 tablespoon white vinegar
  • 1 tablespoon vanilla extract
  • 1 cup vegetable oil (240 mL)
MARSHMALLOW FILLING
  • 16 tablespoons unsalted butter, softened
  • 13 oz marshmallow fluff (370 g)
  • 2 cups powdered sugar (240 g)
Instructions
  1. Preheat the oven to 350˚F (180˚C). Grease and line 2 10-inch (25 cm) round cake pans with parchment paper.
  2. Make the whoopie pie: In a large bowl, whisk together the flour, cocoa powder, espresso powder, salt, baking soda, and brown sugar, making sure there are no lumps.
  3. Make a well in the center of the dry ingredients, then pour in the water, vinegar, vanilla and oil to the well. Whisk to combine, working slowly to avoid clumps.
  4. Scoop 2½ cups (600 g) of batter into the center of each cake pan. Use an offset spatula or a knife to spread the edges of the batter just to the edges of the pans. Do not level the top of the cake, to help create a domed shape.
  5. Bake for 30 minutes, or until a toothpick inserted in the center of the cakes comes out clean. Let cool in the pans for 10 minutes, then carefully transfer to a wire rack to cool completely.
  6. Make the filling: In a large bowl, combine the butter and marshmallow fluff and cream with an electric hand mixer for 2–3 minutes, until fully combined. Sift in the powdered sugar, then beat for another 2–3 minutes, until light and fluffy. Transfer the filling to a piping bag or zip-top bag. Cut a 2-inch (5 cm) wide opening on a corner.
  7. Invert a cake onto a serving platter so the domed side is facing down. Pipe a thick spiral of filling onto the cake, leaving a ¼-inch (½ cm) border around the edge, and smooth with an offset spatula. Place the remaining cake on top of the filling, domed side up, and push down slightly to attach.
  8. Slice and serve.
  9. Enjoy!

Watch the recipe video here:

Your favorite nostalgic chocolate cookie sandwich, now in giant form!Get the recipe: https://tasty.co/recipe/giant-whoopie-pie

Posted by Tasty on Friday, August 30, 2019

Dessert

Apple Pie Cheesecake

Apple Pie Cheesecake
Apple Pie Cheesecake recipe.
Author:
Cuisine: American
Recipe type: Dessert
Ingredients
CHEESECAKE
  • 2 pie crusts
  • 24 oz cream cheese (680 g)
  • 1 cup sugar (200 g)
  • 1 cup sour cream (230 g)
  • ½ teaspoon vanilla extract
  • ½ teaspoon ground cinnamon
  • ½ teaspoon ground nutmeg
  • 3 eggs
APPLE PIE FILLING
  • 3 medium apples, peeled, cored and cubed
  • 1 cup water (240 mL)
  • ⅓ cup sugar (65 g)
  • 1 teaspoon ground cinnamon
  • ½ teaspoon ground nutmeg
  • 2 tablespoons cornstarch
Instructions
  1. Preheat oven to 300˚F (150˚C).
  2. Line a springform pan with a pie crust, pressing it around the sides of the pan until smooth.
  3. In a medium bowl, beat the cream cheese, sugar, vanilla, cinnamon, and nutmeg until smooth.
  4. Add the sour cream and mix together. Add in one egg at a time, whisking until smooth.
  5. Pour mixture into the springform pan and bake for 1 hour and 15 minutes.
  6. After baking, turn off the oven and let the cheesecake cool inside for 1 hour without opening the oven door.
  7. Turn up the oven temperature to 425˚F (220˚C).
  8. In a saucepan, add the apples, sugar, cinnamon, nutmeg, cornstarch, and water over medium-low heat. Stir occasionally until apples are soft (about 10 minutes), then remove from heat. Let cool.
  9. Once cool, spread apple pie filling over cheesecake.
  10. Cut the other pie crust in to ¼-inch (6 mm) strips and make a lattice pattern across the top.
  11. Brush with egg wash.
  12. Bake for 25 minutes, until golden brown.
  13. Chill until set then serve.
  14. Enjoy!

Watch the recipe video here:

This apple pie cheesecake is the best of both worlds ?FULL RECIPE: https://tasty.co/recipe/apple-pie-cheesecake

Posted by Proper Tasty on Tuesday, September 3, 2019

Dessert

Grilled Glazed Ham

Grilled Glazed Ham
This method of grilling and glazing ham can be used with any glaze. Just make sure to heat your ham up over medium indirect heat before brushing it on. (Grill times will be affected by the temperature outside and the wind.)
Author:
Cuisine: American
Recipe type: Dessert
Ingredients
  • One 8- to 10-pound bone-in spiral-cut smoked ham
  • One 20-ounce can pineapple rings, rings and juice separated
  • 1 packed cup dark brown sugar
  • Kosher salt
  • 2 tablespoons apple cider vinegar
  • 10 maraschino cherries, stems removed
Instructions
Special equipment: heavy-duty foil; a small disposable aluminum roaster
  1. Prepare a grill for medium indirect heat. For gas grills (with 3 or more burners), turn all the burners to medium-high heat; after about 15 minutes turn off one of the middle burners and turn the remaining burners down to medium. For charcoal grills, bank one chimney starter-full of lit and ashed-over charcoal briquettes to one side of the grill. Set up a drip pan on the other side to avoid flare-ups. (Be sure to consult the grill manufacturer's guide for best results.)
  2. Cut three 12-inch pieces of heavy-duty foil. Working one piece at a time, fold in half lengthwise. Fold in half again and fold in half one more time; you should have a long strip of foil about 1½ inches wide. Twist the two ends of the strip in opposite directions making a twisted rope of foil. Repeat with the remaining two pieces of foil. Set all three ropes in the center of a small disposable aluminum roaster about 1 inch apart and place the ham on top. (The ropes will prevent the bottom of the ham from burning.) Cover tightly with foil and place over indirect heat (if your grill has a thermometer, it should be at around 325 degrees F). Cover the grill and cook until just warmed through, 35 to 45 minutes.
  3. Meanwhile, boil the pineapple juice, brown sugar and 1 teaspoon salt in a medium saucepan over medium-high heat until the glaze is very thick and has the consistency of honey, 8 to 10 minutes. Stir in the vinegar and remove from the heat.
  4. Carefully remove the foil cover from the ham and discard; baste with the glaze, making sure to get in between each slice. Increase the heat to medium-high and move the ham over direct heat. Cover the grill and cook until the glaze begins to bubble, about 5 minutes. Baste again with the remaining glaze, then cover and cook until the glaze bubbles, 5 minutes more. Continue basting and cooking until the ham is shiny and the glaze begins to brown, about 10 more minutes. Remove from the grill and let sit 10 minutes, uncovered, before serving.
  5. Meanwhile, grill the pineapple rings over direct heat until charred on one side, 4 to 5 minutes. Let cool. Arrange the pineapple rings on the uncut portion of the ham, grill marks facing up, and use toothpicks to secure them in place. Place a cherry in the center of each ring and secure with a toothpick.
  6. Serve the ham with any accumulated juices, remaining pineapple rings and cherries on the side.

Watch the recipe video here:

Make this year's holiday ham on the GRILL for smoky goodness! #ChristmasInJulySave the Recipe of the Day: https://foodtv.com/302aNNu!

Posted by Food Network on Monday, July 8, 2019

Dessert

Potluck Banana Cake

Potluck Banana Cake
I found this recipe more than five years ago and have been making it for family gatherings ever since. The coffee-flavored frosting complements the moist banana cake.
Author:
Cuisine: American
Recipe type: Dessert
Ingredients
  • ½ cup butter, softened
  • 1 cup sugar
  • 2 large eggs
  • 1 teaspoon vanilla extract
  • 2 cups all-purpose flour
  • 2 teaspoons baking soda
  • ½ teaspoon salt
  • 1-1/2 cups mashed ripe bananas (about 3 medium)
  • 1 cup sour cream
COFFEE FROSTING:
  • ⅓ cup butter, softened
  • 2-1/2 cups confectioners' sugar
  • 2 teaspoons instant coffee granules
  • 2 to 3 tablespoons whole milk
Instructions
  1. In a large bowl, cream butter and sugar until light and fluffy. Add eggs, one at a time, beating well after each addition. Stir in vanilla. Combine the flour, baking soda and salt; add to creamed mixture alternately with bananas and sour cream, beating well after each addition.
  2. Pour into a greased 13x9-in. baking dish. Bake at 350° for 35-40 minutes or until a toothpick inserted in the center comes out clean. Cool completely on a wire rack.
  3. For frosting, in a small bowl, beat butter and confectioners' sugar until smooth. Dissolve coffee granules in milk; add to butter mixture and beat until smooth. Spread over cake.

Watch the recipe video here:

Coffee-flavored frosting makes the perfect topping for this moist banana cake.Get the Potluck Banana Cake recipe here–> https://trib.al/rgJzpN5

Posted by Taste of Home on Sunday, June 30, 2019

Dessert

Soft-Baked Chocolate Chip-Cream Cheese Cookie Bars

Soft-Baked Chocolate Chip-Cream Cheese Cookie Bars
Everyone’s all-time favorite cookie reimagined as a chewy-soft cookie bar!
Author:
Cuisine: Italian
Recipe type: Dessert
Ingredients
  • 1 pouch (17.5 oz) Betty Crocker™ chocolate chip cookie mix
  • ½ cup butter, softened
  • 4 oz (half 8-oz package) cream cheese, softened
  • 1 egg
Instructions
  1. Heat oven to 350°F. Spray bottom and sides of 13x9-inch pan with cooking spray.
  2. In large bowl, stir all ingredients until soft dough forms. Spread dough evenly in pan.
  3. Bake 20 to 24 minutes or until toothpick inserted in center comes out clean. Cool completely on cooling rack, about 1 hour. Cut into 6 rows by 4 rows. Store in airtight container.

Watch the recipe video here:

Everyone’s all-time favorite cookie reimagined as a chewy-soft cookie bar!Get the recipe:…

Posted by Betty Crocker on Sunday, June 30, 2019