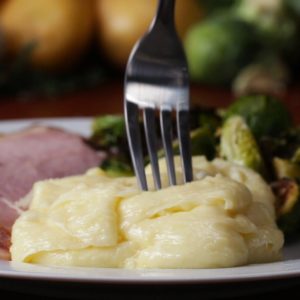
Aligot (Cheesy Potatoes)
Aligot (Cheesy Potatoes)
Aligot (Cheesy Potatoes)
Author: The Chef
Cuisine: American
Recipe type: Main dish
Ingredients
- 1 ½ lb yukon gold potato (680 g), peeled and cut into 1-inch (2 cm) pieces
- 2 cloves garlic, peeled
- 5 cups cold water (1.18 L)
- salt, to taste
- ½ cup butter (115 g), cubed
- 1 cup heavy cream (240 mL)
- 2 ½ cups shredded cheese (250 g), such as Swiss, Comté, Fontina or Gruyère
Instructions
- In a large pot over medium-high heat, add the potatoes, garlic, and cover with cold water. Add a big pinch of salt.
- Bring to a boil, reduce the heat to medium-low and simmer until the potatoes are fork-tender, about 20 minutes.
- Drain potatoes and garlic in a colander and press them through the holes of the colander with a metal spoon back into the pot. Alternatively, use a potato ricer.
- Add the butter and one clove of garlic to the potatoes and stir over medium-low heat with a rubber spatula until melted and smooth.
- Pour in the heavy cream and stir again until combined.
- Gradually add in the cheese, stirring between each addition, until completely melted.
- Continue stirring the potatoes until smooth, thick, and elastic.
- Begin to stretch the potatoes upwards with the spatula. If the mixture is breaking, add in more cheese. If the mixture is too thick add in more cream.
- Serve immediately as a side with roasted veggies or a meat of choice, or alone with fresh chopped garlic!
- Enjoy!
Watch the recipe video here:
Just look at how mesmerizing these cheesy potatoes are ?!Get the recipe: https://tasty.co/recipe/aligot-cheesy-potatoes
Posted by Tasty on Thursday, June 20, 2019