Dessert

Christmas Tree Cookie Forest

Christmas Tree Cookie Forest
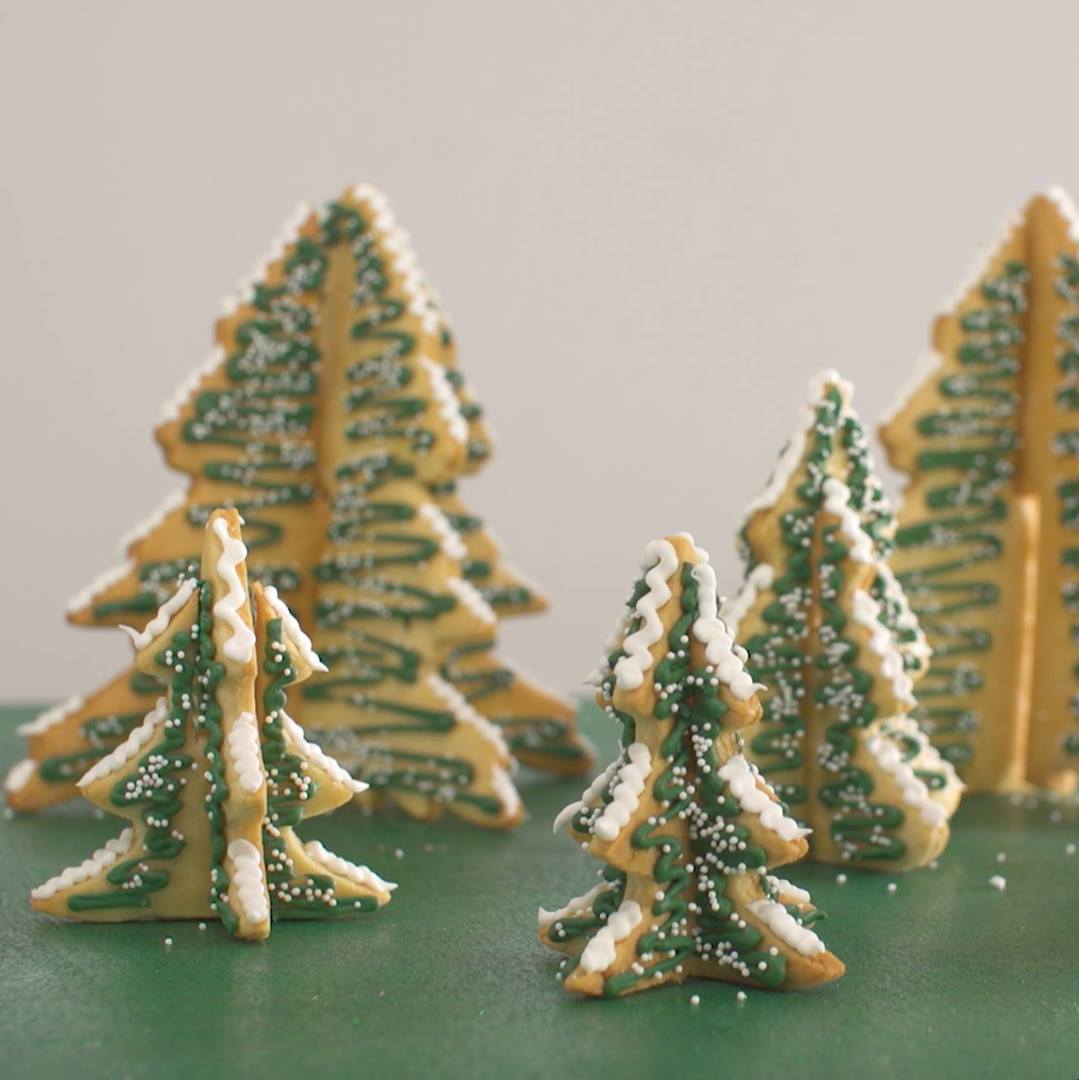
Make your cookie platter vertical (and extra-impressive!) with this 3D Christmas tree forest. Chilling the dough after it's cut helps the shapes stay sharp during baking.
Author:
Cuisine: American
Recipe type: Dessert
Ingredients
  • Dough:
  • 4¾ cups all-purpose flour, plus more for dusting (see Cook's Note)
  • ¼ teaspoon baking soda
  • ¼ teaspoon fine salt
  • 2 teaspoons pure vanilla extract
  • 3 large eggs
  • 3 sticks (24 tablespoons) unsalted butter, at room temperature
  • 1 cup granulated sugar
  • ½ cup confectioners' sugar
  • Royal Icing:
  • 1 pound (about 3½ cups) confectioners' sugar, plus more for thickening and decorating the forest
  • 2 tablespoons meringue powder
  • 1 teaspoon pure vanilla extract
  • Forest green gel food coloring
  • White sprinkles, for decorating
Instructions
Special equipment: tree-shaped cookie cutters (we used 4-inch, 6-inch and 8-inch cutters); 2 pastry bags; 2 small no. 4 round tips
  1. For the dough: Whisk together the flour, baking soda and salt in a medium bowl. Beat together the vanilla and 2 eggs in a small bowl.
  2. Beat the butter, granulated sugar and confectioners' sugar in a large bowl with an electric mixer on low speed. Once they are incorporated, increase the speed to medium and, scraping down the sides of the bowl as needed, beat until slightly creamy, about 3 minutes.
  3. Reduce the speed to low, slowly pour in the egg mixture and beat until combined. Add the flour mixture in 3 additions, increasing the speed as the dough gets thicker to keep the beaters spinning and scraping down the sides of the bowl and the beaters as needed. Once all the flour is just incorporated, increase the speed to medium-high and beat until the dough is very smooth, about 5 minutes.
  4. Turn the dough out of the bowl and bring it together on a clean surface. Divide into 2 pieces. Shape each piece into a flat square and wrap in plastic. Refrigerate for at least 3 hours or up to overnight.
  5. To cut and bake the forest: Position racks in the upper and lower thirds of the oven and preheat to 350 degrees F. Line 3 baking sheets with parchment.
  6. Dust your work surface with flour and roll out a piece of dough until about ¼-inch thick. Keep the other piece refrigerated while you work. Punch out shapes in the dough with tree cookie cutters of various sizes and cut off the dough trunks; for every 3D tree you will need 2 tree cutouts of the same size so punch out the shapes in pairs. For our forest we used 4-inch, 6-inch and 8-inch cutters. Put the trees on the prepared baking sheets and chill while you roll and cut trees from the remaining dough. Combine the scraps of the 2 squares. Chill again, reroll and cut out more trees You should have 8 to 10 pairs of trees, depending on the size of your cutters. Freeze the cutout cookies for at least 30 minutes.
  7. Rearrange the cookies on the baking sheets so that the pairs are next to each other. For the first cookie of each pair, use a sharp paring knife to cut a ½-inch-wide slot from the bottom to a little more than halfway up the cookie. For the second cookie of each pair, cut a similar slot but from the top of the tree down to a little past the middle. You will fit the cookies together with these slots after they are baked. Return the cookies to the freezer for 30 minutes more.
  8. Whisk together the remaining egg with 2 tablespoons water in a small bowl. Brush a thin layer of egg wash on the cookies right before baking.
  9. Bake the cookies, rotating the baking sheets front to back and bottom to top about halfway through, until golden brown and dry on top, 15 to 18 minutes. Let cool completely on the baking sheets set on a cooling rack, about 30 minutes.
  10. Meanwhile, make the royal icing: Combine the confectioners' sugar, meringue powder and vanilla in a large bowl. Add 5 tablespoons water and beat with an electric mixer on medium-high speed until the icing forms thick and glossy peaks, about 2 minutes, adding up to 1 tablespoon more water, if needed.
  11. Remove a third of the royal icing and place it in a pastry bag fitted with a small no. 4 round tip. Color the remaining icing with the green food coloring, one drop at a time, until it's a shade you like. If the frosting is still very stiff, add 1 to 2 teaspoons of water. Fill a second pastry bag fitted with another small no. 4 round tip with the green frosting.
  12. Use a sharp paring knife to shave the cookie edges so they are smooth and flat: Pay attention to the tree bottoms (so the trees will stand straight) and the inner edges of the slots. Assemble the trees by sliding the top-slot trees into the bottom-slot trees. Shave the cookies as needed for a smooth fit, then disassemble them and place the pieces on a flat surface. Don't worry if a tree breaks; glue the pieces together with green royal icing.
  13. To decorate the forest: Decorate each cookie with the green icing, leaving a blank strip up the center without icing; this is where the pieces will fit together. We used a zigzag line of green on each side. Sprinkle with white sprinkles while the icing is still wet. Let set
  14. until firm, 30 to 45 minutes. Turn the cookies over and decorate the backs in the same fashion. Let set until firm, 30 to 45 minutes.
  15. Assemble the trees. Pipe a thin line of white icing on the outer edges of the trees for snow. Let set before serving, 30 to 45 minutes. Arrange the trees on a serving platter to create a forest. Sprinkle with confectioners' sugar for snow.
Cook’s Note
When measuring flour, we spoon it into a dry measuring cup and level off excess. (Scooping directly from the bag compacts the flour, resulting in dry baked goods.) If you don't have tree-shaped cutters, you can make a stencil. Use a ruler to draw the outline of a tree on paper. Cut it out and use it as a guide for trimming the dough with a paring knife.

Watch the recipe video here:

Up your Christmas cookie game this year. ?Get the 8" Giant Cookie Cutter here: https://amzn.to/2TUBO37 (We may make ?from these links!)Save the recipe: https://foodtv.com/2rmrELP

Posted by Food Network on Thursday, December 6, 2018

Drink

Big Batch Charred Whisky Sour

Big Batch Charred Whisky Sour
Goodbye sour mix! Elevate your whisky sour with this quick and easy recipe made from scratch and Crown Royal Blended Whisky!
Author:
Cuisine: American
Recipe type: Drinks
Ingredients
Simple Syrup
  • 1 cup sugar
  • 1 cup water
Cocktail
  • 3 lemons, halved
  • 1 lemon, thinly sliced
  • 1&1/2 cups lemon juice
  • 1&1/2 cups lime juice
  • 1&1/4 cups simple syrup
  • 1&1/2 cups Crown Royal Deluxe
Instructions
Simple Syrup:
  1. ​Combine sugar and water in a small pot. Heat until simmering. Let simmer for 5 minutes, then cool.
  2. Heat a cast-iron skillet over high heat. Place the halved lemons, cut side down, on the pan and let sit until they are blackened. Remove lemon halves and set aside. Scrape off any residue on the pan. Lay down the lemon slices in the pan and let sit until they are blackened on one side. Flip and cook the other side. Once both sides of the slices are charred, remove from the pan and set aside.
  3. Juice the charred halved lemons. Strain the juice into the serving vessel. This should yield a 1⁄2 cup of juice. Add another 11⁄2 cups lemon juice. Add in the lime juice and the simple syrup. Pour in Crown Royal Deluxe and stir.
  4. Fill rocks glasses with ice. Pour whiskey sour into each glass and garnish with a charred lemon slice.
  5. Enjoy!

Watch the recipe video here:

Big Batch Charred Whisky SourGoodbye sour mix! Elevate your whisky sour with this quick and easy recipe made from scratch and Crown Royal Blended Whisky!

Posted by Tasty on Thursday, December 6, 2018

Main dish

Lemony Fried Chicken

Lemony Fried Chicken
Giada De Laurentiis' Lemony Fried Chicken is a must-try twist on a classic dish! ??
Author:
Cuisine: American
Recipe type: Main dish
Ingredients
  • ½ cup buttermilk
  • ¼ cup extra-virgin olive oil
  • 2 teaspoons coriander seeds, toasted and cracked
  • 2 teaspoons lemon zest (2 lemons)
  • Kosher salt
  • One 3½-pound chicken, cut into 8 pieces
  • 2 cups vegetable oil
  • 1½ cups gluten-free flour, such as Cup4Cup
  • Lemon wedges, for serving
Instructions
Special equipment: a deep-frying thermometer
  1. In a large re-sealable plastic bag, mix together the buttermilk, olive oil, coriander, lemon zest and 1½ teaspoons salt. Add the chicken pieces, seal the bag and massage to coat. Refrigerate for at least 4 hours and up to 1 day, turning the chicken pieces occasionally.
  2. Add enough oil to a large, heavy frying pan (preferably cast iron) to come 1 inch up the sides of the pan. Heat over medium until the oil reaches 325 degrees F on a deep-frying thermometer.
  3. Place the flour in a medium bowl and season with ½ teaspoon salt. Working one piece at a time, remove the chicken from the marinade and dredge in the seasoned flour. Shake off the excess flour, then add the chicken to the hot oil. Fry, turning occasionally, until the chicken is golden brown and just cooked through, about 25 minutes. Using tongs, transfer the chicken to a cooling rack over a baking sheet and allow to drain.
  4. Arrange the fried chicken on a warm platter and serve with lemon wedges.

Watch the recipe video here:

How To Make Giada's Lemony Fried Chicken

Giada De Laurentiis' Lemony Fried Chicken is a must-try twist on a classic dish! ??

Posted by Food Network on Sunday, January 7, 2018

Main dish

Buttermilk Biscuits

Buttermilk Biscuits
Your weekend project: Fluffy Buttermilk Biscuits ??
Author:
Cuisine: American
Recipe type: Main dish
Ingredients
  • 4 cups all-purpose flour, plus more for dusting
  • 4 teaspoons baking powder
  • 1 teaspoon baking soda
  • 1 teaspoon salt
  • 12 tablespoons cold unsalted butter, cut into small pieces, plus more for greasing
  • 1½ cups cold buttermilk
  • ½ cup heavy cream
  • 2 teaspoons freshly ground black pepper, not super fine and not coarse, somewhere in between
  • 2 tablespoons melted butter
Instructions
  1. Preheat the oven to 450 degrees F. Grease a baking sheet with butter or line with parchment paper.
  2. Combine the flour, baking powder, baking soda and salt in a large bowl. Combine until the ingredients are incorporated. Cut in the butter using your fingers or a pastry cutter until the mixture resembles coarse meal. Add the buttermilk and gently mix until the mixture just begins to come together.
  3. Scrape the dough onto a lightly floured counter. Pat the dough into a 10 by 12-inch rectangle about ¾-inch thick. Cut into 2-inch squares or use a 2-inch round cutter to cut out biscuits. Press together the scraps of dough, and repeat the process. Place the biscuits on the prepared baking sheet. Brush the tops with cream and sprinkle with the black pepper. Bake the biscuits until lightly golden brown, 12 to 15 minutes. Brush the tops with the melted butter. Cool on a baking rack.

Watch the recipe video here:

How to Make Bobby Flay's Buttermilk Biscuits

Your weekend project: Fluffy Buttermilk Biscuits ??Watch Bobby Flay on a new episode of #BeatBobbyFlay, tonight @ 10|9c!

Posted by Food Network on Thursday, January 4, 2018

Main dish

Chicken Meatball Soup

Chicken Meatball Soup
Author:
Cuisine: American
Recipe type: Main dish
Ingredients
  • CHICKEN MEATBALLS
  • 1 lb ground chicken (455 g)
  • ½ cup panko bread crumbs (25 g)
  • 1 large egg
  • ½ cup grated parmesan cheese (55 g)
  • 2 cloves garlic, minced
  • ¼ cup fresh parsley, finely chopped (10 g)
  • 1 teaspoon kosher salt
  • ½ teaspoon pepper
  • SOUP
  • 2 tablespoons olive oil, divided
  • 1 cup white onion, diced (150 g)
  • ½ cup carrot, diced (60 g)
  • ½ cup celery, diced (110 g)
  • 2 cloves garlic, minced
  • 8 cups chicken stock (1.9 L)
  • 1 bay leaf
  • 1 cup dry orzo pasta (145 g)
  • 4 cups swiss chard, roughly chopped (400 g)
  • 3 tablespoons grated parmesan cheese
  • kosher salt, to taste
  • pepper, to taste
  • 1 tablespoon lemon juice
Instructions
  1. In a medium bowl, combine the ground chicken, bread crumbs, egg, Parmesan, garlic, parsley, salt, and pepper. Mix well, then form into 1-inch (2 cm) meatballs. You should have 16-18 total.
  2. In a large pot, heat 1 tablespoon of olive oil over medium heat. Sear the meatballs on all sides until golden brown, 4-5 minutes. Remove from the pot and set aside.
  3. In the same pot, heat the remaining tablespoon of oil. Add the onion, carrot, and celery and cook, stirring occasionally until tender, 3-4 minutes. Add the garlic and cook until fragrant, 1-2 minutes.
  4. Add the chicken stock and bay leaf. Cover and bring to a boil.
  5. Once boiling, add the orzo and meatballs. Cover and simmer for 7-8 minutes, until the orzo is tender.
  6. Add the Swiss chard, cover, and cook for 2-3 minutes until the chard has wilted.
  7. Add the Parmesan cheese and season to taste with salt and pepper. Add the lemon juice.
  8. Ladle into bowls and serve.
  9. Enjoy!

Watch the recipe video here:

A little comfort food to keep you warm all night ??Get the recipe: https://tasty.co/recipe/chicken-meatball-soup

Posted by Tasty on Tuesday, December 4, 2018

Main dish

Pumpkin Pie Creme Brulee

Pumpkin Pie Creme Brulee
Guy Fieri mixed Pumpkin Pie with Creme Brulee, and the results are EPIC.
Author:
Cuisine: American
Recipe type: Main dish
Ingredients
  • Pecan and Butter Cracker Crust, recipe follows
  • 3½ cups heavy cream, divided
  • 1 teaspoon ground cinnamon
  • 1 teaspoon freshly grated nutmeg
  • ½ teaspoon powdered ginger
  • 1 vanilla bean, seeds scraped and pod reserved
  • 8 egg yolks
  • 1 cup sugar
  • ½ cup whole milk
  • 2 cups canned pumpkin puree
  • Hot water
  • ¼ cup turbinado sugar
  • Butter Cracker and Pecan Crust:
  • 32 butter crackers (recommended: Ritz crackers)
  • ½ cup pecans
  • 5 tablespoons unsalted butter melted, plus more if needed
  • 2 to 3 tablespoons dark brown sugar
Instructions
  1. Preheat the oven to 300 degrees F.
  2. Divide the crust into 8 (6-ounce) custard cups. Put them into a 9 by 13-inch baking dish or roasting pan and blind bake in the oven for 10 to 12 minutes. Remove and set aside to cool.
  3. In a medium sauce pot, over medium-high heat, add 2 cups of the cream, the spices, the vanilla seeds and the vanilla bean pod. Bring to a boil and remove from heat.
  4. In a medium bowl, whisk the yolks with the sugar until the mixture is pale yellow and the sugar is dissolved.
  5. Add the remaining 1½ cups of cream and the ½ cup of milk to the cream and spice mixture. Slowly incorporate the yolk and sugar mixture, then strain through a medium-size sieve. Whisk in the pumpkin puree.
  6. Divide the pumpkin mixture evenly into the custard cups lined with the crust.* Add the hot water into the baking dish or roasting pan to create a hot bath and put the pan into the oven. Bake until the custard is starting to set, yet still a little wiggly in the middle, about 35 to 45 minutes. Remove the brulee from the oven and let cool to room temperature. Cover and refrigerate overnight or at least 6 hours.
  7. Lightly sprinkle each custard with the turbinado sugar. Heat the sugar with a butane torch until caramelized. To get a thick caramelized sugar crust, repeat this, with just a light sprinkling each time. Allow to cool and serve.
  8. *Guy's Tip: if you happen to have any leftover creme brulee mixture, pour it into a baking dish and put it into another roasting pan. Add hot water about halfway up the sides of the dish and bake until custard is starting to set, yet still a little wiggly in the middle, about 35 to 45 minutes. Remove and cool to room temperature. Cover and refrigerate overnight or at least 6 hours. Refer to recipe for caramelizing sugar on top after it has cooled completely.
Butter Cracker and Pecan Crust:
  1. In the bowl of a food processor fitted with the metal blade, pulse the crackers and pecans until finely ground, about 6 to 10 (3-second) pulses. Add the melted butter and brown sugar and pulse to combine. Press into the bottom of a springform pan, baking dish, or 8 (6-ounce) ramekins.

Watch the recipe video here:

How To Make Guy's Pumpkin Pie Creme Brulee

Guy Fieri mixed Pumpkin Pie with Creme Brulee, and the results are EPIC.

Posted by Food Network on Wednesday, October 18, 2017

Dessert

Chocolate Chip Cookie Bombe

Chocolate Chip Cookie Bombe
Meet this next-level ice cream cake: An edible chocolate chip cookie bowl is filled with layers of vanilla ice cream and bits of your favorite chocolate candy bar. A peanut butter tower (!) in the center takes it over the top.
Author:
Cuisine: American
Recipe type: Dessert
Ingredients
  • 1½ sticks (12 tablespoons) unsalted butter, at room temperature, plus more for greasing
  • 2¼ cups all-purpose flour, plus more for dusting (see Cook's Note)
  • 1 teaspoon baking soda
  • 1 teaspoon fine salt
  • ¾ cup packed light brown sugar
  • ⅔ cup granulated sugar
  • 2 large eggs
  • 1 teaspoon pure vanilla extract
  • 6 ounces semisweet mini chocolate chips
  • 2 ounces hardening chocolate ice cream topping, such as Magic Shell
  • 5 peanut butter-filled chocolate cups, such as Reese's Peanut Butter Cups
  • 8 cups (4 pints) vanilla ice cream, softened at room temperature
  • 2 cups chocolate candy bars, chopped, such as Kit Kat, Twix, Snickers
  • Whipped cream, for decorating
  • Sprinkles, for decorating
Instructions
Special equipment: a 4-quart heat-safe bowl, 2.5-quart heat-safe bowl
  1. Position a rack in the bottom half of the oven and preheat to 350 degrees F. Cut two 16-by-6-inch pieces of parchment. Butter and flour the inside of a 4-quart heat-safe bowl, press a piece of parchment paper against the bottom and up the side of the bowl. Press the remaining parchment on top of the first, turning it slightly so that the 2 pieces form an "X"; set aside. Butter and flour the bottom of a 2.5-quart heat-safe bowl; set aside.
  2. Preheat the oven to 350 degrees F. Whisk together the flour, baking soda and salt in a large bowl. Beat together the butter, brown sugar and granulated sugar in a large bowl with an electric mixer on medium-high speed until light and fluffy, about 4 minutes. Add the eggs, one at a time, beating to incorporate after each addition. Beat in the vanilla. Reduce the mixer speed to low and add the flour mixture, beating just until incorporated. Add the chocolate chips and mix until combined.
  3. Put the dough into the larger prepared bowl. With generously floured hands, press the dough evenly up the side and across the bottom of the bowl (re-flour your hands as needed). Place the smaller bowl inside the larger bowl so that the buttered and floured bottom-side sits directly on top of the cookie dough. Bake until the cookie is a deep golden brown, 50 to 55 minutes. Let the cookie cool completely before removing the inner bowl, about 2 hours.
  4. To fill: Brush ice cream topping evenly over the inside of the cookie. Stack the peanut butter-filled chocolate cups in a tower in the middle of the cookie bowl. Let harden completely in the freezer, about 15 minutes.
  5. Spread half the ice cream in the bowl, working around the chocolate cup tower. Layer with 1½ cups chopped candy bars then spread the remaining ice cream on top. Sprinkle with the remaining candy bars and cover with plastic wrap. Freeze until solid, 6 hours or up to overnight.
  6. Remove from the freezer 15 minutes before serving. Flip the cookie bombe upside down on a serving platter and lift off the bowl and parchment strips. Decorate with whipped cream and sprinkles around the base and top of the bombe. Slice with a very hot, sharp knife as you would a cheesecake.

Watch the recipe video here:

How to Make a Chocolate Chip Cookie Bombe

This Chocolate Chip Cookie Bombe is STUFFED with all of your favorite treats (hello, peanut butter cups!). ? ? ? (Trending on Pinterest)

Posted by Food Network on Sunday, November 12, 2017

Dessert

Lemon Pudding Cake with Fresh Mixed Berries

Lemon Pudding Cake with Fresh Mixed Berries
Tyler Florence's Lemon Pudding Cakes are tangy and sweet and your new favorite dessert ?
Author:
Cuisine: American
Recipe type: Dessert
Ingredients
  • 1 tablespoon unsalted butter
  • ⅔ cup superfine sugar, plus more for dusting
  • 2 eggs, separated
  • ⅔ cup reduced fat buttermilk
  • 2 tablespoons lemon juice
  • 1 tablespoon lemon zest
  • ¼ cup all-purpose flour
  • ¼ teaspoon salt
Garnish:
  • 1 cup fresh raspberries
  • 1 cup fresh blueberries
  • 1 cup fresh blackberries
  • 2 tablespoons confectioners' sugar
Instructions
  1. Preheat oven to 325 degrees F. Butter and lightly sugar 4 ramekins (about 1-cup size).
  2. In a mixer, add egg yolks, buttermilk, lemon juice and lemon zest and beat until well combined. Reduce the speed to low and sift in flour, sugar and salt. Continue to mix until combined. Beat egg whites until you get stiff peaks then combine the 2 mixtures by gently folding them together, a little at a time. Divide evenly amongst ramekins then bake in a water bath - set ramekins in a roasting tray and fill with water halfway up the sides of the ramekins.
  3. Bake for 45 minutes until the top springs back when gently pressed and the cakes have a nice golden brown color. Allow to cool slightly, then carefully invert onto a plate. Serve with fresh berries and dust with powdered sugar.

Watch the recipe video here:

How To Make Tyler's Lemon Pudding Cake

Tyler Florence's Lemon Pudding Cakes are tangy and sweet and your new favorite dessert ?

Posted by Food Network on Sunday, November 19, 2017

Main dish

Shrimp Fettuccine Alfredo

Shrimp Fettuccine Alfredo
This take on a classic Italian-American recipe is super easy to make. Slightly reducing the cream and adding a hefty dose of cheese means you don't have to use flour to thicken the sauce.
Author:
Cuisine: American
Recipe type: Main dish
Ingredients
  • Kosher salt
  • 12 ounces fettuccine
  • Olive oil, for tossing
  • ¾ pound large shrimp (about 16), shelled and deveined, tails removed
  • Freshly ground black pepper
  • 1 stick (8 tablespoons) unsalted butter
  • 2 cups heavy cream
  • 2 pinches freshly grated nutmeg
  • 1½ cups freshly grated Parmigiano-Reggiano cheese
Instructions
  1. Bring a large pot of water to a boil, and salt generously. Add the pasta, and boil according to package directions until al dente, tender but still slightly firm. Strain, and toss with a splash of oil.
  2. Meanwhile, arrange the shrimp in a single layer on a large pie pan or paper plate, and pat them with a paper towel until completely dry. Season with salt and pepper.
  3. Heat a large skillet over medium heat, and add 2 tablespoons of the butter. When the butter melts, raise the heat to medium-high, and invert the plate of shrimp over the skillet so the shrimp fall into the pan all at once. Cook the shrimp, without moving them, until the underside is pink, 1 to 2 minutes. Flip the shrimp, and cook until fully pink and cooked through, about 2 minutes more. Transfer the shrimp to a bowl.
  4. Reduce the heat to medium, and add the remaining 6 tablespoons butter. Scrape the bottom of the skillet with a wooden spoon to release any browned bits. When the butter has mostly melted, whisk in the cream and nutmeg and bring to a simmer, then cook for 2 minutes. Lower the heat to keep the sauce warm.
  5. Whisk the Parmigiano-Reggiano into the sauce. Add the shrimp and cooked pasta, and toss well. Season with salt and pepper. Serve hot in heated bowls.

Watch the recipe video here:

Shrimp Fettuccine Alfredo

This Shrimp Fettuccine Alfredo couldn't be simpler to make. (Follow Hearty for more like this!)

Posted by Food Network on Sunday, December 10, 2017

Main dish

Little Mozzarella-Stuffed Meatloaves

Little Mozzarella-Stuffed Meatloaves
Game plan: Heat the tomato sauce while the meatloaves cook
Author:
Cuisine: American
Recipe type: Main dish
Ingredients
Loaves:
  • 1½ pounds meatloaf mix (ground beef, pork, and veal)
  • 1 medium onion, grated
  • ½ cup panko (Japanese bread crumbs) or regular dried bread crumbs
  • 1 large egg, beaten
  • ¼ cup chopped fresh flat-leaf parsley
  • 2 tablespoons Worcestershire sauce
  • 1 tablespoon whole-grain mustard
  • 2 teaspoons kosher salt
  • ½ teaspoon Italian seasoning
  • ½ teaspoon garlic powder
  • Freshly ground black pepper
  • 4 thin slices pancetta (about 1- ounce), optional
  • 4 small squares smoked mozzarella (about 2 ounces total)
Glaze:
  • ¼ cup tomato paste
  • 2 tablespoons balsamic vinegar
  • 1 tablespoon extra-virgin olive oil
  • 2 cups marinara sauce, jarred or homemade, hot
Instructions
Special equipment: 4-inch round biscuit cutter, or tuna or other can, top and bottom removed
  1. Preheat the oven to 425 degrees F. Line a baking sheet with parchment paper or foil.
  2. Break the meatloaf mixture into a large bowl and use your hands to lightly work in the onion, bread crumbs, egg, parsley, Worcestershire sauce, mustard, salt, Italian seasoning, garlic powder, and pepper until evenly mixed. Take care not to overwork the mixture.
  3. Space the pancetta slices, if using, a few inches apart on the prepared pan and put the cutter on top of 1 piece. Divide the meatloaf mixture into 4 equal portions. Press a piece of cheese into the center and then press the meat around it to enclose it completely. Put a portion in the cutter and press gently so that it covers the pancetta evenly, and makes a neat, flat disk. Repeat with the remaining meatloaf mix to make 4 little loaves. Remove the cutter.
  4. Whisk the glaze ingredients in a small bowl, and then spread about 1 tablespoon of the mixture over the top and sides of each meatloaf. Bake for 10 minutes, then reduce the heat to 325 degrees F. and bake until cooked through, about 15 minutes more. To serve, ladle some hot marinara sauce into the centers of 4 plates, and set the meatloaves on top.

Watch the recipe video here:

Mozzarella Stuffed Meatloaves

Little Mozzarella Stuffed Meatloaves are just what you need. (Follow Gooey for more like this!)

Posted by Food Network on Sunday, December 17, 2017