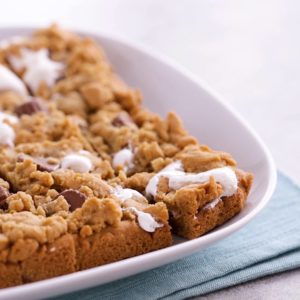
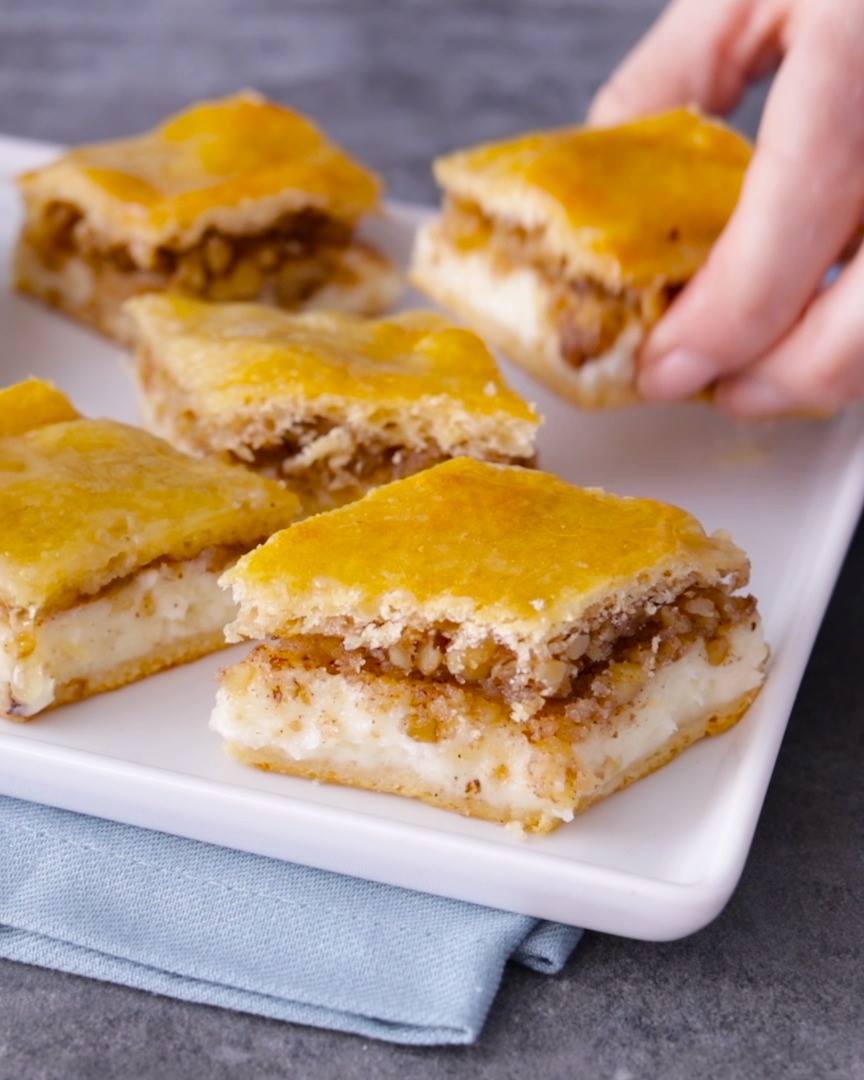
Dessert

Fluffernutter Bars

Fluffernutter Bars
Marshmallow and peanut butter come together in these gooey, indulgent bars.
Author:
Cuisine: American
Recipe type: Dessert
Ingredients
  • 1 roll (16.5 oz) Pillsbury™ refrigerated peanut butter cookies
  • ½ cup milk chocolate Reese's™ minis peanut butter cups (from 8-oz package) (25 mini cups)
  • ½ cup marshmallow creme
Instructions
  1. Heat oven to 350°F.
  2. In medium bowl, mix cookie dough and peanut butter cups until well blended. Reserve 1 cup cookie dough. Press remaining dough evenly in bottom of ungreased 8-inch square pan. Bake 15 minutes.
  3. Drop tablespoonfuls marshmallow cream on bar base. Crumble reserved cookie dough onto marshmallow and bar base.
  4. Bake 14 to 18 minutes or until golden brown. Cool completely, about 1 hour. For bars, cut into 4 rows by 4 rows.

Watch the recipe video here:

Cookie Countdown Day 24: We're just *nuts* about these 3-ingredient bars!Fluffernutter Bars recipe:…

Posted by Pillsbury on Monday, December 17, 2018

Main dish

Omelet With Bacon, Mushrooms, and Ricotta

Omelet With Bacon, Mushrooms, and Ricotta
Don’t sweat rolling this into a perfect omelet; just top the cooked eggs with mushrooms and ricotta, and fold like a taco.
Author:
Cuisine: American
Recipe type: Main dish
Ingredients
Omelet
  • 3 slices thick-cut bacon
  • 4 ounces button mushrooms
  • Kosher salt, freshly ground pepper
  • 4 ounces fresh ricotta or cream cheese (about ½ cup)
  • ¼ ounce Parmesan, finely grated (about ¼ cup)
  • 6 large eggs
Salad
  • 2 tablespoons olive oil
  • 2 tablespoons white wine vinegar
  • 1 teaspoon Dijon or other mustard
  • 2 heads of Boston or Bibb lettuce, leaves separated
  • Handful of chopped chives
Instructions
Omelet
  1. Cut bacon crosswise into ½”-wide pieces. Cook in a large nonstick skillet over medium, stirring and turning occasionally, until starting to brown and crisp but not all of the fat is rendered, 6–8 minutes. Transfer to a small plate or bowl with a slotted spoon.
  2. While the bacon is cooking, finely chop the mushrooms.
  3. Add mushrooms to skillet with bacon drippings, season with salt and pepper, and increase heat to medium-high. Cook, tossing often, until browned and any liquid from mushrooms has cooked off, about 5 minutes. Use a slotted spoon to transfer to a small bowl; let skillet cool slightly. Add ricotta and Parmesan to mushrooms and stir well to combine; season with salt and pepper.
  4. Whisk eggs in a medium bowl until very smooth and a little frothy, about 1 minute; season with salt and pepper. Cook eggs in reserved skillet over medium, stirring constantly and making sure to scrape up eggs from bottom and around edge of pan, until large folded curds form. Shake pan to distribute uncooked eggs over surface and spoon mushroom mixture slightly off center. Top with bacon and cook until bottom of omelet takes on a light golden-brown color but surface is still slightly wet. Fold one side of omelet over filling (like a taco); slide omelet onto a cutting board or large plate.
Salad and Assembly
  1. Whisk oil, vinegar, and mustard in a large bowl to combine; season with salt and pepper. Add lettuce and half of chives and toss to coat.
  2. Top omelet with remaining chives cut in half and serve with salad.

Watch the recipe video here:

This is what brunch dreams are made of.Recipe: http://bonap.it/DWS0Zss

Posted by Bon Appétit Magazine on Saturday, December 15, 2018

Main dish

Ube Halaya

Ube Halaya
WATCH: How To Make Ube Halaya
Author:
Cuisine: American
Recipe type: Main dish
Ingredients
  • ½ kilo uncooked purple yam (ube)
  • 2½ cups water
  • ½ cup butter
  • ½ cup sugar
  • ½ teaspoon salt
  • ½ teaspoon vanilla extract
Instructions
  1. Thinly peel and then cube ube. (Wear gloves if desired as it stains.) Set aside.
  2. Pour water into a medium saucepot. Add then boil the cubed ube until tender. Transfer cooked ube to a large bowl, and mash. Set side.
  3. In a frying pan over low heat, melt butter then add sugar, and salt, stirring until the sugar has begun to dissolve, stirring regularly until well mixed. Stir in vanilla extract.
  4. Add the mashed purple yam then stir until the texture of the mixture becomes really thick (about 5 minutes over low heat).
  5. Transfer the mixture to a jar, and let cool completely. Keep refrigerated.

Watch the recipe video here:

The best ube halaya is the one you make at home.See the full recipe here: https://bit.ly/2HVAha1Subscribe to our YouTube channel for more videos, recipes, and step-by-step guides:www.YouTube.com/Yummyph

Posted by Yummy PH on Sunday, December 16, 2018

Dessert

No-Bake Baileys® Cheesecake Balls

No-Bake Baileys® Cheesecake Balls
Boozy chocolate-coated cheesecake balls with no need to bake, they only take 15 minutes or so (if you don't include the chilling between each step)
Author:
Cuisine: American
Recipe type: Dessert
Ingredients
  • 25 milk chocolate topped butter cookies (such as Le Petit Ecolier), crushed
  • 1 (8 ounce) container mascarpone cheese
  • ⅓ cup Irish cream liqueur (such as Baileys®)
  • 1 (9.7 ounce) package white chocolate, chopped
  • 2 ounces dark chocolate, chopped
Instructions
  1. Combine crushed cookies, mascarpone cheese, and Irish cream liqueur in a bowl; mix well.
  2. Line a baking sheet with parchment paper. Scoop small portions of the cookie mixture using a melon baller or small cookie scoop and roll into twenty 1-inch balls. Lay on the prepared baking sheet and chill in the refrigerator for about 45 minutes.
  3. Place white chocolate in top of a double boiler over lightly simmering water. Stir frequently, scraping down the sides with a rubber spatula to avoid scorching, until chocolate is melted, about 5 minutes. Dip cheesecake balls into melted chocolate and return to fridge to chill until chocolate has hardened completely, about 1 hour.
  4. Place dark chocolate in top of a double boiler over lightly simmering water. Stir frequently, scraping down the sides with a rubber spatula to avoid scorching, until chocolate is melted, about 5 minutes. Drizzle dark chocolate over chilled cheesecake balls. Allow to set, about 30 minutes.

Watch the recipe video here:

No-Bake Baileys® Cheesecake Balls: https://trib.al/8Bj8p5p

Posted by Allrecipes on Saturday, December 15, 2018

Dessert

Chocolate Chip Cheesecake I

Chocolate Chip Cheesecake I
This is the best cheesecake I've ever had. People have offered to pay me to make these for them during the holidays!
Author:
Cuisine: American
Recipe type: Dessert
Ingredients
  • 1½ cups graham cracker crumbs
  • ⅓ cup white sugar
  • ⅓ cup unsweetened cocoa powder
  • ⅓ cup butter, melted
  • 3 (8 ounce) packages cream cheese
  • 1 (14 ounce) can sweetened condensed milk
  • 3 eggs
  • 2 teaspoons vanilla extract
  • 1 cup mini semi-sweet chocolate chips
  • 1 teaspoon all-purpose flour
Instructions
  1. Preheat oven to 300 degrees F (150 degrees C). Mix graham cracker crumbs, sugar, butter and cocoa. Press onto bottom and up the sides of a 9 inch springform pan. Set crust aside.
  2. Beat cream cheese until smooth. Gradually add sweetened condensed milk; beat well. Add vanilla and eggs, and beat on medium speed until smooth. Toss ⅓ of the miniature chocolate chips with the 1 teaspoon flour to coat (this keeps them from sinking to the bottom of the cake). Mix into cheese mixture. Pour into prepared crust. Sprinkle top with remaining chocolate chips.
  3. Bake at 300 degrees F (150 degrees C) for 1 hour. Turn off oven (do not open oven door) and leave the cake in the oven to cool in the oven for another hour. Remove from oven and cool completely. Refrigerate before removing sides of pan. Keep cake refrigerated until time to serve.

Watch the recipe video here:

"This is the best cheesecake I've ever had. People have offered to pay me to make these for them during the holidays!"Chocolate Chip Cheesecake: https://trib.al/86eOlUV

Posted by Allrecipes on Sunday, December 16, 2018

Main dish

Sweet & Sour Chicken

Sweet & Sour Chicken
Author:
Cuisine: American
Recipe type: Main dish
Ingredients
CHICKEN
  • 1 lb boneless, skinless chicken breast (455 g)
  • salt, to taste
  • pepper, to taste
  • ½ cup cornstarch (60 g)
  • 2 eggs, beaten
  • oil, to fry
SAUCE
  • 1 tablespoon oil
  • ½ tablespoon garlic, minced
  • 1 bell pepper, diced
  • ¾ cup cider vinegar (180 mL)
  • 1 tablespoon soy sauce
  • ¼ cup ketchup (55 g)
  • ½ cup sugar (100 g)
GARNISH
  • scallion, chopped
  • sesame seeds
Instructions
  1. Season chicken with salt and pepper. Coat with cornstarch, dip in beaten egg.
  2. Fry until golden, crispy and cooked through. Set aside. Dab with paper towel if greasy.
  3. In a large pan, heat oil and fry garlic until fragrant.
  4. Add the bell pepper, cider vinegar, soy sauce, ketchup and sugar. Bring to a boil.
  5. When the sauce has thickened, add the fried chicken. Toss to coat.
  6. Garnish with chopped scallions and sesame seeds. Serve with rice.
  7. Enjoy!

Watch the recipe video here:

Sweet & Sour Chicken ?FULL STORY: https://tasty.co/recipe/sweet-sour-chicken

Posted by Proper Tasty on Sunday, December 16, 2018

Main dish

Baklava Cheesecake Bars

Baklava Cheesecake Bars
We took everyone’s favorite buttery, honey-walnut treat and turned it into this incredibly easy-but-impressive dessert bar mash-up.
Author:
Cuisine: American
Recipe type: Main dish
Ingredients
  • 2 cans (8 oz each) Pillsbury™ refrigerated crescent dough sheet
  • 2 packages (8 oz each) cream cheese, softened
  • 1½ cups sugar
  • ½ teaspoon grated lemon peel
  • 2 cups walnuts, finely chopped
  • ½ teaspoon ground cinnamon
  • ¼ cup honey
  • 1 teaspoon fresh lemon juice
Instructions
  1. Heat oven to 350°F. Unroll 1 can of dough. Place in bottom of ungreased 13x9-inch (3-quart) baking dish. Press in bottom of baking dish.
  2. In medium bowl, beat cream cheese, 1 cup of the sugar and the lemon peel with electric mixer on medium speed until smooth and creamy. Spread over dough in baking dish. Set aside.
  3. In medium bowl, mix remaining ½ cup sugar, the walnuts and cinnamon; sprinkle evenly over cream cheese mixture.
  4. Unroll second can of dough. Carefully place on top of walnut mixture, stretching dough to cover filling.
  5. In small bowl, mix honey and lemon juice; brush over dough.
  6. Bake 30 to 35 minutes or until golden brown. Cool 20 minutes. Refrigerate about 3 hours or until well chilled. For diamond shapes, cut 6 diagonal parallel lines down length of pan; cut 6 diagonal lines across straight lines.

Watch the recipe video here:

Just look at those beautiful cheesecake bars!Baklava Cheesecake Bars recipe:…

Posted by Pillsbury on Saturday, December 15, 2018

Main dish

Taco Norteños with Bacon-Fat Flour Tortillas

Taco Norteños with Bacon-Fat Flour Tortillas
There’s no need to roll these superthin. In fact, a little heft keeps them moist. This recipe is from Fresa's in Austin, TX.
Author:
Cuisine: American
Recipe type: Main dish
Ingredients
Tortillas
  • 8 ounces thin-cut smoked bacon, cut into ¼-inch pieces
  • 2 tablespoons plus ½ teaspoon vegetable oil
  • 1¼ cups whole milk, divided
  • 2 teaspoons baking powder
  • 1½ teaspoons kosher salt
  • 3 cups all-purpose flour, plus more for surface
Filling and Assembly
  • 2 pounds hanger steak, center membrane removed
  • Kosher salt, freshly ground pepper
  • 2 tablespoons olive oil
  • 2 large onions, thinly sliced
  • 10 garlic cloves, thinly sliced
  • 4 serrano chiles or jalapeños, thinly sliced
  • 4 beefsteak or vine-ripe tomatoes, cut into ½-inch pieces
  • ½ cup chopped cilantro, plus leaves for serving
  • 4 ounces Monterey Jack, coarsely grated (about 1 cup)
  • Lime wedges (for serving)
Instructions
Tortillas
  1. Cook bacon in a large broilerproof skillet, preferably cast iron, over medium heat, turning occasionally, until brown and crisp, 8–10 minutes. Using tongs, transfer bacon to a small bowl and save for taco filling. Pour off 2 Tbsp. bacon fat from skillet; set aside for making tortillas. Set skillet with remaining fat aside for making taco filling.
  2. Bring oil, ¾ cup milk, and reserved 2 Tbsp. bacon fat to a simmer in a small saucepan (be careful not to boil); immediately remove from heat. Whisk baking powder, salt, and 3 cups flour in a medium bowl to combine. Pour in hot milk mixture and remaining ½ cup milk. Mix with your hands until a shaggy dough forms.
  3. Turn dough out onto a lightly floured work surface and knead until smooth and elastic, about 4 minutes. Wrap in plastic and let rest at room temperature 1 hour to relax dough.
  4. Divide dough into 16 Ping-Pong–size balls (about 1½"). Working one at a time and keeping remaining balls covered with a kitchen towel, roll out on a lightly floured surface to 6" rounds.
  5. Heat a comal, griddle, or a clean large cast-iron skillet over medium. Working in batches, cook tortillas, reducing heat if they are getting dark too quickly, until brown in spots on bottom sides and air bubbles form on surface, about 2 minutes. Poke large bubbles with a fork to release steam, flip tortillas, and cook until brown in spots on second sides, 1–2 minutes. Stack and wrap tortillas in a kitchen towel as you go. This will keep them warm until you are ready to assemble your tacos.
Filling and Assembly
  1. Season steak with salt and pepper. Let sit uncovered at room temperature 1 hour.
  2. Prepare a grill for medium-high heat. Grill steak until nicely browned and an instant-read thermometer registers 120° for medium-rare, about 5 minutes per side. Transfer to a cutting board and let rest 10 minutes before slicing against the grain.
  3. Heat broiler. Heat oil in reserved skillet with bacon fat over medium-high and add onions and garlic; season with salt and pepper. Cook, stirring often, until just beginning to soften, about 5 minutes. Add chiles and cook, stirring often, until chiles are softened and onions are golden brown, about 5 minutes. Add tomatoes and cook until tomatoes are very soft and sauce is thick like ragù, 10–15 minutes. Mix in steak and any accumulated juices, reserved bacon, and chopped cilantro and cook until meat is heated through, about 1 minute; season with salt and pepper. Top with cheese and broil until cheese is melted and starting to brown, about 1 minute.
  4. Spoon filling into warm tortillas and top with cilantro leaves. Serve with lime wedges for squeezing over.

Watch the recipe video here:

Three words: bacon-fat tortillas.RECIPE: http://bonap.it/tkpVYfw

Posted by Bon Appétit Magazine on Saturday, December 15, 2018

Main dish

Spiced and Steamed Couscous with Brown Butter

Spiced and Steamed Couscous with Brown Butter
Steam, fluff; steam, fluff. This couscous recipe is time-consuming but worth it.
Author:
Cuisine: American
Recipe type: Main dish
Ingredients
  • 3 cups medium-grind couscous (not instant)
  • 2 cups chicken or vegetable stock
  • 1 3-inch cinnamon stick
  • 2 garlic cloves, crushed
  • 2 star anise pods
  • ½ teaspoon coriander seeds
  • ½ teaspoon cumin seeds
  • 2 teaspoons kosher salt, plus more
  • 6 tablespoons unsalted butter
  • Aleppo-style pepper (for serving)
Instructions
  1. Spread out couscous on a rimmed baking sheet. Bring stock, cinnamon stick, garlic, star anise pods, coriander seeds, cumin seeds, and 2 tsp. salt to a simmer in a small saucepan over medium heat, stirring occasionally, until salt is dissolved, about 4 minutes. Let cool. Strain stock over couscous; discard solids. Let sit, stirring occasionally, until liquid is absorbed and grains begin to swell, 10–15 minutes. Rake and rub couscous with your hands until no clumps remain.
  2. Pour water into a large pot to come 1" up sides. Bring to a gentle simmer. Transfer couscous to a steamer basket or a colander and set inside pot, making sure couscous is not touching water. The sides of the steamer basket should be in direct contact with the pot; this forces the steam up through the couscous instead of around the sides. (If there’s a gap between the steamer and the pot, fill it in with crumpled foil.) Steam, uncovered, gently tossing occasionally, until steam escapes through couscous, 15–20 minutes.
  3. Spread out couscous on a clean baking sheet, discarding any grains that may have stuck to steamer basket. Drizzle ¼ cup cold water over couscous to moisten. Let cool slightly, then rub couscous to break up any clumps.
  4. Pour fresh water into pot to come 1" up sides and steam couscous again, tossing occasionally, until tender and nearly tripled in size, 15–20 minutes.
  5. Meanwhile, melt butter in a small saucepan over medium, stirring often, and cook until it foams, then browns, 4–6 minutes.
  6. Transfer couscous back to rimmed baking sheet and toss with a slotted spoon to remove any remaining clumps. Drizzle with brown butter and toss to coat. Taste couscous and season with more salt if needed. Top with pepper before serving.
Do Ahead: Couscous can be steamed once 4 hours ahead. Store on baking sheet at room temperature. Steam the second time just before serving.

Watch the recipe video here:

Steam, fluff, steam, fluff. This couscous recipe is time-consuming but worth it.Recipe: http://bonap.it/yTtl7MH

Posted by Bon Appétit Magazine on Saturday, December 15, 2018

Dessert

Christmas Cookie Cheesecake

Christmas Cookie Cheesecake
Sugar cookie meets cheesecake in this brilliant holiday mash-up: a creamy vanilla cheesecake gets the royal icing treatment — no cookie platter required.
Author:
Cuisine: American
Recipe type: Dessert
Ingredients
  • One 16.5-ounce tube store-bought sugar cookie dough
  • Four 8-ounce packages cream cheese, at room temperature
  • 2 cups granulated sugar
  • 1 cup sour cream
  • 2 tablespoons vanilla extract
  • 4 large eggs, at room temperature
  • Red and green sprinkles, for decorating
  • One 1-pound box confectioners' sugar (about 4 cups)
  • 2 tablespoons meringue powder
  • Red and green gel food coloring
Instructions
Special equipment: two pastry bags fitted with small round tips
  1. Position an oven rack in the middle of the oven and preheat to 350 degrees F. Press the cookie dough into the bottom of a 9-inch springform pan (use the bottom of a measuring cup to help spread it out and make it even). Bake until the cookie is set and golden brown, 12 to 15 minutes. Let cool completely, about 30 minutes. Wrap the bottom and sides of the pan with a large piece of foil and put it in a large roasting pan. Reduce the oven temperature to 325 degrees F.
  2. Beat the cream cheese and granulated sugar together in a large bowl with an electric mixer on medium speed for 1 minute. Add the sour cream and vanilla and beat until just combined. Mix in the eggs by hand, one at a time, until just combined. (Take care not to overmix or the cheesecake will puff up and crack). Pour the batter into the springform pan. Add enough hot water to the roasting pan to come about halfway up the side of the springform pan.
  3. Bake until the outside of the cake is set but the center is still slightly loose, about 1 hour and 20 minutes. Turn the oven off and leave the cheesecake in the oven for another hour. Remove the cheesecake from the roasting pan to a cooling rack. Run a knife around the edge and cool to room temperature. Cover and refrigerate at least 8 hours.
  4. Run a knife around the edge of the pan once more and unlock to unmold the cheesecake. Transfer to a serving platter or cake stand and smooth the edges with a knife. Pat the Jimmie sprinkles into the sides of the cheesecake making sure not to cover the crust or get any on top.
  5. Whisk together the confectioners' sugar and meringue powder in a large bowl. Add 5 tablespoons water and beat with an electric mixer on medium-high speed until soft glossy peaks form, adding up to 1 more tablespoon water if necessary.
  6. Transfer about ½ cup of the royal icing to a pastry bag fitted with a small round tip. Thin the remaining icing with 1 teaspoon of water at a time until it is the consistency of syrup (you know you have reached the right consistency if you drizzle a bit of the icing and it sinks back into the icing within 8 to 10 seconds). Transfer 1 cup of the thinned icing in another pastry bag fitted with a small round tip. Divide the remaining batter between two small bowl and color one red and one green with the red and green gel food coloring.
  7. Use the thick white icing to pipe a large scalloped circle around the cake leaving a ¾-inch border. Use the thinned white icing to fill the center of the scalloped circle. Use an offset spatula to spread the icing out so that it is smooth. Decorate with the colored icing while the white icing is still set. Chill the cake until the icing is set, at least 1 hour.

Watch the recipe video here:

Recipe of the Day: Christmas Cookie Cheesecake ??? Save the recipe: https://foodtv.com/2UyMEwc

Posted by Food Network on Saturday, December 15, 2018