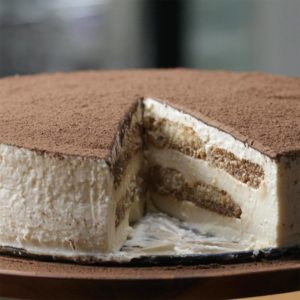
Showing 3,071 Result(s)
Dessert

Tiramisu Cheesecake

Tiramisu Cheesecake
Tiramisu Cheesecake
Author:
Cuisine: American
Recipe type: Dessert
Ingredients
  • 20 large ladyfingers
  • 1 cup coffee (240 mL)
  • 16 oz cream cheese (455 g)
  • 16 oz mascarpone cheese (455 g)
  • 1 tablespoon vanilla extract
  • 1 cup milk, hot (240 mL)
  • ½ cup sugar (100 g)
  • 4 teaspoons gelatin
  • 2 tablespoons cocoa powder
Instructions
  1. Dip the ladyfingers in coffee.
  2. In two spring form pans lined with parchment paper, layer the coffee-dipped lady fingers in a single layer.
  3. Freeze until the ladyfingers are frozen.
  4. In a bowl, add the cream cheese, mascarpone cheese, and vanilla extract. Stir to combine.
  5. Add the milk, sugar, and gelatin to a bowl and whisk until the gelatin has dissolved.
  6. Pour the milk mixture through a sieve into the bowl of cream cheese.
  7. Pour 1 cup (290 g) of cheesecake batter into a springform pan. Refrigerate until firm, about 2 hours
  8. Add one layer of frozen ladyfingers on top of the refrigerated cheesecake layer.
  9. Add another cup (290 g) of cheesecake batter on top. Refrigerate for two hours, and repeat with remaining batter and ladyfinger layer.
  10. Refrigerate for 2 hours or until firm.
  11. Dust the top with cocoa powder.
  12. Enjoy!

Watch the recipe video here:

A match made in dessert heaven ?FULL RECIPE: https://tasty.co/recipe/tiramisu-cheesecake

Posted by Proper Tasty on Sunday, March 3, 2019

Main dish

Cajun Shrimp and Rice

Cajun Shrimp and Rice
Author:
Cuisine: American
Recipe type: Main dish
Ingredients
  • 1 tablespoon unsalted butter
  • 2 tablespoons extra-virgin olive oil
  • 3 cloves garlic, minced
  • 2 teaspoons Cajun seasoning
  • 1 pound large shrimp, peeled and deveined, tails intact
  • Kosher salt and freshly ground pepper
  • 4 plum tomatoes, chopped
  • 2 bunches scallions, chopped
  • 3 cups cooked white rice
  • 3 tablespoons chopped fresh parsley
  • Lemon wedges, for serving (optional)
Instructions
  1. Heat the butter, olive oil and garlic in a large skillet over medium-high heat until fragrant, about 1 minute. Add the Cajun seasoning and shrimp and cook, stirring, until the shrimp begin to curl, about 1 minute. Season with salt and pepper.
  2. Add the tomatoes and scallions to the skillet and cook, stirring, about 1 minute. Add the rice and ¼ cup water and continue to cook until the rice is warmed through and the shrimp are opaque, about 3 more minutes. Stir in the parsley and serve with lemon, if desired.
  3. Per serving: Calories 357; Fat 11 g (Saturated 3 g); Cholesterol 176 mg; Sodium 537 mg; Carbohydrate 40 g; Fiber 3 g; Protein 23 g

Watch the recipe video here:

Recipe of the Day: One-Pot Cajun Shrimp and Rice?Save the recipe: https://foodtv.com/2C13tYU!

Posted by Food Network on Sunday, March 3, 2019

Dessert

The Best One-Bowl Brownies

The Best One-Bowl Brownies
Author:
Cuisine: American
Recipe type: Dessert
Ingredients
  • 1 cup unsalted butter, 2 sticks (230 g)
  • 1 ½ cups semi-sweet chocolate chips, or dark chocolate chips, divided (260 g)
  • 1 ½ cups granulated sugar (300 g)
  • ¾ cup brown sugar (165 g)
  • 1 tablespoon vanilla extract
  • 1 teaspoon salt
  • 3 large eggs
  • 1 ¼ cups all-purpose flour (155 g)
  • ⅓ cup dark cocoa powder (40 g)
  • nonstick cooking spray, for greasing
Instructions
  1. Preheat the oven to 350˚F (180˚C).
  2. Add the butter and 1 cup (175 g) of chocolate chips to a large microwave-safe bowl. Microwave for 1½ minutes, then let sit for 3 minutes before whisking together.
  3. Add the granulated and brown sugars, vanilla, and salt. Whisk to combine.
  4. Whisk in the eggs until fully combined.
  5. Sift the flour and cocoa powder into the bowl and fold in with a spatula. Add the remaining chocolate chips and fold to incorporate.
  6. Line a 9-inch (23-cm) square baking pan with parchment paper and grease with nonstick spray. Spread the batter evenly in the pan.
  7. Bake for 35-40 minutes, until a toothpick inserted in the center comes out with a few moist crumbs attached.
  8. Let cool completely before cutting.
  9. Enjoy!

Watch the recipe video here:

Which piece of the brownie do you prefer? ?FULL RECIPE: https://tasty.co/recipe/the-best-one-bowl-brownies

Posted by Proper Tasty on Saturday, March 2, 2019

Main dish

Instant Pot Mongolian Beef and Rice

Instant Pot Mongolian Beef and Rice
One-pot Mongolian beef and rice? You’re in the right place.
Author:
Cuisine: American
Recipe type: Main dish
Ingredients
Meat Mixture:
  • 1 tbsp olive oil
  • 1 tbsp cornstarch
  • 1 – 1½ lbs flank steak, sliced across the grain into bite-sized pieces
  • Sauce Mixture:
  • 1 cup water
  • ½ cup soy sauce
  • ½ cup brown sugar
  • 10 cloves garlic, minced
  • 1 tbsp fresh ginger, minced
  • ¼ tsp cayenne
Rice Mixture:
  • 2 cups long grain white rice, rinsed
  • 2¼ cups water
To Finish:
  • 2 tbsp cornstarch
  • 2 tbsp cold water
  • 4 green onions, green tops only, cut into 2-3” lengths
  • sesame seeds for garnish
Instructions
  1. Add olive oil to the Instant Pot. Using the display panel select the SAUTE function.
  2. Add beef and cornstarch to a large bag or bowl and mix to coat beef evenly.
  3. When oil gets hot, brown the meat on both sides, 2-3 minutes per side. Meat will not be cooked through. Do not crowd the pot–you may have to work in batches.
  4. Add the Sauce Mixture ingredients to the pot and deglaze by using a wooden spoon to scrape the brown bits from the bottom of the pot.
  5. Turn the pot off by selecting CANCEL, then secure the lid, making sure the vent is closed.
  6. Place rinsed rice and water in a separate cooking pan with at least a 7-cup capacity. Place an extra-tall trivet or riser (we love these) in the bottom of the pot and place the rice-filled cooking pan on the trivet. Check that the bottom of the cooking pan is not in contact with the sauce mixture and that the top of the cooking pan does not exceed the Max line on the Instant Pot. (Note: If you don’t have these accessories, you can also make the rice separately!)
  7. Using the display panel select the MANUAL function*. Use the +/- keys and program the Instant Pot for 10 minutes.
  8. When the time is up, let the pressure naturally release for 10 minutes, then quick-release the remaining pressure.
  9. Open the pot and carefully remove the rice pan and riser. Fluff the rice with a fork and set aside.
  10. Mix together the cornstarch with 2 tbsp cold water in a small bowl and stir into the sauce until thickened, cooking 2-3 minutes, returning to SAUTE mode if needed.
  11. Add the green onions to the pot, stir to mix. Select CANCEL to turn off the pot and let the mixture cool for 5 minutes before serving.
  12. Serve beef and sauce over rice and garnish with sesame seeds.

Watch the recipe video here:

Instant Pot Mongolian Beef and RiceFULL RECIPE: http://chopsecrets.com/instant-pot-mongolian-beef-and-rice/

Posted by Chop Secrets on Saturday, March 2, 2019

Main dish

Bucatini with Butter-Roasted Tomato Sauce

Bucatini with Butter-Roasted Tomato Sauce
We love the way that roasting intensifies the flavor of canned tomatoes. While we're pretty obsessed with the texture of bucatini, a strand pasta with a hole running through it, this dish is every bit as delicious with spaghetti, linguine, or even rigatoni.
Author:
Cuisine: American
Recipe type: Main dish
Ingredients
  • 8 garlic cloves
  • ¼ cup (½ stick) unsalted butter
  • 1 28-ounce can whole peeled tomatoes
  • 2 anchovy fillets packed in oil
  • ½ teaspoon crushed red pepper flakes, plus more for serving
  • Kosher salt
  • Freshly ground black pepper
  • 12 ounces bucatini or spaghetti
  • Finely grated Parmesan (for serving)
Instructions
  1. Preheat oven to 425°. Crush 8 garlic cloves with the flat side of a chef's knife and remove peel. Cut ¼ cup (½ stick) butter into small pieces (about ½").
  2. Empty 28 oz. can of tomatoes into a 13x9" baking dish and crush lightly with your hands. Watch out for flying tomato juices. Scatter garlic, butter pieces, 2 anchovies, and ½ tsp. red pepper flakes over tomatoes; season with salt and black pepper.
  3. Roast tomatoes, tossing halfway through, until garlic is very soft and mixture is thick and jammy, 35–40 minutes. While tomatoes are roasting, bring a large pot of water (4-6 qt.) to a boil over high heat and add a small fistful of salt.
  4. Remove pan from oven and let sauce cool slightly. Using a potato masher or fork, break up garlic and tomatoes until mixture looks like coarse applesauce.
  5. Cook 12 oz. bucatini or spaghetti in pot of boiling water, stirring occasionally with tongs, according to package instructions for al dente. Toward end of cook time, use a heatproof measuring cup to scoop out and reserve ½ cup pasta cooking liquid. Drain pasta in a colander; reserve pot.
  6. Return pasta to pot and add tomato sauce and pasta cooking liquid. Cook over medium-high heat, tossing with tongs, until sauce coats pasta, about 3 minutes.
  7. Divide pasta among plates. Serve topped with Parmesan and more red pepper flakes.
Do Ahead: Tomato sauce can be made 4 days ahead. Let cool; cover and chill. Reheat before mixing with pasta.

Watch the recipe video here:

Because you need more butter-roasted things in your life. (via Basically)Recipe: http://bonap.it/8kyDbdY

Posted by Bon Appétit Magazine on Saturday, March 2, 2019

Main dish

Instant Pot Mini Mushroom Quiche

Instant Pot Mini Mushroom Quiche
Delicate mushrooms are a perfect accompaniment to the bold flavor of the asiago.
Author:
Cuisine: American
Recipe type: Main dish
Ingredients
  • 3 oz asiago cheese, shredded
  • 2 oz mushrooms, finely diced
  • 1 tbsp chives, snipped
  • 3 tbsp spinach leaves, cut into thin ribbons
  • 4 eggs, beaten
  • ¼ cup heavy cream (or half and half)
  • ½ tsp garlic salt
  • ½ tsp kosher salt
  • 1 cup water
  • Additional asiago cheese for garnish (optional)
Instructions
  1. Coat the inside of a silicone mold (we love these: https://amzn.to/2Q2dnyq) with nonstick spray.
  2. Firmly press the asiago cheese into the bottom and slightly up the sides of the silicone mold. Top with diced mushrooms, chives, and spinach.
  3. Combine the eggs, cream, garlic salt and salt in a medium bowl and whisk thoroughly. Pour into molds. Molds should not be more than ¾ full.
  4. Pour one cup of water in the Instant Pot and insert the trivet. Carefully lower the mold on to the trivet. Secure the lid, making sure the vent is closed.
  5. Using the display panel select the MANUAL function*. Use the +/- keys and program the Instant Pot for 5 minutes.
  6. When the time is up, let the pressure naturally release for 5 minutes, then quick-release the remaining pressure.
  7. Carefully remove the mold and turn out onto a plate while still warm. Immediately flip each mini quiche so that the mushrooms are on top and press down lightly with fingers to flatten the bottom of each quiche.
  8. Garnish with additional asiago cheese if desired. Serve warm.

Watch the recipe video here:

Instant Pot Mini Mushroom QuicheFULL RECIPE: http://chopsecrets.com/instant-pot-mini-mushroom-quiche/

Posted by Chop Secrets on Friday, March 1, 2019

Dessert

Rhubarb Custard Bars

Rhubarb Custard Bars
Once I tried these rich, gooey bars, I just had to have the recipe so I could make them for my family and friends. The shortbread-like crust and rhubarb and custard layers inspire people to find rhubarb they can use to fix a batch for themselves. —Shari Roach, South Milwaukee, Wisconsin
Author:
Cuisine: American
Recipe type: Dessert
Ingredients
  • 2 cups all-purpose flour
  • ¼ cup sugar
  • 1 cup cold butter
FILLING:
  • 2 cups sugar
  • 7 tablespoons all-purpose flour
  • 1 cup heavy whipping cream
  • 3 large eggs, beaten
  • 5 cups finely chopped fresh or frozen rhubarb, thawed and drained
TOPPING:
  • 6 ounces cream cheese, softened
  • ½ cup sugar
  • ½ teaspoon vanilla extract
  • 1 cup heavy whipping cream, whipped
Instructions
  1. In a bowl, combine the flour and sugar; cut in butter until the mixture resembles coarse crumbs. Press into a greased 13x9-in. baking pan. Bake at 350° for 10 minutes.
  2. Meanwhile, for filling, combine sugar and flour in a bowl. Whisk in cream and eggs. Stir in the rhubarb. Pour over crust. Bake at 350° until custard is set, 40-45 minutes. Cool.
  3. For topping, beat cream cheese, sugar and vanilla until smooth; fold in whipped cream. Spread over top. Cover and chill. Cut into bars. Store in the refrigerator.

Watch the recipe video here:

Bring on spring with these rich & gooey rhubarb bars! Get the recipe for these Rhubarb Custard Bars: https://trib.al/6hZyr9X

Posted by Taste of Home on Friday, March 1, 2019

Main dish

Instant Pot Chicken Fettuccini Alfredo

Instant Pot Chicken Fettuccini Alfredo
This dish is truly a one-pot wonder.
Author:
Cuisine: American
Recipe type: Main dish
Ingredients
Chicken Mixture:
  • 1 tbsp olive oil
  • 2 lbs chicken breasts, boneless and skinless
  • ½ tsp kosher salt
  • ¼ tsp black pepper
Sauce Mixture:
  • 2 tbsp butter
  • 5 cloves garlic, minced
  • 2 cups heavy cream
  • 2½ cups chicken broth
  • ¼ tsp kosher salt
  • 1 pinch ground nutmeg
  • 1 lb dry fettuccini noodles, broken in half to fit flat in the pot
To Finish:
  • ¾ cup parmesan cheese, shredded
  • 3 tbsp fresh basil, cut into thin ribbons
Instructions
  1. Add olive oil to the Instant Pot. Using the display panel select the SAUTE function. Season the chicken with salt and pepper.
  2. When oil gets hot, brown the chicken on both sides, 3-4 minutes per side. Meat will not be cooked through. Do not crowd the pot–you may have to work in batches. Transfer browned meat to a shallow dish and cover loosely with foil.
  3. Add butter to the Instant Pot. When butter is melted, add garlic and cook for 1 minute or until it just begins to brown.
  4. Mix in cream, broth, salt, and nutmeg and deglaze by using a wooden spoon to scrape the brown bits from the bottom of the pot.
  5. Fan the noodles in the pot (this will help prevent them from sticking in clumps), and ensure all noodles are submerged. Nestle chicken breasts in sauce in an even layer, turning once to coat.
  6. Turn the pot off by selecting CANCEL, then secure the lid, making sure the vent is closed.
  7. Using the display panel select the MANUAL function*. Use the +/- keys and program the Instant Pot for 10 minutes.
  8. When the time is up, let the pressure naturally release for 10 minutes, then quick-release the remaining pressure.
  9. Turn the pot off by selecting CANCEL. Carefully remove the chicken to a cutting board and slice into bite-sized pieces.
  10. Return chicken to the pot, stir in parmesan cheese and serve immediately, garnished with basil.

Watch the recipe video here:

Instant Pot Chicken Fettuccini AlfredoFULL RECIPE: http://chopsecrets.com/instant-pot-chicken-fettuccini-alfredo/

Posted by Chop Secrets on Friday, March 1, 2019

Main dish

Hawaiian Sausage Skillet

Hawaiian Sausage Skillet
I made this up one day when I couldn't find a recipe anywhere with these ingredients. So I kind of threw it together on a whim. Sugar can be adjusted for sweetness, and if the sauce gets a bit thicker than desired I suggest adding a little chicken broth as it's thickening. Serve immediately over rice.
Author:
Cuisine: American
Recipe type: Main dish
Ingredients
  • 1 tablespoon vegetable oil, or more to taste
  • 1 (16 ounce) package Polish sausage, or to taste, cut into 1-inch squares
  • 1 large onion, thinly sliced
  • 1 large green bell pepper, cut into 1-inch squares
  • ¾ fresh pineapple - peeled, cored, and cut into chunks
  • 2 tablespoons cornstarch
  • ½ cup pineapple juice, or more to taste
  • ⅓ cup packed brown sugar, or to taste
  • 2 tablespoons cider vinegar
  • 2 tablespoons soy sauce
  • 2 teaspoons minced garlic
Instructions
  1. Heat oil in a large skillet over medium heat. Cook and stir sausage, onion, and green bell pepper until vegetables start to become tender, about 8 minutes; add pineapple and cook, stirring occasionally, until the pineapple is hot, about 5 minutes more.
  2. Beat pineapple juice and cornstarch together in a bowl using a whisk. Stir brown sugar, cider vinegar, soy sauce, and minced garlic with the pineapple juice until the sugar dissolves into the liquid; pour over the sausage mixture and cook until the sauce thickens, 5 to 8 minutes.

Watch the recipe video here:

Hawaiian Sausage Skillet: https://trib.al/T9hcADm

Posted by Allrecipes on Thursday, February 28, 2019

Dessert

Jellied bouillon with frankfurters

Jellied bouillon with frankfurters
We're back at it again! Bringing the retro recipes back to the 21st century with jellied bouillon with frankfurters. If you're looking for something out of the ordinary to serve to your guests at your next get together, this is one recipe you need to try!
Author:
Cuisine: American
Recipe type: Dessert
Ingredients
  • 2 tablespoons unflavored gelatin
  • ½ cup cold water
  • 3 cups hot beef stock
  • 10 hot dogs
  • 3 hard boiled eggs, halved
  • ½ cup celery, diced
Instructions
  1. In a small bowl, combine cold water and gelatin. Pour the mixture into hot beef stock. Whisk well, until well combined.
  2. Arrange hot dogs, eggs, and celery in a loaf pan. Slowly pour the gelatin mixture to fill the pan. Place in the fridge to chill for about 4 hours, or until completely set.
  3. Once firm, quickly invert the loaf pan onto a serving platter. Garnish with sliced cucumber.

Watch the recipe video here:

Would you dare to try this?Recipe: http://sha.red/XpSef

Posted by Shared Food on Wednesday, February 27, 2019