Main dish

Chicken Bacon Ranch Dough Balls

Chicken Bacon Ranch Dough Balls
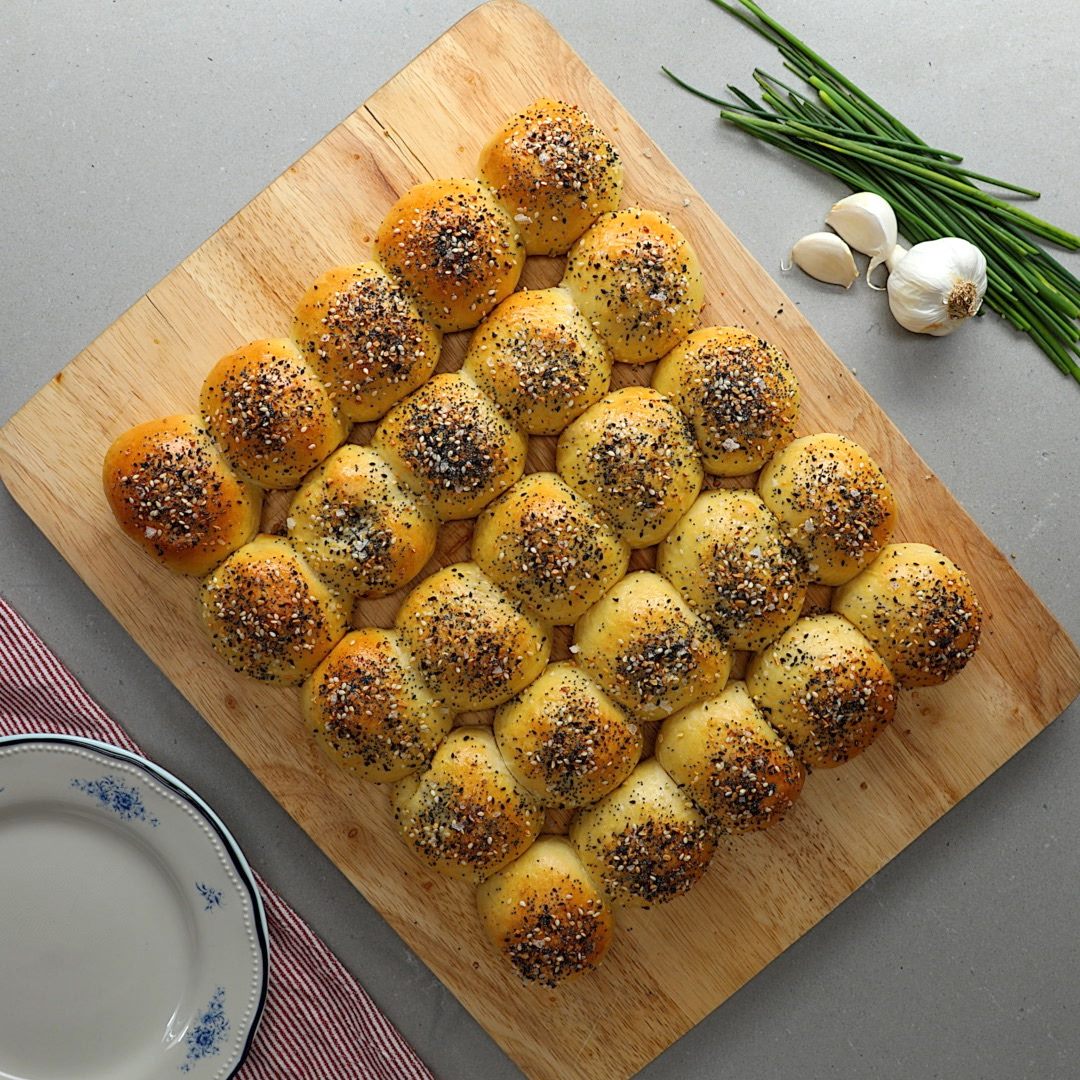
Stuffed doughballs are incredibly delicious. These chicken bacon ranch dough balls are also topped with one of our favourites...everything bagel seasoning. It rounds them out so perfectly!
Author:
Cuisine: American
Recipe type: Main dish
Ingredients
  • 3 cups shredded cooked chicken
  • ½ cup chopped cooked crispy bacon
  • ¼ cup chopped chives
  • 1 cup cream cheese
  • 1 cup grated cheddar cheese
  • ½ cup ranch dressing
  • 500g milk bread dough
  • 2 tbsp poppy seeds
  • 1 tbsp sesame seeds
  • 1 tbsp black sesame seeds
  • 1 tbsp granulated garlic
  • 1 tbsp granulated onion
  • 2 tsp coarse salt
  • Egg wash
Instructions
  1. Mix together chicken, bacon, chives, cream cheese, ranch, and grated cheese until combined.
  2. Take 30g balls of dough and flatten into a round. Place about 2 tbsp of the chicken mix into the centre. Fold up the sides and pinch to seal.
  3. Arrange on a tray fairly close together. Cover with cling film and let proof for 30 minutes or so.
  4. Meanwhile, mix together poppy seeds, sesame seeds, garlic, onion and coarse salt.
  5. Egg wash all of the buns and then sprinkle with everything mix.
  6. Bake at 180ºC for 15-20 minutes until golden brown.
  7. Enjoy!

Watch the recipe video here:

Chicken Bacon Ranch Dough Balls

Chicken Bacon Ranch Dough Balls

Posted by Twisted on Wednesday, August 1, 2018

Breakfast

Bacon Wrapped Jalapeno Popper Chicken Roll-ups

Bacon Wrapped Jalapeno Popper Chicken Roll-ups
Spirals occur naturally throughout the universe, from the ammonite to the fern, the whirlpool to the cyclone. Something in them draws us in, much like you are drawn in to this video of a chicken breast spiralled full of cheese wrapped in bacon and lovingly grilled over a charcoal BBQ.
Author:
Cuisine: American
Recipe type: Breakfast
Ingredients
  • 3 chicken breasts
  • 300g cream cheese
  • 100g mozzarella, finely grated
  • 100g cheddar, finely grated
  • 3 tbsp pickled jalapenos, finely chopped
  • 1 tsp salt
  • 1 tsp grated black pepper
  • 18 slices streaky bacon
Instructions
  1. Mix together the cream cheese, mozzarella, cheddar, pickled jalapenos, salt and pepper.
  2. Take the chicken breasts and lay each one on a large sheet of clingfilm. Cover with more clingfilm and bash, firmly but authoritatively, with a rolling pin to flatten them evenly to about 1.5 cm thickness.
  3. Spread the mixture onto each chicken breast and roll them up lengthways. Wrap them in bacon thoroughly to make sure the filling doesn't drip out too much.
  4. Bake or grill for roughly 15 - 20 minutes (or until cooked through). Don't worry if a little cheese mixture escapes.
  5. Serve with chips.

Watch the recipe video here:

Bacon Wrapped Jalapeno Popper Chicken Roll-ups

Bacon Wrapped Jalapeno Popper Chicken Roll-ups

Posted by Twisted on Wednesday, August 1, 2018

Cake

Magic Mushroom Cake

Magic Mushroom Cake
Mushrooms are magical in more than one way. This cake, for starters.
Author:
Cuisine: American
Recipe type: Cake
Ingredients
Cake
  • 350g all-purpose flour
  • 450g caster sugar
  • 100g cocoa powder
  • 1 tsp bicarbonate of soda
  • 1 tsp salt
  • 350g unsalted butter, softened
  • 4 large eggs, at room temperature
  • 350ml milk
  • 300g chopped mint slice cookies
Frosting
  • 2 batches chocolate Swiss meringue buttercream frosting
Magic mushrooms
  • 1 batch American buttercream frosting
  • 1 tbsp cocoa powder
  • 5 drops red food gel
Grass Frosting
  • 1 batch American buttercream frosting
  • Light green Frosting: 4 drops green food gel
  • Green frosting: 4 drops green food gel + 2 drops blue food gel
  • Dark green frosting: 4 drops green food gel + 2 drops blue food gel + 3 drops purple food gel
Flowers
  • ¼ batch American buttercream frosting
  • 2 drops blue food gel
  • 2 drops pink food gel
  • 2 drops yellow food gel
  • 2 drops orange food gel
Chocolate Bark
  • 500g dark chocolate (melted)
  • 300g white chocolate + 100g dark chocolate (melted together)
Instructions
Magic mushrooms
  1. To make magic mushrooms set aside 2 tbsp of white frosting in a small bowl. Add cocoa powder to the rest of the frosting and mix until well combined. Split the frosting in half and add the red food gel into the frosting. Mix until evenly coloured.
  2. Fit the end of a piping bag with a large round tip and pipe long upright stalks of light cocoa frosting onto a baking tray lined with baking paper. Chill
  3. Fit the end of another piping bag with a large round tip and pipe low, wide bulbs of red frosting. Add little blobs of white frosting to make the little white spot details. Chill the stalks and mushroom heads for about 40 min. Get them really chilled.
  4. Once the stalks are chilled use a very sharp knife to cut off the very top, creating a nice flat surface. Add a little dab of frosting on top of the stalk and stick the mushroom head on top. Keep chilled until ready to use.
Chocolate Bark
  1. Add a long piece of baking paper on a flat work surface. Drizzle the melted dark chocolate on top and use a large offset spatula to spread out the chocolate. Give it time to completely set. Use a fork to add some grooves in the set chocolate before you add some random light chocolate on top. Use the back of a tablespoon to spread it around. Let that second layer set completely before you use a sharp knife dipped in boiling water to cut different shaped rectangles of the bark. Kind of like random sized pieces of wood flooring.
Cake
  1. Please note: this chocolate cake recipe makes 1 batch. You’ll need two batches of chocolate cake to make this 6 layered cake. All other ingredients in the recipe are measured up to make the full 6 layer cake.
  2. Preheat a fan-forced oven to 140C (280F) or 160C (320F) for a conventional oven. Spray three 8” cake tins with oil spray and line the bottom with baking paper.
  3. Add the flour, sugar, cocoa powder, bicarb soda and salt to a large mixing bowl and mix together using a hand mixer to combine.
  4. Next add the softened butter and mix on low speed until mixture reaches a crumbly sand like texture.
  5. Add the eggs and milk and mix on low speed until no dry ingredients are showing. Scrape down the bowl and mix for another 20 seconds.
  6. Fill three 8” cake tins with batter. I find using an ice cream scooper to help me do this makes it easy to distribute the batter evenly so that everything bakes at the same time.
  7. Bake for 50-60 min or until a toothpick inserted comes out clean. If the pick comes out with wet batter, bake for a further 10 min at a time until baked fully. Allow the tins to cool for 2 min and then carefully flip the cake tins over on to a cooling rack to cool completely before using. Chilling your cakes overnight before decorating means they’ll be easier to trim and decorate. So I bake my cakes the day before I trim them.
  8. To trim your chilled cake use a cake leveller or large serrated knife to carefully trim the first layer of cake by trimming it in half. Then trim the crust off the second layer so that you end up with two layers from each baked cake. When trimming make sure you aim to get both layers of cake the same height. Keep that in mind when trimming the first layer so the next layer will still be the same height as the first when trimming the crust off. Once you’re done trimming your three baked cakes you should end up with 6 layers of cake altogether.
  9. To prepare crumb coat, add a dab of chocolate Swiss meringue buttercream frosting onto an 10” cake board or serving plate. Add the first layer of cake. Pipe a ring of frosting around the first layer and fill the centre of the cake with more frosting. Use a small offset spatula to spread around a little before adding some chopped mint slice cookies. Add the second layer of cake and repeat with the remaining layers. Add more frosting around and top of the cake. Use a your small spatula to smoothen out the top and bottom of the cake before using a cake scraper (otherwise known as a bench scraper) to smoothen out the frosting. Get it as neat as you can. This should just be a neat thin layer of frosting which is aimed at trapping any cake crumbs so that random bits of cake crumbs don’t show up on the outside of the cake. Chill for 2 hours or overnight.
  10. Add a fresh layer of frosting using a small offset spatula. Use a cake scraper to smoothen out the frosting around the sides. Then smoothen out the top using the cake scraper.
  11. Stick the chocolate bark all around the cake.
Grass Frosting
  1. Split the frosting up into 3 bowls. Use the colour formulations to colour the three different shades of frosting.
  2. Fit the end of a piping bag with a grass tip. Line half of the inside of your bag with the dark green frosting. Line the other half with the green frosting. Fill the centre with the light green frosting
  3. Pipe grass on top of the cake and around the bottom.
Flowers
  1. Split the frosting up into 5 bowls. Use the colour formulations to colour the 5 different shades of frosting. Fit the end of four separate piping bags with very small round tips. For the pink flowers fit the end of a piping bag with a small star tip. Pipe random mini blobs of each colour in the grass.
  2. Add the buttercream mushrooms on top to finish.

Watch the recipe video here:

Magic Mushroom Cake

Mushrooms are magical in more than one way. ?✨Taste for Yourself: https://taste.md/2LSsqfl?: The Scran Line

Posted by Tastemade on Wednesday, August 1, 2018

Dessert

Fluffy Chocolate Lava Pancakes

Fluffy Chocolate Lava Pancakes
Fluffy pancakes AND melted chocolate? The perfect breakfast! ??
Author:
Cuisine: American
Recipe type: Dessert
Ingredients
  • 1 cup (240 mL) heavy cream, hot
  • 1 cup (170 g) dark chocolate
  • 2 egg yolks
  • 2 tablespoons white sugar
  • 3 tablespoons butter, melted
  • 1 ½ cups (360 mL) milk
  • 2 cups (250 g) all-purpose flour
  • 2 teaspoons baking powder
  • 1 teaspoon salt
  • 4 egg whites
TOPPINGS (OPTIONAL)
  • maple syrup
  • powdered sugar
  • fresh berries
  • butter
Instructions
  1. Add the dark chocolate into the heated heavy cream. Mix both together until the chocolate fully melts forming a chocolate ganache.
  2. Pour the ganache into mason jar lid rings that are laying on a parchment paper-lined sheet tray. Freeze the chocolate ganache for at least 15 minutes to firm up.
  3. In a large bowl, add the egg yolks, sugar, and melted butter, whisk until smooth. Add in the milk, whisk again. Then sift in the flour, baking powder and salt.
  4. Whisk the dry ingredients into the wet until as smooth as possible. Small lumps are perfectly fine.
  5. Beat the egg whites until stiff peaks form and then fold them into the pancake batter until just combined.
  6. In a small skillet, melt butter until bubbling and then add your pancake batter. Take chocolate ganache disc straight from the freezer and place on top of the batter and press in down to the center. Put another layer of batter over the top.
  7. Cover the skillet with a lid and let the pancakes cook on low heat for 20-30 minutes or until the top has full set. Then flip the pancake and cook the other side for 2 minutes on medium heat to color the other side.
  8. Serve with butter, maple syrup, powdered sugar, or berries (optional).
  9. Enjoy!

Watch the recipe video here:

Fluffy Chocolate Lava Pancakes

Fluffy pancakes AND melted chocolate? The perfect breakfast! ??FULL RECIPE: https://tasty.co/recipe/fluffy-chocolate-lava-pancakes

Posted by Proper Tasty on Saturday, June 16, 2018

Main dish

Bibimbap By Chef Esther Choi

Bibimbap By Chef Esther Choi
Have you tried Bibimbap? We teamed up with James Beard Foundation Greens and Chef Esther Choi to bring you this amazing Korean staple! ??
Author:
Cuisine: Italian
Recipe type: Main dish
Ingredients
  • MEAT MARINADE
  • 8 oz (225 g) ribeye steak, thinly sliced
  • 2 green onions, chopped
  • ½ red chili, thinly sliced
  • 1 clove garlic, thinly sliced
  • 2 tablespoons soy sauce
  • 1 tablespoon sesame oil
  • 2 teaspoons sugar
  • 1 teaspoon mirin
  • BIBIMBAP
  • 1 cup (40 g) fresh spinach
  • ½ cup (120 mL) sesame oil, divided, plus 1 tablespoon
  • 3 tablespoons salt, divided
  • ¼ cup (25 g) bean sprout
  • ½ yellow squash, julienned
  • ½ zucchini, julienned
  • ¼ cup (35 g) daikon radish, julienned
  • ¼ cup (60 mL) water
  • ½ carrot, julienned
  • ¼ cup (20 g) dried shiitake mushroom
  • ½ cup (120 mL) hot water
  • 2 cloves garlic, minced, divided
  • 1 tablespoon gochugaru
  • 2 teaspoons sesame seeds, plus more for garnish
  • 1 cucumber, halved lengthwise, seeded and sliced
  • 4 cups (920 g) purple rice, cooked - equal portions of white, black, and brown rice
  • 4 fried eggs
  • 2 green onions, cut into 2-inch (5-cm) pieces, thinly sliced
  • 1 tablespoon nori seaweed, thinly sliced
  • ¼ cup (20 g) kimchi, thinly sliced, for serving
  • ¼ cup (20 g) gochujang, for serving
Instructions
  1. To marinate the meat, add the ribeye to a medium bowl with the green onion, red chili, garlic, soy sauce, sesame oil, sugar, and mirin. Mix until the meat is well-coated. Marinate in the refrigerator for at least 30 minutes.
  2. Bring a large pot of water to boil over high heat and season generously with salt. Blanch the spinach for 30 seconds, transfer to an ice bath to shock, and drain. Transfer to a small bowl and season with 1 teaspoon of sesame oil, a pinch of salt, and pepper.
  3. Blanch the bean sprouts for 1-2 minutes, then shock the ice bath. Strain and pat dry with a paper towel. Transfer to a small bowl and season with 1 teaspoon sesame oil, a pinch of salt, and pepper.
  4. In a medium skillet over medium heat, add 1 tablespoon of sesame oil, the yellow squash, and 1 teaspoon salt. Sauté for 2-3 minutes, until the squash is softened. Set the squash aside in a small bowl.
  5. In the same skillet over medium heat, add another tablespoon of sesame oil, the zucchini, and 1 teaspoon of salt. Sauté for 2-3 minutes, until the zucchini is softened. Set aside in a small bowl.
  6. Add another tablespoon of sesame oil, the daikon, and a teaspoon of salt to the same skillet and for sauté over medium heat for 30 seconds. Add ¼ cup (60 ml) of water and cook until liquid has evaporated, 4-5 minutes. Set aside in a small bowl.
  7. In the same skillet over medium heat, add another tablespoons of sesame oil, the carrots, and 1 teaspoon of salt and sauté for 2-3 minutes, until softened. Set aside in a small bowl.
  8. In a small bowl, pour the hot water over the dried mushrooms and soak for 5 minutes, or until the mushrooms have softened. Wring out excess moisture from the mushrooms and thinly slice.
  9. In the skillet over medium heat, add 1 tablespoon of sesame oil and sauté 1 minced clove of garlic for 30 seconds, or until fragrant. Add the mushrooms and sauté for 2-3 minutes more. Set aside in a small bowl.
  10. Add the remaining ¼ cup (60 ml) of sesame oil to a liquid measuring cup or small bowl. Add 2 teaspoons of salt, the remaining minced garlic clove, the gochugaru, and sesame seeds and whisk to combine.
  11. Pour a bit of the seasoned oil over the sautéed beans sprouts, sliced cucumber, and blanched spinach, tossing with your fingers to coat.
  12. Heat a large skillet over high heat, then add the ribeye and marinade and stir-fry for 2-3 minutes, until the beef is browned. Remove the pan from the heat.
  13. Assemble the bibimbap: Place the rice in the center of a shallow dish. Add the cucumber, mushrooms, zucchini, carrots, daikon, spinach, bean sprouts, and yellow squash around the sides of the rice. Scoop the beef into the center of the rice and top with the fried egg. Garnish with thinly sliced green onions and nori and a sprinkle of sesame seeds.
  14. Serve the bibimbap with kimchi and gochujang. To eat, mix everything together.
  15. Enjoy!

Watch the recipe video here:

Bibimbap by Chef Esther Choi

Have you tried Bibimbap? We teamed up with James Beard Foundation Greens and Chef Esther Choi to bring you this amazing Korean staple! ??FULL RECIPE: https://tasty.co/recipe/bibimbap-by-chef-esther-choi

Posted by Tasty on Sunday, June 17, 2018

Breakfast

Ham And Cheese Lattice Quiche

Ham And Cheese Lattice Quiche
Wake up and get some ham and cheese lattice quiche in your life ?
Author:
Cuisine: American
Recipe type: Breakfast
Ingredients
  • 4 premade pie crusts
  • 2 tablespoons flour
  • 2 cups (340 g) dried bean
  • 8 eggs
  • ¼ cup (35 g) zucchini, sliced
  • 1 cup (200 g) tomato, chopped
  • ¼ cup (25 g) shredded mozzarella cheese
  • ¼ teaspoon pepper
  • ¼ teaspoon salt
  • 1 cup (240 mL) heavy cream
  • 10 slices ham slice, ½ inch (2 cm) piece
  • 15 slices cheese slice, ½ inch (2 cm) piece
Instructions
  1. Preheat oven to 350°F (177°C).
  2. On a floured surface, trim the pie crusts to fit a 9x9-inch (23x23-cm) square pan.
  3. Overlap the pie crusts slightly and use a rolling pin to roll out until smooth.
  4. Place the large pie crust onto the parchment paper-lined square pan, so that the edges hang over the sides of the pan
  5. Line the asparagus stalks along the edge of the pan.
  6. Cover the asparagus border with pie the crust, trimming any excess.
  7. Place a parchment paper square at the base of the pie crust and add dried beans.
  8. Bake the pie crust for 40 minutes.
  9. In a bowl, whisk the eggs.
  10. Add in the asparagus, zucchini, tomatoes, mozzarella, pepper, salt, and heavy cream, whisking to combine.
  11. Pour the mixture into the baked pie crust and bake for another 40 minutes.
  12. On a sheet of parchment paper, assemble the ham and cheese lattice.
  13. Lay the lattice on top of the quiche.
  14. Bake for another 20 minutes.
  15. Remove the parchment paper and cut the quiche into 9 servings.
  16. Enjoy!

Watch the recipe video here:

Ham And Cheese Lattice Quiche

Wake up and get some ham and cheese lattice quiche in your life ?FULL RECIPE: https://tasty.co/recipe/quiche-with-ham-and-cheese-lattice

Posted by Proper Tasty on Sunday, June 24, 2018

Cake

Pull-Apart Pool Cupcake Cake

Pull-Apart Pool Cupcake Cake
It's everybody into the pool for this fun summer dessert that requires little more than box cake mix, frosting and colorful supermarket candy.
Author:
Cuisine: American
Recipe type: Cake
Ingredients
  • Cupcakes:
  • One 15.25-ounce box vanilla cake mix (plus required ingredients)
  • Three 16-ounce tubs vanilla frosting
  • Blue food coloring, as needed
  • Decorations:
  • 6 ounces blue candy-coated chocolates, such as M & M's
  • 14 ounces white candy-coated chocolates, such as M & M's
  • One 3-ounce package blue sweetened powdered gelatin (1/4 cup)
  • 1 striped sour candy belt
  • 11 graham cracker bears
  • 2 candy necklaces
  • 1 small jawbreaker
  • 2 gummy ring candies, such as Lifesavers Gummies
  • 1 chocolate chew candy, such as Tootsie Roll
  • 1 white flat taffy candy strip, such as Airheads
  • 1 green flat taffy candy strip, such as Airheads
Instructions
  1. Special equipment: two 12-cup muffin pans; 24 cupcake liners; a pastry bag fitted with a large round tip; an offset spatula; 2 drink umbrellas
  2. For the cupcakes: Line two 12-cup muffin pans with cupcake liners. Prepare the cupcakes according to the package directions. Transfer to cooling racks and cool completely.
  3. In a clean mixer bowl, combine 1½ tubs of the frosting and about ¼ teaspoon blue food coloring. Beat until smooth and no streaks remain, adding more color if needed to make a light blue frosting.
  4. Dollop a tiny bit of blue frosting on the bottom of the liner of one of the cupcakes (this will help anchor it to the serving tray), then dollop a generous amount on top of the cupcake. Anchor the cupcake to a serving tray large enough to hold all 24 cupcakes. Repeat with the remaining cupcakes, arranging them in a 4-by-6 cupcake grid with the edges touching.
  5. Using an offset spatula, smooth the blue frosting across the tops of the cupcakes, adding more as necessary, so it appears as 1 layer and the individual cupcakes are no longer visible. Smooth the remaining blue frosting on the sides to cover the cupcakes but not the liners.
  6. Put the remaining 1½ tubs white frosting in a pastry bag fitted with a large round tip. Pipe the outline of a rectangle in white (about 5 by 7 inches) closer to one short edge of the cupcake grid to make the pool. Pipe around the outline of the rectangle all the way to the edges of the cupcake grid with white, leaving the inside of the pool blue. Smooth the white frosting with an offset spatula.
  7. For the decorations: Arrange a row of blue candy-coated chocolates on the white frosting around the perimeter of the pool, then arrange another row of blue candy-coated chocolates around the outer perimeter of the cupcake grid. Fill in between the 2 blue rows with rows of white candy-coated chocolates to make the pool deck. Chill the cake 30 minutes to set the frosting inside the pool.
  8. Meanwhile, bring ½ cup water to a boil in a small saucepan. Stir in the blue gelatin until dissolved. Combine a mixture of water and ice in a measuring cup to make ½ cup. Stir into the dissolved gelatin until the ice melts. Chill the gelatin mixture while the cake chills. After 30 minutes, pour the gelatin into the pool. Chill until completely set, about 2 hours.
  9. Cut 2 strips of sour candy belt, each slightly larger than a graham bear, to make beach towels. Lay 1 bear on each towel and arrange them to relax by the pool. Add a drink umbrella over each to shade them from the sun.
  10. Cut the candy necklaces open where they tie to make 2 long strips. Cut 2 strips the same size as the length of the pool and arrange them over the gelatin for lanes. Gently pull out and discard the strings, keeping the candies in straight lines. Arrange 3 bears around a jawbreaker in the pool to play a game of volleyball. Stick a bear in each gummy ring candy for floaties and add to the pool.
  11. Cut the chocolate chew into 4 pieces crosswise to make legs for the diving board. Cut a 1½-inch piece from the white taffy and attach it to the legs to make a diving board. Set at the deep end of the pool and press a bear at the end, ready to dive in.
  12. Cut the green taffy into a rectangle a little larger than a bear. With the back of a paring knife, score lines in the taffy to resemble the puffy parts of a blow-up raft. Stick a bear on the raft and add him to the pool. Stick the remaining bears in the pool to hang out.

Watch the recipe video here:

How to Make A Pull-Apart Pool Cupcake Cake

Recipe of the Day: Pull-Apart Pool Cupcake Cake ? Save this recipe: http://bit.ly/2MnoPDh.

Posted by Food Network on Friday, June 22, 2018

Main dish

Mini Taco S’mores

Mini Taco S'mores
A genius muffin-tin hack makes quick work of turning out mini taco shells and a kitchen blowtorch gives these gooey dessert tacos a campfire taste. And did we mention the melted chocolate inside?
Author:
Cuisine: American
Recipe type: Main dish
Ingredients
  • Ten 8-inch flour tortillas
  • 1 stick (8 tablespoons) unsalted butter, chopped
  • ¼ cup granulated sugar
  • 1 teaspoon ground cinnamon
  • 3 cups mini marshmallows
  • Six 1.55-ounce milk chocolate bars, such as Hershey's, broken into rectangles
  • 2 graham cracker sheets, finely crushed
Instructions
  1. Special equipment: a 3-inch round cutter; two 12-cup muffin tins; a kitchen blowtorch
  2. Preheat the oven to 350 degrees F. Use a 3-inch round cookie cutter to cut 34 rounds from the tortillas.
  3. Microwave the butter, sugar and cinnamon in a medium microwave-safe bowl in 30-second intervals, stirring in between each, until the butter is melted. Brush both sides of the tortilla rounds with the butter mixture.
  4. Flip two 12-cup muffin tins upside down. Place the tortilla rounds in between the muffin cups in both directions, folding them to create mini taco shells (you should get 17 per muffin tin). Bake until the shells are crisp and just beginning to turn light golden brown, 11 to 13 minutes.
  5. Carefully overstuff each shell with mini marshmallows while they are still warm and in the muffin tins. Using a kitchen blowtorch, toast the marshmallows until golden brown all over. Stuff 1 milk chocolate rectangle on top of the marshmallows on each taco, pushing it down so the warm marshmallows melt the chocolate. Let sit until partially melted, about 5 minutes, then use the kitchen blowtorch to melt the chocolate completely.
  6. Put the remaining chocolate in a small microwave-safe bowl and microwave in 30-second intervals, stirring in between each, until melted, about 1 minute.
  7. Transfer the tacos to a serving platter, sprinkle with the graham cracker crumbs and serve warm alongside the melted chocolate for dipping.

Watch the recipe video here:

How to Make Mini Taco S'mores

Recipe of the Day: Mini Taco S'mores ?❤️ Save this recipe: http://bit.ly/2JI59IV.

Posted by Food Network on Sunday, June 24, 2018

Main dish

Cajun Shrimp and Rice

Cajun Shrimp and Rice
Recipe of the Day: Cajun Shrimp and Rice ?
Author:
Cuisine: American
Recipe type: Main dish
Ingredients
  • 1 tablespoon unsalted butter
  • 2 tablespoons extra-virgin olive oil
  • 3 cloves garlic, minced
  • 2 teaspoons Cajun seasoning
  • 1 pound large shrimp, peeled and deveined, tails intact
  • Kosher salt and freshly ground pepper
  • 4 plum tomatoes, chopped
  • 2 bunches scallions, chopped
  • 3 cups cooked white rice
  • 3 tablespoons chopped fresh parsley
  • Lemon wedges, for serving (optional)
Instructions
  1. Heat the butter, olive oil and garlic in a large skillet over medium-high heat until fragrant, about 1 minute. Add the Cajun seasoning and shrimp and cook, stirring, until the shrimp begin to curl, about 1 minute. Season with salt and pepper.
  2. Add the tomatoes and scallions to the skillet and cook, stirring, about 1 minute. Add the rice and ¼ cup water and continue to cook until the rice is warmed through and the shrimp are opaque, about 3 more minutes. Stir in the parsley and serve with lemon, if desired.
  3. Per serving: Calories 357; Fat 11 g (Saturated 3 g); Cholesterol 176 mg; Sodium 537 mg; Carbohydrate 40 g; Fiber 3 g; Protein 23 g

Watch the recipe video here:

How To Make Cajun Shrimp and Rice

Recipe of the Day: Cajun Shrimp and Rice ? Save this recipe: http://bit.ly/2JOGbeF.

Posted by Food Network on Monday, June 25, 2018

Breakfast

Grilled Cheese Tacos

Grilled Cheese Tacos
GRILLED CHEESE TACOS
Author:
Cuisine: American
Recipe type: Breakfast
Ingredients
  • 12 slices white bread
  • 12 pieces cheddar cheese
  • Softened butter
  • 2 tsp oil
  • 500g beef mince
  • 1 white onion, diced
  • 2 cloves garlic, minced
  • Salt and pepper to taste
  • ½ cup passata
  • 2 tbsp taco seasoning
  • Shredded lettuce
  • Diced tomatoes
  • Sour cream
Instructions
  1. Heat oil over medium heat in pan. Add beef mince and cook until browned. Add taco seasoning, garlic, salt and pepper and cook until aromatic. Add passata to cook until reduced. Keep warm.
  2. Place one round of cheese between two pieces of white bread. Cut our a 5” circle where the cheese is. Remove crusts and save for breadcrumbs.
  3. Roll flat with a rolling pin. Spread butter on both sides. Form into a taco shape and place into an upside down muffin tin. Bake at 180ºC for about 10 minutes until golden brown.
  4. Fill each taco with taco mix and top with desired toppings
  5. Enjoy!

Watch the recipe video here:

Grilled Cheese Tacos

Grilled Cheese Tacos

Posted by Twisted on Tuesday, July 31, 2018