Showing 126 Result(s)
Main dish

Hanger Steak with Charred Scallion Sauce
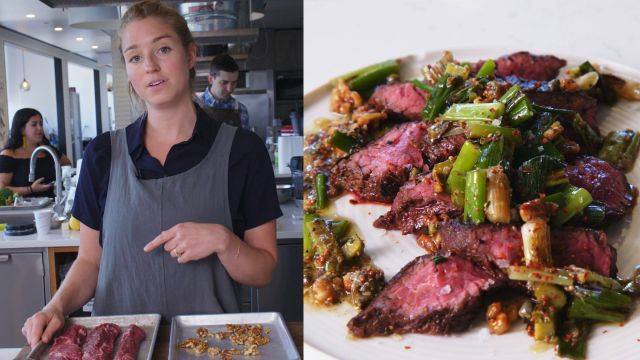
Hanger Steak with Charred Scallion Sauce
This sauce is an ode to the classic French dish of leeks in vinaigrette, swapping out the leeks for tender charred scallions. It acts as a bright, addictive condiment for this quick-cooking cut of steak. If you can’t find hanger steak, skirt steak works for this recipe—adjust cook time accordingly. The sauce also pairs well with roast chicken, pork chops...we could do this all day.
Author:
Cuisine: American
Recipe type: Main dish
Ingredients
  • ½ cup crushed or coarsely chopped walnuts
  • 1 small garlic clove
  • 9 Tbsp. extra-virgin olive oil, divided
  • 1 1½-lb. hanger steak, cut into 4 pieces, center membrane removed
  • Kosher salt, freshly ground pepper
  • ¾ tsp. Aleppo-style pepper, plus more for serving
  • 12 scallions
  • 5 tsp. sherry vinegar or red wine vinegar
  • 1 Tbsp. chopped cornichons
  • 1 Tbsp. chopped drained capers
  • 1 Tbsp. whole grain mustard
  • ¾ tsp. chopped thyme
  • Pinch of sugar
  • Flaky sea salt
Instructions
  1. Preheat oven to 350°. Toast walnuts on a rimmed baking sheet, tossing once, until golden brown, 8–10 minutes. Transfer to a medium bowl. Finely grate garlic over warm walnuts and toss with 6 Tbsp. oil.
  2. Heat a large cast-iron skillet over medium-high. Season steaks with kosher salt and black pepper; sprinkle all over with Aleppo-style pepper. Rub with 2 Tbsp. oil and cook, turning occasionally, until deeply browned and an instant-read thermometer inserted into the thickest part registers 130° for medium-rare, 10–12 minutes. Transfer steaks to a cutting board.
  3. Wipe out skillet and reduce heat to medium. Place scallions and 1 Tbsp. oil in skillet, season with kosher salt, and cook, turning occasionally, until softened and deeply charred, about 4 minutes. Transfer to cutting board; trim and cut into 1" pieces. Add to bowl with walnut mixture along with vinegar, cornichons, capers, mustard, thyme, and sugar and toss to combine; season with kosher salt and black pepper.
  4. Slice steak against the grain and sprinkle with sea salt. Serve with scallion sauce and more Aleppo-style pepper.

Watch the recipe video here:

If you've never charred scallions before, prepared to use this technique frequently. Make it: http://bonap.it/K8oHNd5

Posted by Bon Appétit Magazine on Saturday, May 4, 2019
Main dish

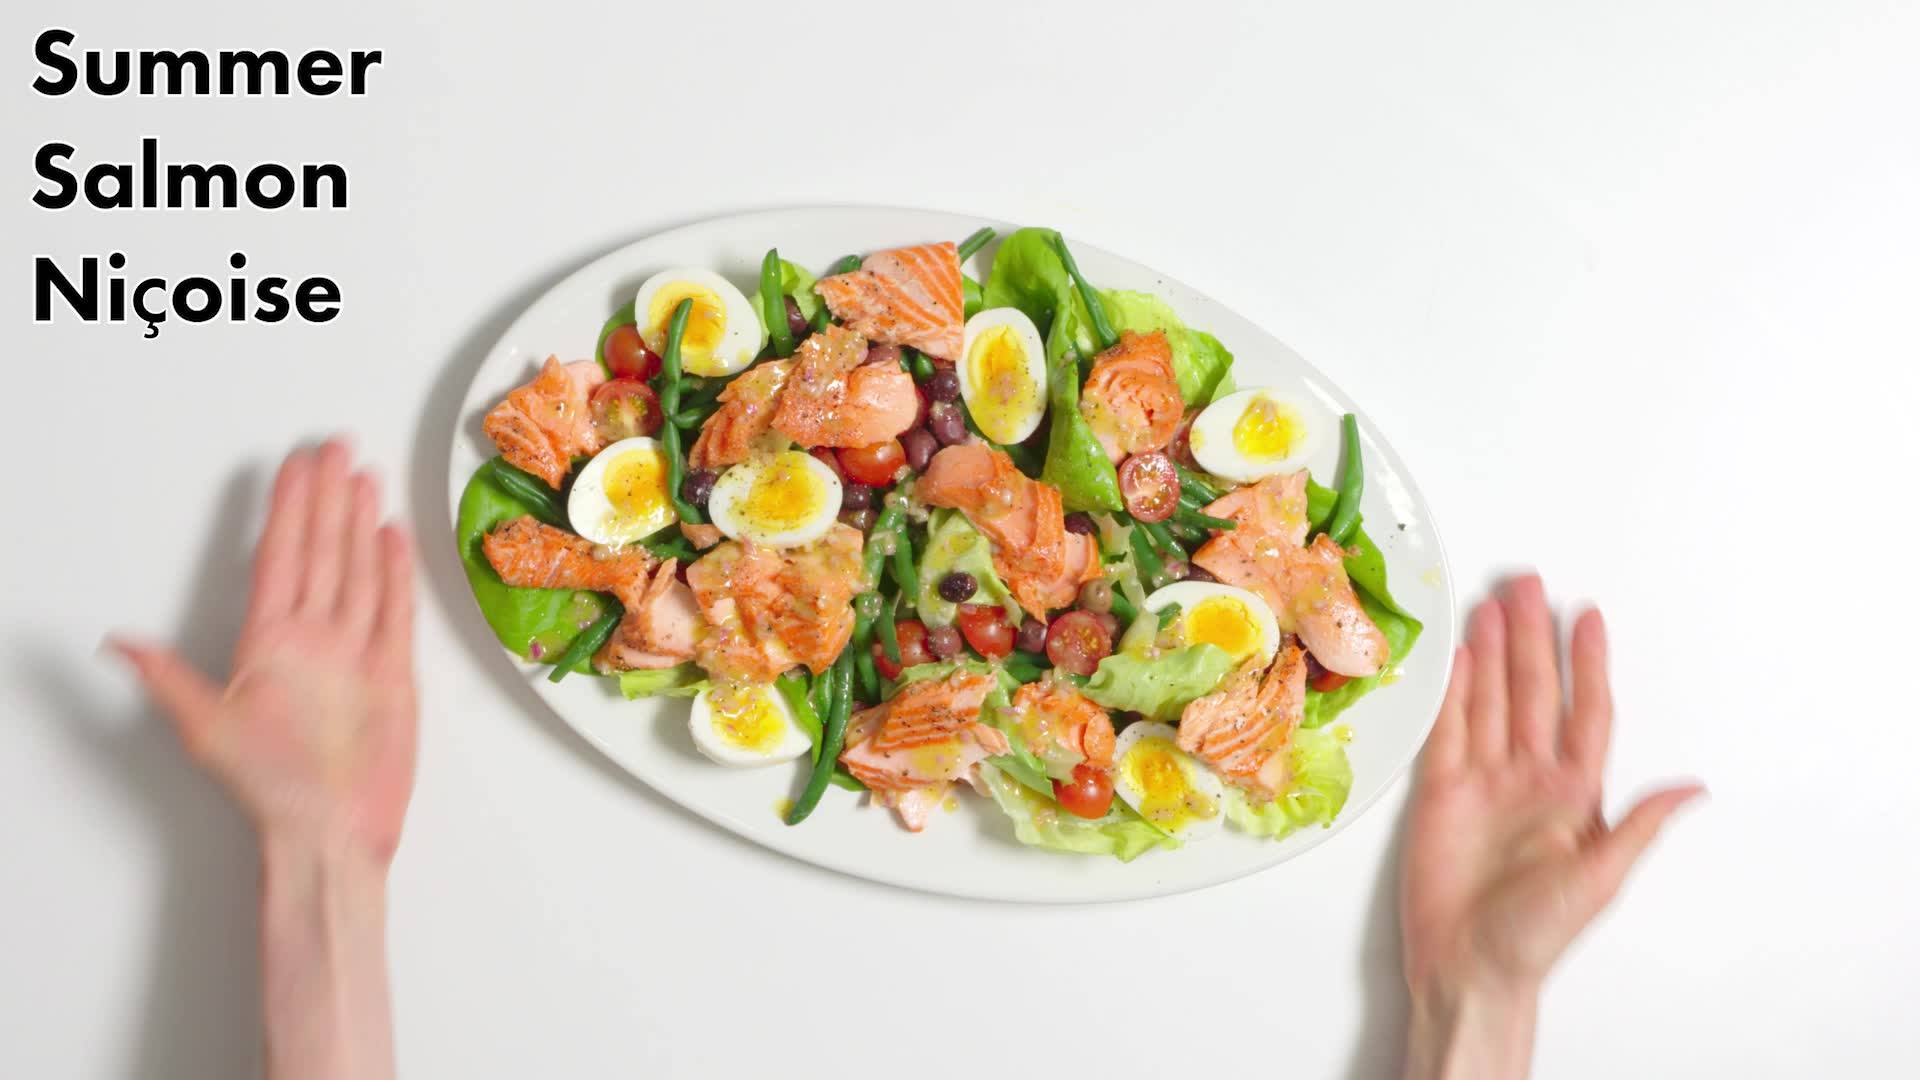
Summer Salmon Niçoise

Summer Salmon Niçoise
We love a classic Niçoise salad made with fancy oil-packed tuna, but using warm, slow-roasted salmon instead makes the whole thing feel a little more special. About that slow-roasted salmon: It is, hands down, the most foolproof way of achieving tender, perfectly-cooked fish we have ever come up with, no hot pan or sizzling oil necessary.
Author:
Cuisine: American
Recipe type: Main dish
Ingredients
  • 8 Tbsp. extra-virgin olive oil, divided
  • 1 lb. skinless salmon fillet
  • Kosher salt
  • Freshly ground pepper
  • 8 oz. green beans
  • 1 cup cherry tomatoes
  • 1 small shallot
  • 1 head of butter lettuce
  • 4 large eggs, room temperature
  • 1 Tbsp. Dijon mustard
  • 1 Tbsp. red wine vinegar
  • A pinch of sugar
  • ½ cup Niçoise or other black olives
Instructions
  1. Arrange a rack in center of oven; preheat to 300°. Pour 1 Tbsp. oil into center of a rimmed baking sheet, then arrange 1 lb. salmon over oil. Season salmon all over with salt and pepper, then drizzle with another 1 Tbsp. oil.
  2. Roast salmon until flesh flakes in the thickest part of the fillet with pressed gently, 30–35 minutes. Meanwhile, fill a medium saucepan three-quarters full with water. Add several generous pinches of salt and bring to a boil, covered, over medium-high heat.
  3. While salmon is cooking and water is coming to a boil, focus on the rest of your salad prep. First, trim stem end off of 8 oz. green beans.
  4. Cut 1 cup tomatoes in half.
  5. Peel and finely chop 1 shallot. Transfer to a medium bowl; set aside.
  6. Separate leaves from 1 head of lettuce and arrange across a large platter. Cover with damp paper towels and chill until ready to serve.
  7. When water is boiling, add green beans and cook until tender but still retain some snap, about 2 minutes. As you wait for the green beans to cook, fill another medium bowl halfway with ice water. Using tongs, remove green beans immediately (but leave boiling water right where it is) and transfer to bowl with ice water. Leave green beans there for 15–20 seconds, or just long enough to chill them completely, then remove from water and pat dry; set aside. Keep the ice water for cooking the eggs.
  8. Add 4 eggs to saucepan and cook exactly 8 minutes. Transfer to ice water bath and let cool 2 minutes. Peel eggs, keeping them submerged in ice bath as you work. Pat eggs dry and transfer to cutting board.
  9. Time to make your dressing: Add 1 Tbsp. mustard, 1 Tbsp. vinegar, and a pinch of sugar to bowl with shallot; season with salt and a generous amount of pepper. Whisking constantly, slowly stream in remaining 6 Tbsp. oil until you have a thick, emulsified dressing.
  10. Remove platter with lettuce from fridge and drizzle with about one-third of dressing. Arrange green beans, tomatoes, and ½ cup olives over lettuce. Cut eggs in half and tuck into gaps on platter.
  11. Using your hands or a fork, flake off large pieces of salmon and arrange over salad.
  12. Drizzle platter with remaining dressing. Season with salt and pepper.

Watch the recipe video here:

Seems fancier than it actually is. Promise. ( via Basically) Make it: http://bonap.it/rB3zQId

Posted by Bon Appétit Magazine on Friday, May 3, 2019

Main dish

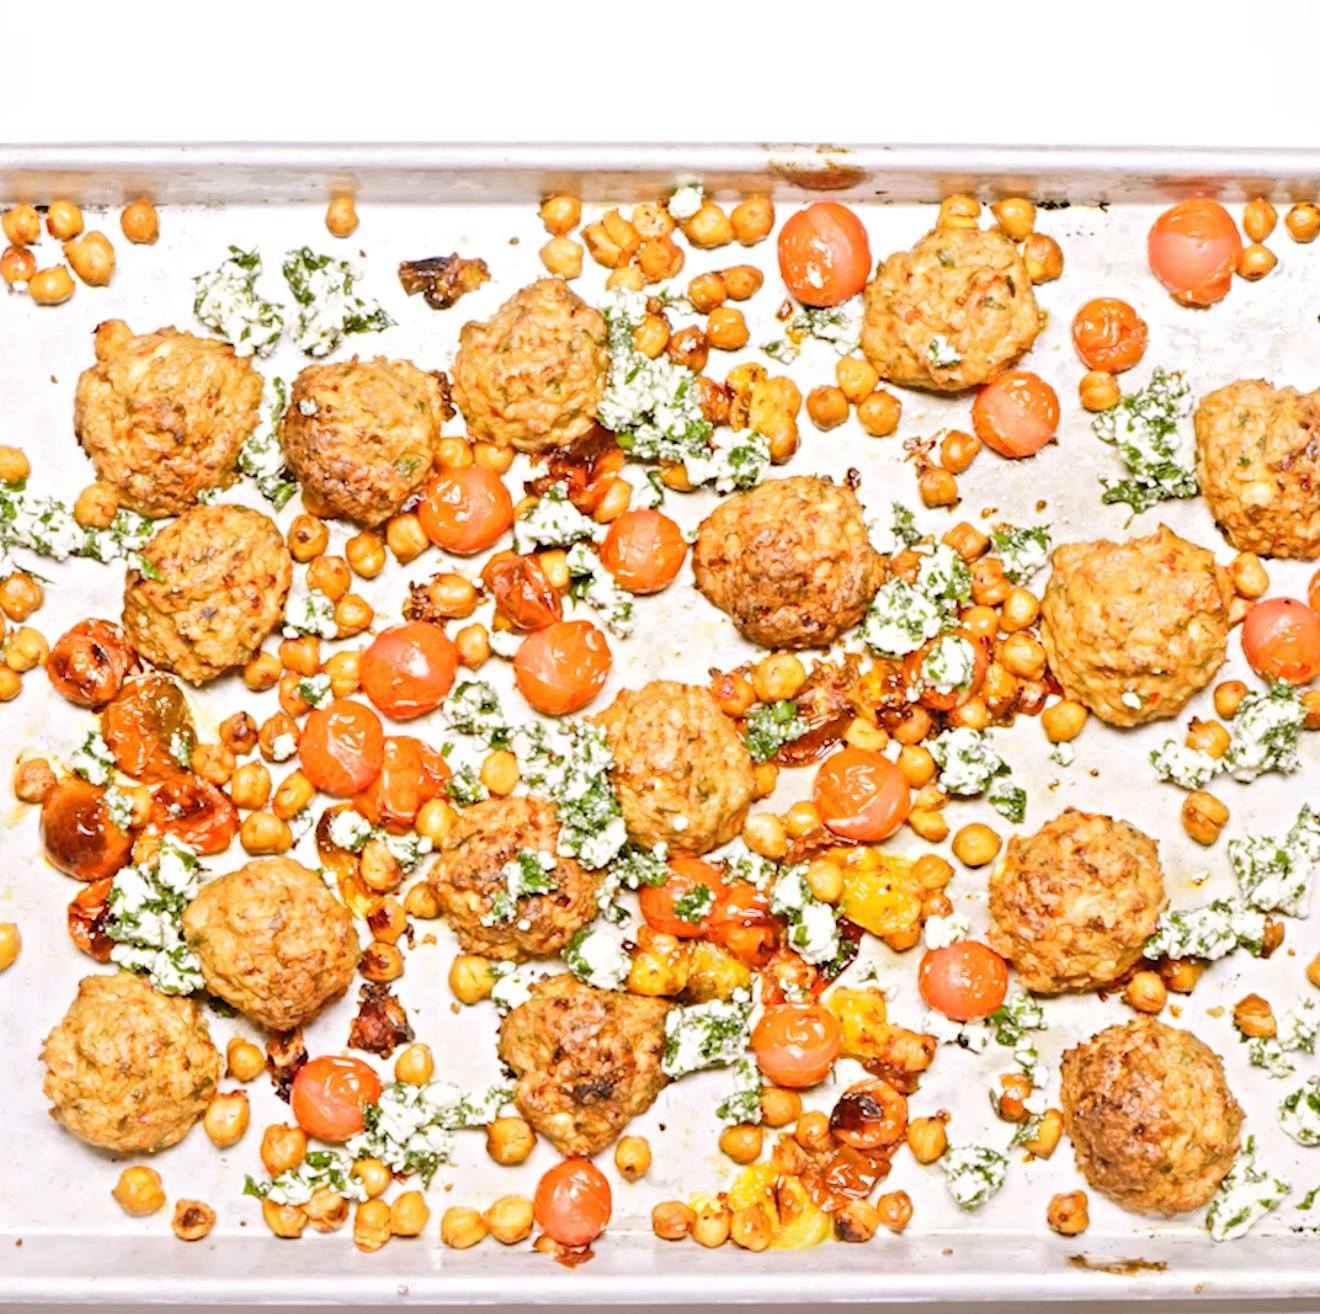
Sheet Pan Chicken Meatballs with Tomatoes and Chickpeas

Sheet Pan Chicken Meatballs with Tomatoes and Chickpeas
Harissa, a spicy North African paste of chiles, garlic, and spices, is available in many large grocery stores and Middle Eastern markets—some brands come in tubes, others are sold in jars. If you can’t find it, though, substitute by mixing together your favorite hot sauce, tomato paste, a pinch or two of ground cumin, and a drizzle of olive oil. Keep playing with the ratios until you have a medium-spicy paste.
Author:
Cuisine: American
Recipe type: Main dish
Ingredients
  • 6 tablespoons jarred harissa paste, such as Mina, divided
  • 1 large egg
  • ½ cup panko (Japanese breadcrumbs)
  • 6 ounces feta in brine plus ¼ cup brine, cheese crumbled, divided
  • ⅔ cup chopped parsley, divided
  • 6 tablespoons olive oil, divided
  • 3 garlic cloves, divided
  • 1 teaspoon kosher salt, plus more
  • Freshly ground black pepper
  • 1 pound ground chicken
  • 1 pint mixed cherry tomatoes, halved if large
  • 1 15-ounce can chickpeas, rinsed, drained
Instructions
  1. Place a rack in top of oven; preheat to 400°. Taste your harissa. If it’s extremely spicy, cut quantities used in recipe in half (most kinds in the jar are fairly mild).
  2. Using a fork, stir 1 egg, ½ cup panko, ¼ cup feta brine, half of crumbled feta, half of parsley, 4 Tbsp. harissa, and 2 Tbsp. oil in a large bowl until egg is blended and mixture looks homogenous.
  3. Finely grate 2 garlic cloves into bowl, then add 1 tsp. salt and several cranks of black pepper. Be pretty generous here; 10 cranks wouldn’t be too much! Stir again with a fork.
  4. Add chicken and work with clean hands until chicken is totally intermingled with panko mixture. Work it enough so that you don’t see big distinct pieces of meat, but then stop. Overworking could lead to crumbly meatballs. The mixture will feel very soft and wet and look a bit shiny.
  5. Pour tomatoes and chickpeas into the center of a large rimmed baking sheet. Add 2 Tbsp. oil and remaining 2 Tbsp. harissa. Season with a good pinch of salt and pepper. Using clean hands or a small spatula, toss everything together right on sheet until chickpeas and tomatoes are evenly coated. Next you’re going to form the meatballs, but don’t wash your hands if you used them—the coating of oil will prevent them from sticking to your palms.
  6. Roll chicken mixture gently and loosely between your palms into about 16 golf ball-sized balls (it’s okay if the balls aren’t perfectly round; just try to make them about the same size). Place on baking sheet, tucking them in and around chickpeas and tomatoes and spacing evenly apart.
  7. Bake meatballs on top rack until about halfway cooked through, 12–15 minutes. Remove from oven and take a look. The tomatoes should be starting to soften and burst, and the meatballs should look opaque and feel a bit springy to the touch. If not, bake a few minutes longer.
  8. Meanwhile, combine remaining 3 oz. feta, ⅓ cup parsley, and 2 Tbsp. oil in a small bowl, then grate in remaining garlic clove. Toss with fork to distribute. Turn on broiler (to high if your broiler has settings).
  9. Place baking sheet back on top rack if your broiler is on the top of your oven. If you have the kind that’s a drawer underneath the oven, slide ‘er right in. Broil meatballs, rotating tray once or twice if they’re browning unevenly, until browned and fully cooked through, some tomatoes are lightly charred, and some chickpeas are crisp, 8–10 minutes.
  10. Let sit a few minutes, then sprinkle feta mixture over meatballs.
Do Ahead: Meatballs can be formed on baking sheet 1 day ahead. Cover with plastic wrap and chill.

Watch the recipe video here:

These sheet pan chicken meatballs are exactly what you should make tonight. (via Basically)Recipe: http://bonap.it/t1vtVuE

Posted by Bon Appétit Magazine on Monday, April 29, 2019

Main dish

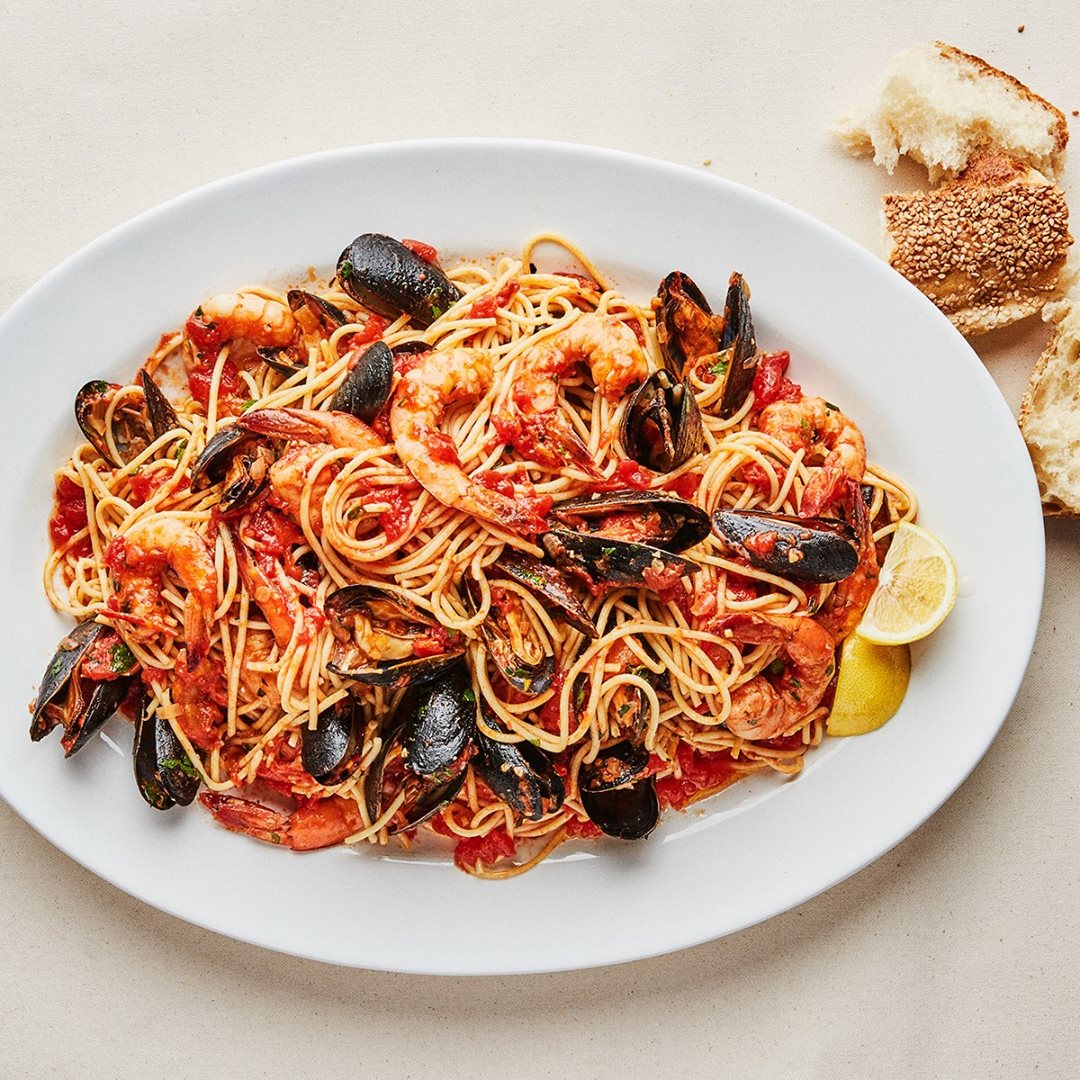
Seafood Spaghetti with Mussels and Shrimp

Seafood Spaghetti with Mussels and Shrimp
If you don’t have a large enough pot to toss all the shellfish and pasta together, you can always transfer everything to the largest bowl or platter you have, or go old-school and just pour the sauce over the pasta at the table.
Author:
Cuisine: American
Recipe type: Main dish
Ingredients
  • ¼ cup extra-virgin olive oil
  • 1 medium onion, finely chopped
  • 4 garlic cloves, sliced
  • ¾ teaspoon crushed red pepper flakes
  • 3 tablespoons tomato paste
  • 1 cup dry white wine
  • 1 28-ounce can whole peeled tomatoes
  • Kosher salt
  • 1 pound spaghetti
  • 2 pounds mussels, scrubbed, debearded
  • 2 pounds large shrimp, peeled, deveined
  • 3 tablespoons unsalted butter
  • 3 tablespoons finely chopped parsley
  • 1 tablespoon fresh lemon juice
  • Lemon wedges (for serving)
Instructions
  1. Heat oil in a large heavy pot over medium. Cook onion, stirring occasionally, until golden and softened, 8–10 minutes. Add garlic and red pepper flakes and season with salt. Cook, stirring often, until fragrant and garlic is softened, about 2 minutes. Add tomato paste and cook, stirring occasionally, until slightly darkened in color and starts sticking to bottom of pan, about 4 minutes. Add wine and cook, stirring often, until the smell of the alcohol is almost completely gone, about 4 minutes. Add tomatoes and juices, crushing with your hands, and increase heat to medium-high. Cook, stirring often, until sauce thickens slightly, 8–10 minutes. Taste and season sauce with salt.
  2. Meanwhile, cook pasta in a large pot of boiling salted water, stirring occasionally, until very al dente, about 3 minutes less than package directions. Drain, reserving 1 cup pasta cooking liquid.
  3. Add mussels, shrimp, and ¼ cup pasta cooking liquid to sauce. Cover and cook, shaking pot occasionally, until mussels open, about 4 minutes. Using tongs, pick out shrimp and mussels and transfer to a large bowl, discarding any mussels that have not opened. Loosely cover with foil to keep warm.
  4. Add pasta and another ¼ cup pasta cooking liquid to sauce and stir to coat. Reduce heat to medium, add butter, and continue to cook, stirring and adding more pasta cooking liquid as needed, until sauce coats pasta, about 4 minutes. Remove from heat, return shrimp and mussels to pot, and carefully toss to combine. Mix in parsley and lemon juice.
  5. Transfer pasta to a platter and serve with lemon wedges for squeezing over.

Watch the recipe video here:

Let this pasta be the star of your seven fishes menu. Make it: http://bonap.it/nZU6g0p

Posted by Bon Appétit Magazine on Sunday, April 28, 2019

Main dish

Classic Chickpea Hummus

Classic Chickpea Hummus
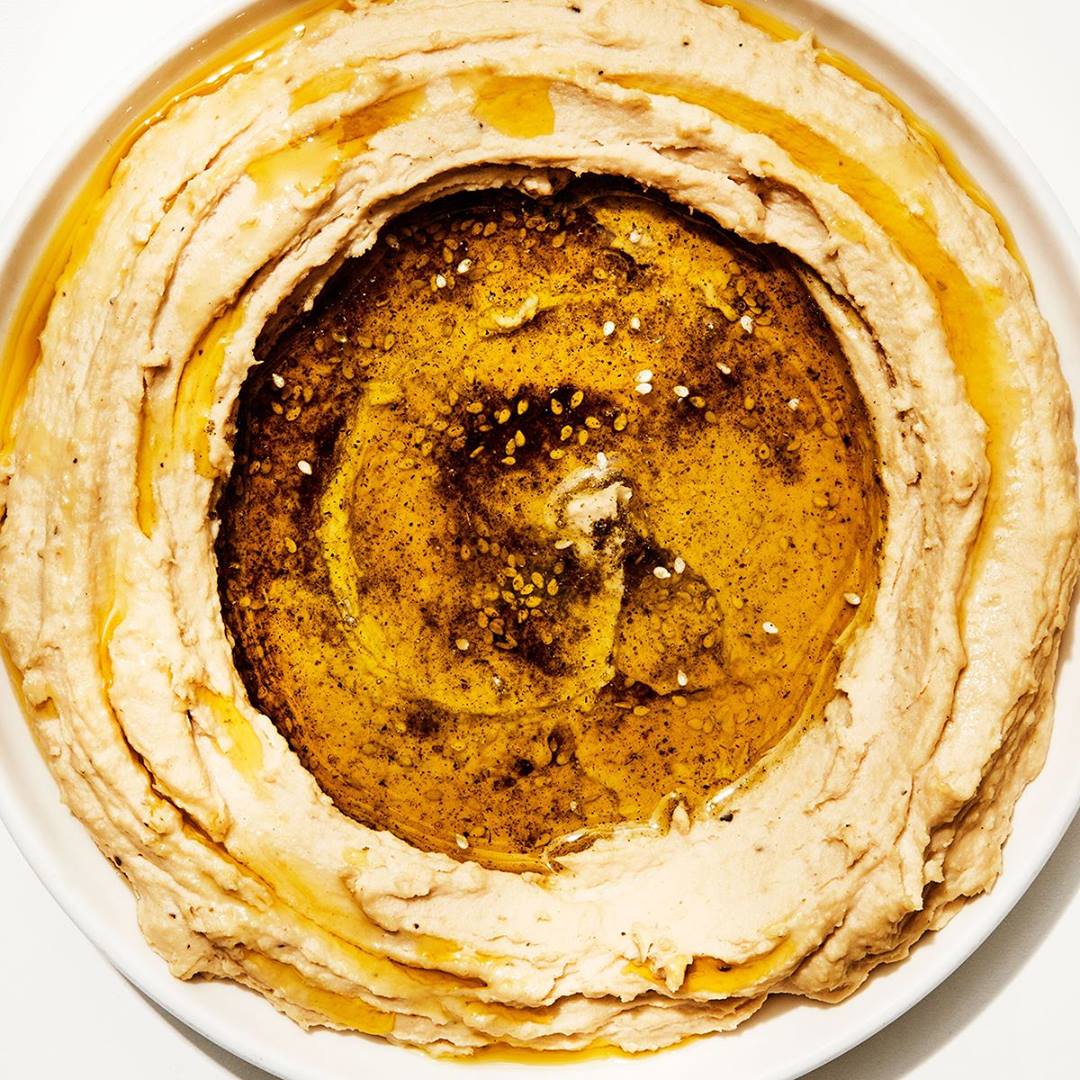
Za’atar, a Middle Eastern spice blend that usually contains a mix of dried thyme, sumac, and sesame seeds, is available at specialty stores or online. And while it's terrific on hummus, it's also totally optional—you can’t go wrong with a drizzle of good olive oil and a sprinkling of sesame seeds or just some flaky sea salt. Once you've got the base recipe down, here are four more ways to riff on it.
Author:
Cuisine: American
Recipe type: Main dish
Ingredients
  • 1 15½-oz. can chickpeas
  • 1 large lemon
  • 1 garlic clove
  • ½ cup tahini, well mixed
  • ¾ tsp. (or more) kosher salt
  • 10 cranks freshly ground black pepper
  • ¼ tsp. ground cumin
  • 3 Tbsp. extra-virgin olive oil, plus more for drizzling
  • Za’atar and/or sesame seeds (for serving)
Instructions
  1. Start by prepping all of your ingredients: Drain 15½ oz. chickpeas in a strainer or colander and rinse thoroughly. Let drain again while you do the other prep.
  2. Cut 1 lemon in half, remove any visible seeds, and squeeze juice into a small bowl. You should have 3–4 Tbsp.
  3. Smash 1 garlic clove with the flat side of your knife on a cutting board and remove peel. Continue to mash with side of knife until a paste forms. (You can also grate garlic on a microplane if you have one—you're just looking for a fine paste.)
  4. Combine drained chickpeas, 3 Tbsp. lemon juice, garlic, ½ cup tahini, ¾ tsp. salt, 10 cracks pepper, ¼ tsp. cumin, and 2 Tbsp. water in a food processor.
  5. Process until smooth, about 1 minute.
  6. With the motor running, stream in 3 Tbsp. oil, then continue to process until hummus is very light and creamy, about 1 minute longer. Taste and season with more salt, if needed.
  7. Transfer hummus to a shallow bowl, top with za’atar and/or sesame seeds, and drizzle with more oil.
Do Ahead: Hummus can be made 4 days ahead. Transfer to an airtight container and chill.

Watch the recipe video here:

So easy, you'll never buy hummus again. (via Basically)Make it: http://bonap.it/i988gjU

Posted by Bon Appétit Magazine on Saturday, April 27, 2019

Main dish

Put-It-On-Everything Cashew Sauce

Put-It-On-Everything Cashew Sauce
Author:
Cuisine: American
Recipe type: Main dish
Ingredients
  • 2 cups raw cashews
  • 1 cup mixed tender herbs, such as parsley, cilantro, dill, and/or basil
  • 2 Tbsp. unseasoned rice or distilled white vinegar
  • 1 Tbsp. kosher salt
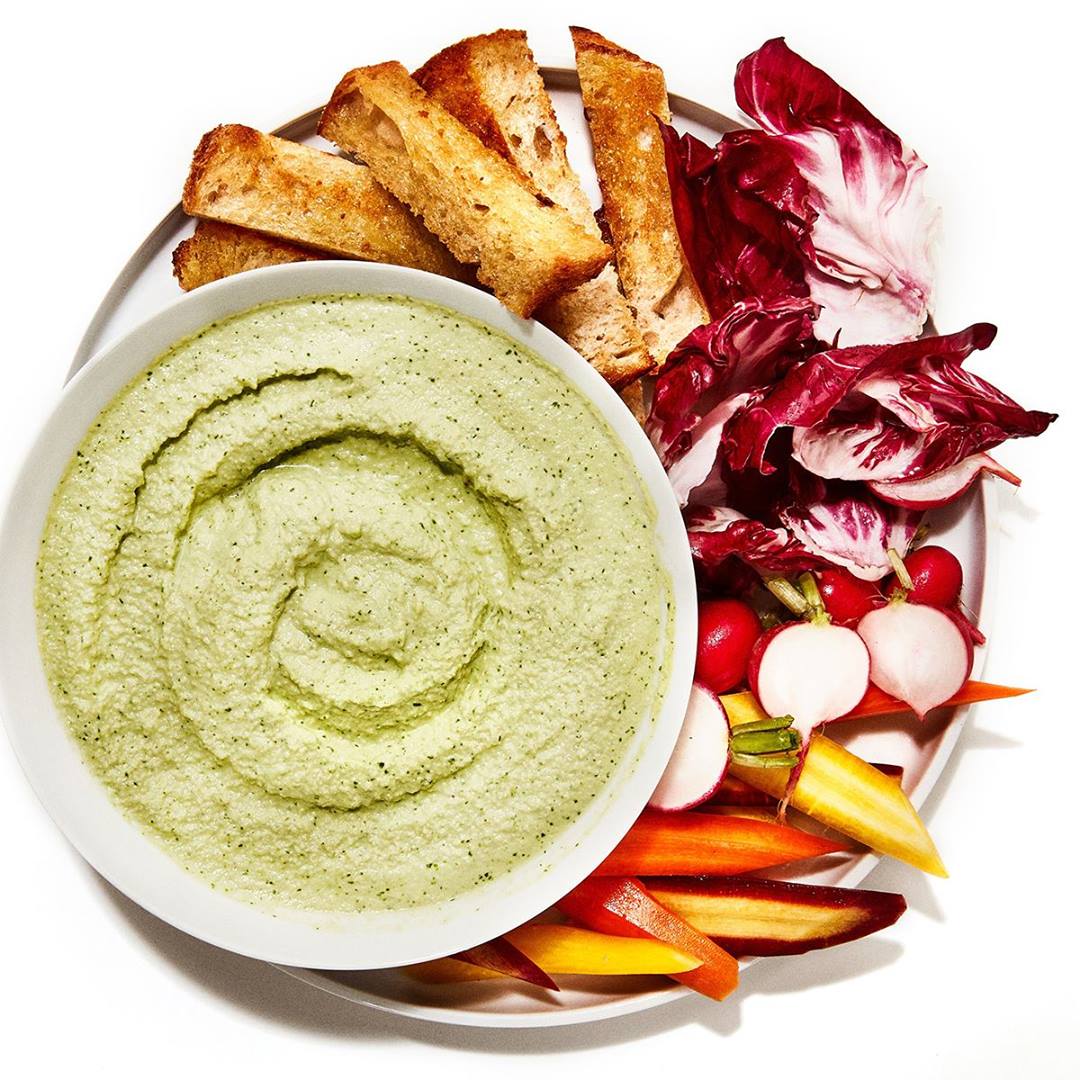
  • Crudités, such as radicchio, carrots, radishes, and batons of bread (for serving)
Instructions
  1. Bring 2 cups water to a boil in a tea kettle or small saucepan. Place 2 cups cashews in a medium heatproof bowl and cover with boiling water. Cover bowl with a plate or plastic wrap and let sit 10 minutes.
  2. Strain cashews through a fine-mesh sieve into another medium bowl, reserving soaking liquid.
  3. Transfer nuts to blender, then add 1 cup herbs, 2 Tbsp. vinegar, 1 Tbsp. salt, and half of soaking liquid.
  4. Blend on medium speed, scraping down sides with a spatula and adding more soaking liquid as needed, until cashew cream is very smooth and the consistency of yogurt, 1–2 minutes.
  5. Using spatula, transfer cashew cream to a medium bowl. Serve with crudités alongside.

Watch the recipe video here:

Rich, creamy, AND vegan—meet your new all-purpose condiment. (via Basically)Make it: http://bonap.it/m38Psgz

Posted by Bon Appétit Magazine on Wednesday, April 24, 2019

Main dish

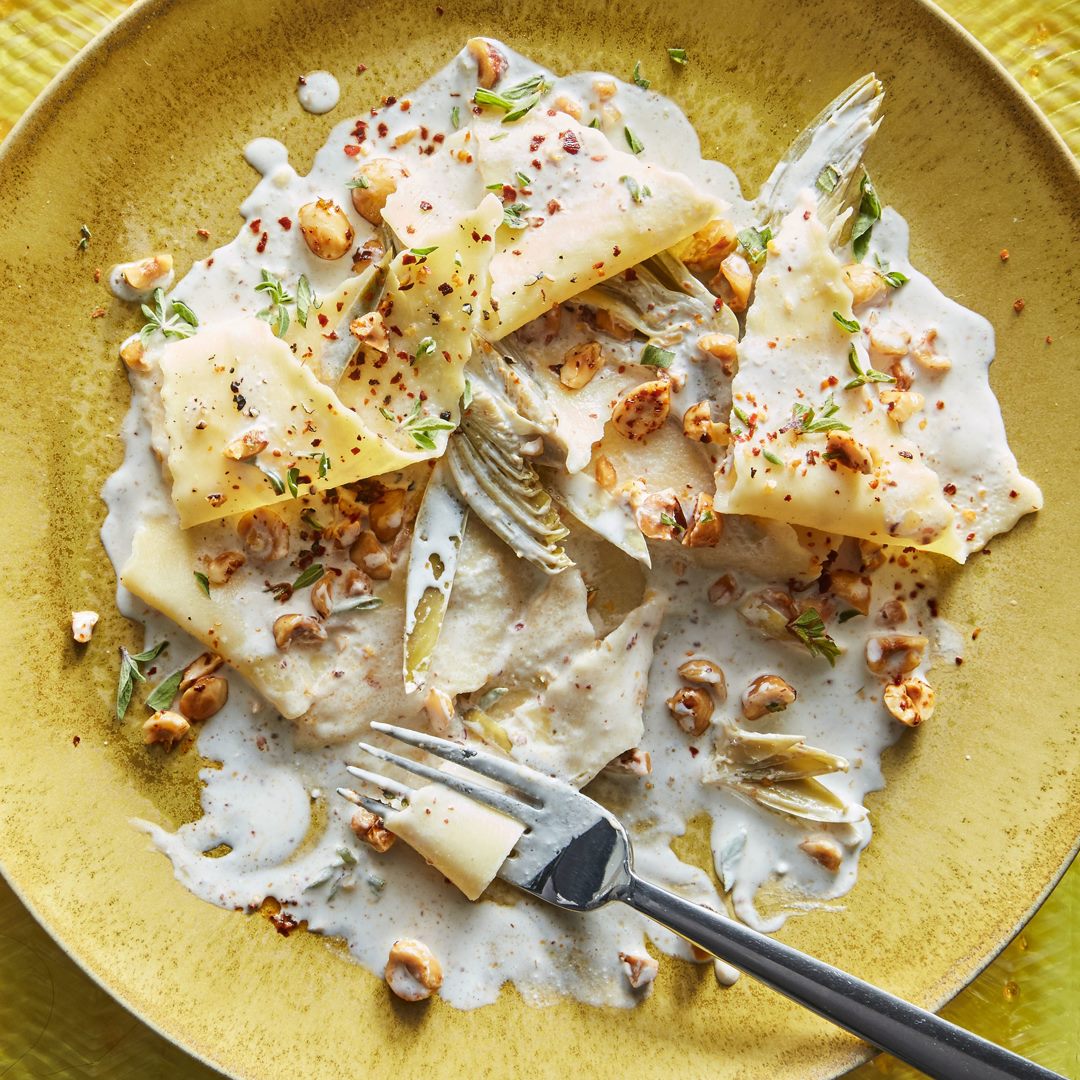
Pasta with Baby Artichokes, Mascarpone, and Hazelnuts

Pasta with Baby Artichokes, Mascarpone, and Hazelnuts
The hardest part of making this recipe is trimming the artichokes, which isn’t as hard as it seems. If you can’t get your hands on baby artichokes, use the hearts of two globe artichokes.
Author:
Cuisine: American
Recipe type: Main dish
Ingredients
  • 12 ounces fresh lasagna sheets (about 8x6 inches)
  • All-purpose flour (for surface)
  • 1 lemon, halved
  • 1 pound baby artichokes (about 8)
  • 3 garlic cloves, crushed
  • 2 bay leaves
  • ¼ cup plus 3 tablespoons olive oil
  • Kosher salt
  • ¾ cup blanched hazelnuts
  • 2 tablespoons finely chopped marjoram or oregano
  • 1½ teaspoons Aleppo-style pepper
  • 1 cup mascarpone
  • 1 teaspoon finely grated lemon zest
  • 1 teaspoon fresh lemon juice
Instructions
  1. Preheat oven to 350°. Place a pasta sheet on a lightly floured work surface. Using a paring knife or a pastry wheel, cut the sheet into quarters (each piece should be about 4x3"), then cut each piece on a diagonal from corner to corner to create 4 triangles. Transfer triangles to a flour-dusted baking sheet and cover with a kitchen towel. Repeat process with remaining lasagna sheets.
  2. Squeeze juice from lemon halves into a large bowl of cold water. Working with 1 artichoke at a time, pull off all the tough dark outer leaves until mostly yellow leaves remain. Using a serrated knife, cut 1" off top of artichoke. Trim stem, leaving at least ½" intact. Using a paring knife or a vegetable peeler, remove dark green outer layer from stem. Cut artichoke in half lengthwise and then into ⅓"-thick wedges. Drop artichoke pieces in lemon water. The acid in the water will keep them from turning brown while you trim the remaining artichokes.
  3. Once all the artichokes have been trimmed, drain and place in a wide medium saucepan. Add garlic, bay leaves, and ¼ cup oil. Pour in cold water to submerge artichokes; season generously with salt. Bring to a simmer over medium heat and cook until a paring knife slides through artichokes with little to no resistance, 8–10 minutes. Let cool, then drain and set artichokes aside.
  4. While the artichokes are simmering away, toast hazelnuts on a rimmed baking sheet, tossing once, until golden brown, 10–12 minutes. Let cool, then coarsely chop. Toss in a medium bowl with marjoram, Aleppo-style pepper, and 3 Tbsp. oil; season with a generous pinch of salt. Set aside.
  5. Mix mascarpone, lemon zest, and lemon juice in a separate medium bowl; season with salt. Set aside.
  6. Cook pasta in a large pot of boiling salted water, stirring occasionally, until very al dente. Drain, reserving ½ cup pasta cooking liquid.
  7. Return pasta and ¼ cup pasta cooking liquid to pot and set over low heat. Add reserved mascarpone mixture and gently toss, adding more pasta cooking liquid as needed if sauce is too thick, until pasta is al dente and sauce coats pasta. Add reserved artichokes and half of reserved hazelnut mixture and gently stir to distribute (you want to avoid breaking up artichokes very much).
  8. Divide pasta among bowls. Top with remaining hazelnut mixture.
  9. Do Ahead: Hazelnuts can be toasted 3 days ahead; store airtight at room temperature. Artichokes can be trimmed and cooked 1 day ahead; let cool in cooking liquid. Cover and chill. Drain just before adding to pasta.

Watch the recipe video here:

Creamy pasta lovers unite.RECIPE: http://bonap.it/tDQo4SF

Posted by Bon Appétit Magazine on Sunday, April 14, 2019

Main dish

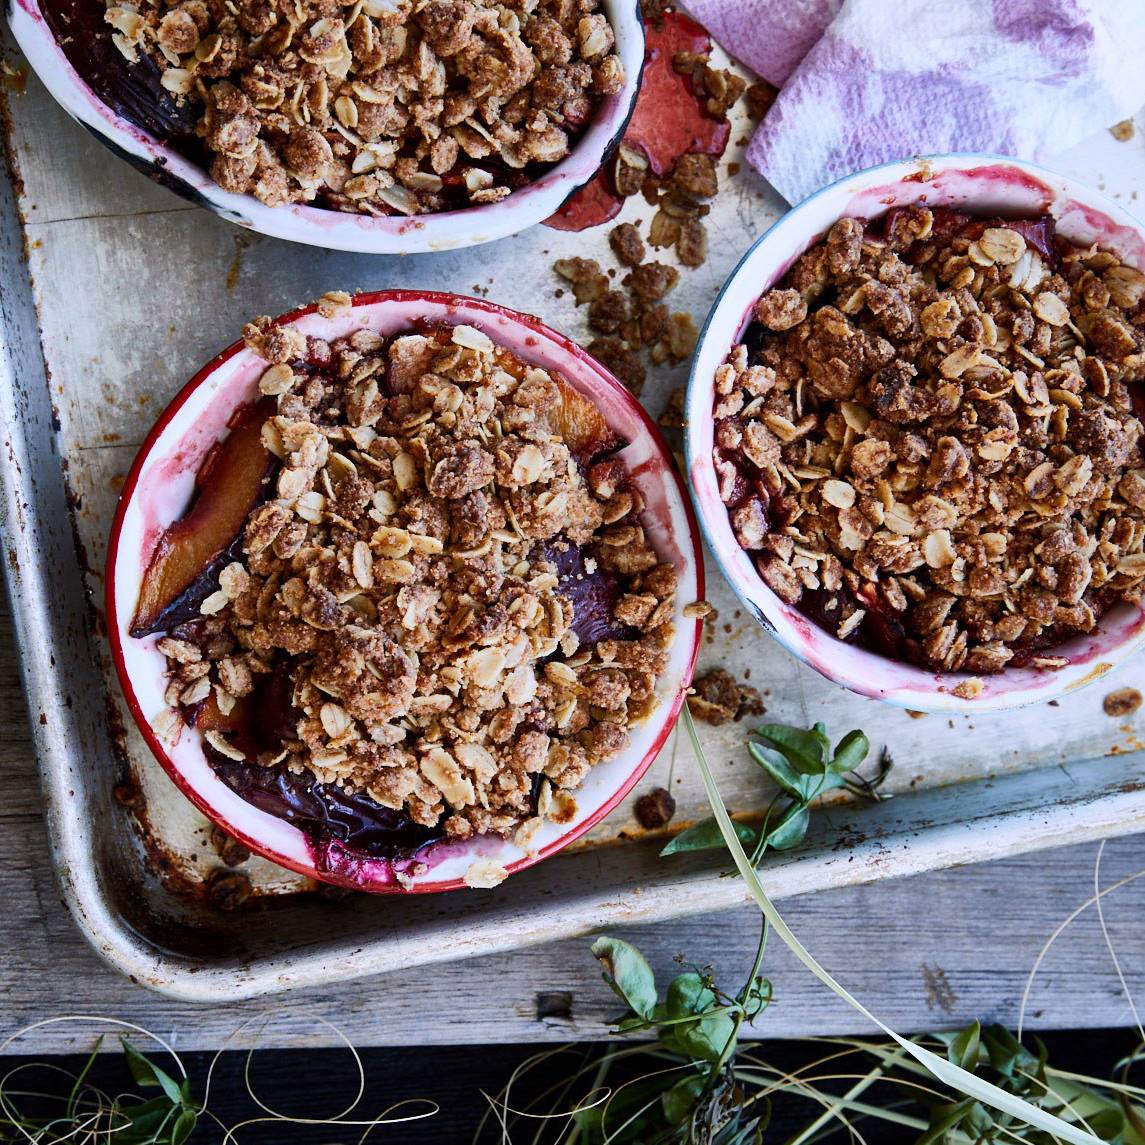
Plum-Rosemary-Crisp with Oat-Spelt Topping

Plum-Rosemary-Crisp with Oat-Spelt Topping
Double up on the topping and save half for later. Baked on its own, it’s great with yogurt. As an alternative, try the topping with an oat-quinoa flour mixture here. This recipe is from Tandem in Portland, ME.
Author:
Cuisine: American
Recipe type: Main dish
Ingredients
Filling
  • 1 tablespoon unsalted butter, melted
  • 3 pounds ripe plums, cut into wedges
  • 2 teaspoons finely chopped rosemary
  • 1 tablespoon plus ⅓ cup raw sugar or (packed) dark brown sugar
  • 1 tablespoon apple cider vinegar
  • 2 teaspoons finely grated lemon zest
  • Pinch of kosher salt
  • 3 tablespoons all-purpose flour
Topping and Assembly
  • 1 cup old-fashioned oats
  • ¾ cup spelt flour
  • ¼ cup raw sugar or (packed) dark brown sugar
  • ¼ teaspoon kosher salt
  • ¼ teaspoon ground cinnamon
  • Pinch of ground cardamom
  • 6 tablespoons unsalted butter, melted, slightly cooled
Instructions
Filling
  1. Brush inside of a shallow 2-qt. baking dish with butter. Toss plums, rosemary, and 1 Tbsp. raw sugar in a large bowl. Let sit, tossing once or twice, until plums release their juices, 15–20 minutes.
  2. Add vinegar, zest, salt, and remaining ⅓ cup raw sugar to plums and toss to combine. Sprinkle flour evenly over top and toss until flour is no longer visible.
  3. Transfer filling to prepared baking dish and spread out to make an even layer; set aside.
Topping and Assembly
  1. Preheat oven to 350°. Whisk oats, spelt flour, raw sugar, salt, cinnamon, and cardamom in a medium bowl. Drizzle butter over mixture, tossing with a fork to incorporate. As soon as all the butter has been added, work with your hands until no dry spots remain and mixture holds together in clumps. Scatter over a rimmed baking sheet and let sit uncovered at room temperature until slightly dried out (this will help it crisp in the oven when baking), 10–15 minutes.
  2. Scatter topping evenly over reserved filling. Bake crisp on a foil-lined rimmed baking sheet until topping is golden and crisp and fruit juices are bubbling around the edges, 35–45 minutes. Let cool at least 15 minutes before serving.
Do Ahead:
  1. Topping can be made 2 days ahead; after drying out, cover and chill. Crisp can be baked 8 hours ahead; let cool, then tent with foil. Reheat, uncovered, in 350° oven 10–15 minutes.

Watch the recipe video here:

Summer is coming, do you know where your fruit crisp is? RECIPE: http://bonap.it/kFgYIQ4

Posted by Bon Appétit Magazine on Saturday, April 13, 2019

Main dish

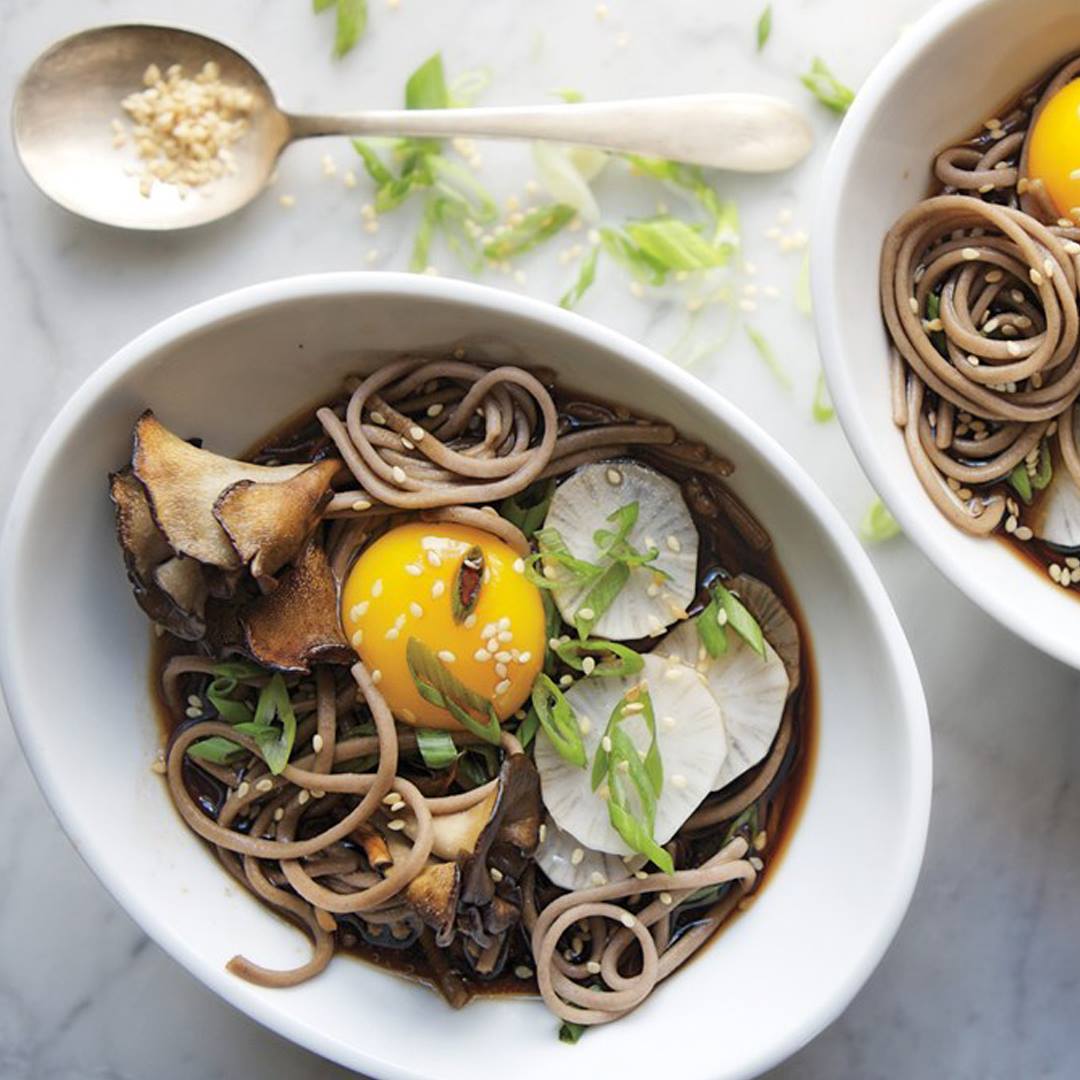
Soba and Maitake Mushrooms in Soy Broth

Soba and Maitake Mushrooms in Soy Broth
This soup is trendy ramen’s healthier sibling: The buckwheat in soba is nutritious and a good source of fiber (in a flavorful maitake mushroom soy broth, too).
Author:
Cuisine: American
Recipe type: Main dish
Ingredients
  • 2 garlic cloves, peeled, crushed
  • 1 1” piece peeled ginger, thinly sliced
  • ½ cup reduced-sodium soy sauce
  • ¼ cup dried wakame (optional)
  • 2 tablespoons vegetable oil
  • ½ pound maitake mushrooms, torn into large pieces
  • Kosher salt and freshly ground black pepper
  • 8 ounces soba (Japanese-style noodles)
  • 4 baby turnips or radishes, trimmed, thinly sliced
  • 4 large egg yolks
  • 4 scallions, thinly sliced
  • 1 tablespoon toasted sesame seeds
Instructions
  1. Bring garlic, ginger, and 4 cups water to a boil in a small saucepan; reduce heat and simmer 10 minutes. Add soy sauce and wakame, if using. Set broth aside.
  2. Heat oil in a large skillet over medium-high heat. Add mushrooms; season with salt and pepper. Cook, tossing occasionally, until golden brown and crisp, 10–12 minutes. Transfer to a large plate.
  3. Meanwhile, cook soba in a large pot of boiling salted water, stirring occasionally, until al dente; drain. Return reserved broth to a simmer.
  4. Divide soba and broth among bowls; top with mushrooms, turnips, and egg yolks. Add scallions and sprinkle with sesame seeds.

Watch the recipe video here:

Noodle soup: never a bad idea.GET THE RECIPE: http://bonap.it/DRrZFlf

Posted by Bon Appétit Magazine on Saturday, April 13, 2019

Main dish

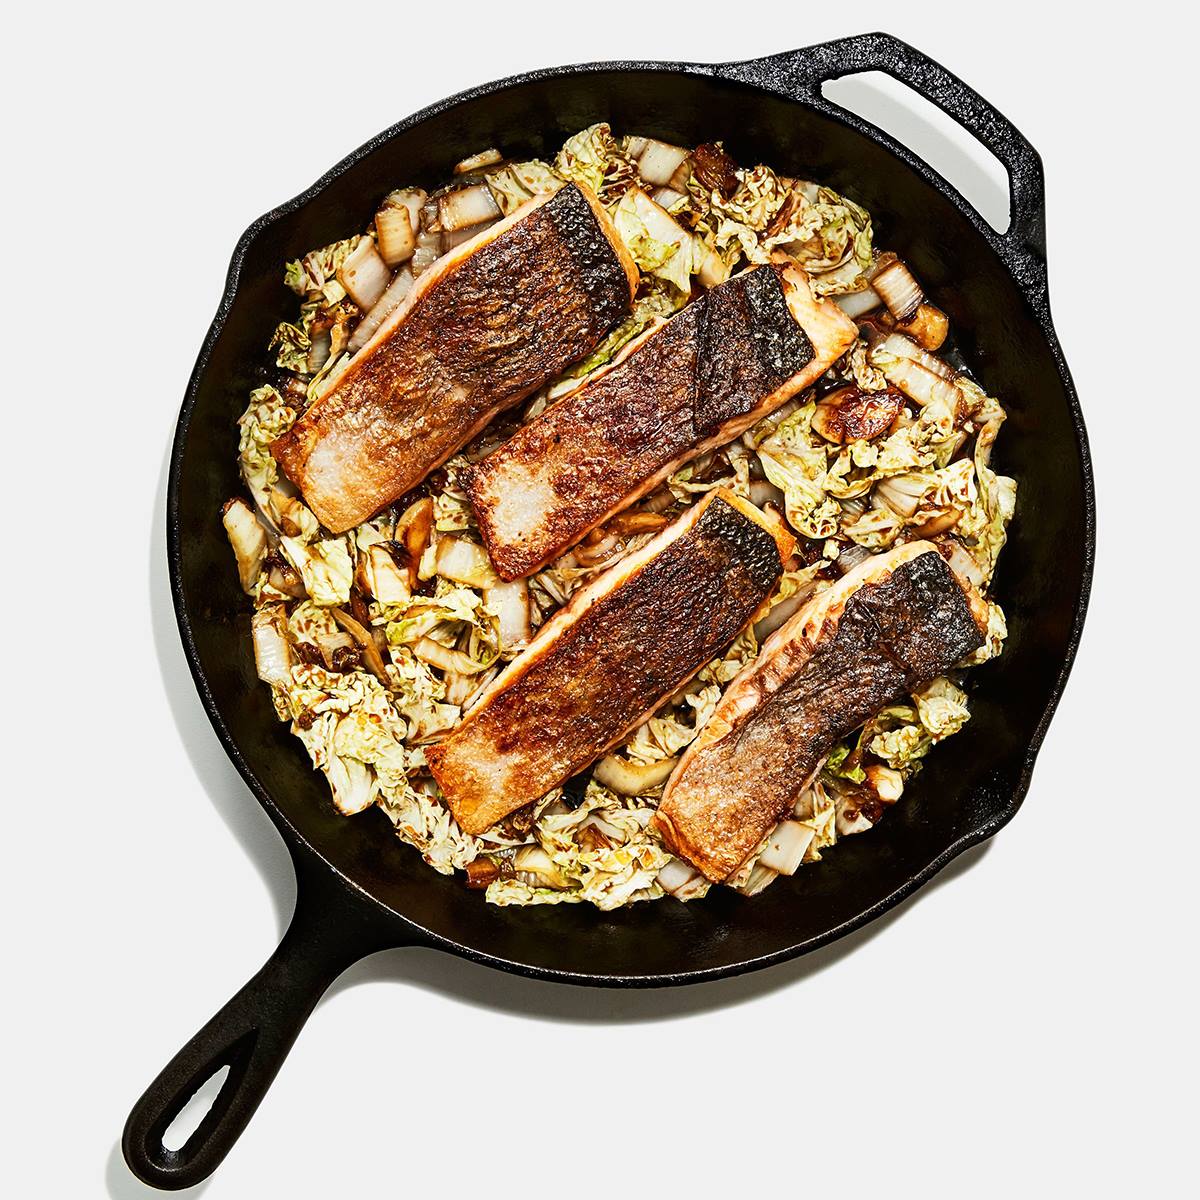
Crispy-Skin Salmon with Napa Cabbage

Crispy-Skin Salmon with Napa Cabbage
Does the thought of cooking fish at home freak you out? We got you. This method guarantees that the salmon comes out perfectly cooked with crispy skin. Use the same technique with any skin-on fish fillets for great results every time.
Author:
Cuisine: American
Recipe type: Main dish
Ingredients
  • 1 small head of Napa cabbage
  • 5 garlic cloves
  • 1 2-inch knob ginger
  • 2 tablespoons rice wine vinegar
  • 2 tablespoons soy sauce
  • 1 tablespoon honey
  • 1½ teaspoons cornstarch
  • 4 6-ounce skin-on salmon fillets
  • Kosher salt
  • Freshly ground black pepper
  • 3 tablespoons vegetable oil, divided
Instructions
  1. Starting at leafy green end of Napa cabbage, slice about one-third of head crosswise into ½”-thick ribbons. Set darker green pieces aside. Thinly slice remaining pale-green and white parts of cabbage crosswise and transfer to a medium bowl (discard cabbage core).
  2. Smash 5 garlic cloves and discard peel.
  3. Scrape down and around ginger with the curved tip of a spoon to remove skin, then thinly slice ginger crosswise.
  4. Stir 2 Tbsp. rice wine vinegar, 2 Tbsp. soy sauce, 1 Tbsp. honey, and 1½ tsp. cornstarch in a small bowl with a spoon until cornstarch is dissolved.
  5. Thoroughly pat dry 4 salmon fillets with paper towels. Season flesh side with salt and pepper.
  6. Drizzle 2 Tbsp. vegetable oil across surface of a large skillet, preferably cast iron. Arrange salmon fillets skin side down in skillet, spacing evenly apart. Heat skillet over medium (yes, you’re starting the cooking from cold).
  7. Cook salmon, occasionally sliding a flexible metal spatula underneath skin to lift fillets and let fresh hot fat flow underneath (if the skin is sticking, let it cook longer until skin releases), until flesh is opaque all the way up the sides of each fillet and only the top of thickest part is still translucent, 5–10 minutes. It will take more or less time depending on thickness of your salmon fillets. As fish is cooking, move pieces around pan to encourage even cooking.
  8. Using spatula and a pair of tongs, carefully turn each fillet so skin side is up. Turn off heat and let heat remaining in skillet gently cook second side. Once fillets have stopped sizzling, carefully transfer to a plate.
  9. Return pan to medium-high heat and add half of cabbage from bowl. Cook, tossing occasionally with tongs, until cabbage is wilted and browned and even charred in some spots, about 5 minutes. Toss in remaining cabbage from bowl and cook, stirring often, until second batch is tender, about 4 minutes.
  10. Scrape cabbage mixture back into bowl and add remaining 1 Tbsp. oil. Add garlic and ginger to pan and cook, tossing often, until garlic is browned all over and ginger is browned around the edges, about 3 minutes.
  11. Stir soy mixture to re-incorporate cornstarch and add to skillet. Stir rapidly until mixture is thickened, which will only take a few seconds, then remove from heat.
  12. Add cooked cabbage and uncooked green cabbage back to skillet and toss well to coat.
  13. Arrange salmon fillets over of cabbage and serve.

Watch the recipe video here:

Because you deserve the crispiest skinned fish. (via Basically) Recipe: http://bonap.it/HyokiDa

Posted by Bon Appétit Magazine on Thursday, April 11, 2019