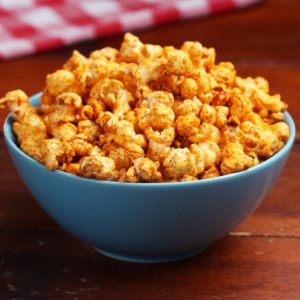
Showing 3,071 Result(s)
Breakfast

BBQ Popcorn

BBQ Popcorn
If you are looking for an under-30-minute snack, look no further! This BBQ-flavored popcorn is especially great to share with friends and family on a game day.
Author:
Cuisine: American
Recipe type: Breakfast
Ingredients
  • 2 teaspoons smoked paprika
  • ½ teaspoon chili powder
  • 1 teaspoon garlic powder
  • 1 teaspoon onion powder
  • 1 teaspoon kosher salt
  • 2 tablespoons brown sugar
  • 3 tablespoons olive oil
  • 1 ½ tablespoons coconut oil
  • ⅓ cup yellow popcorn kernals (55 g)
Instructions
  1. In a small bowl, mix together the paprika, chili powder, garlic powder, onion powder, and salt. Set aside.
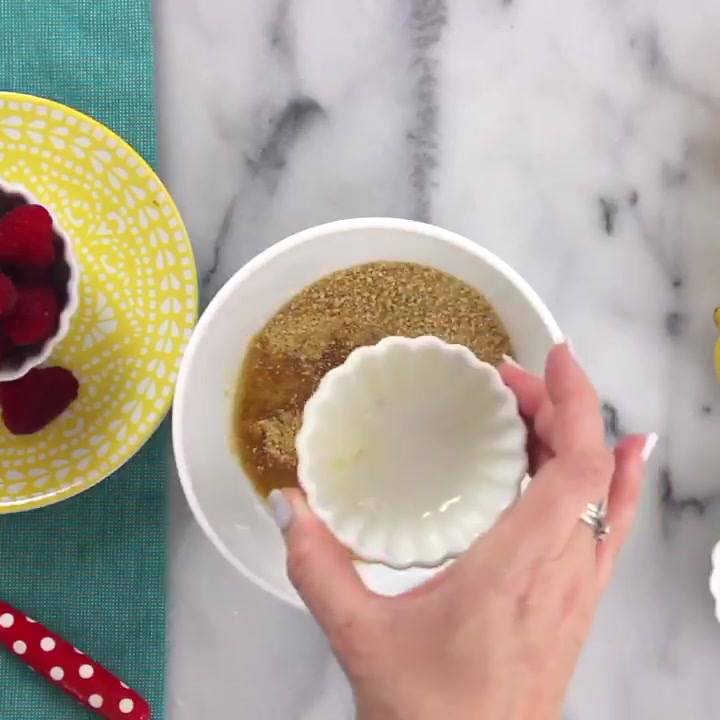
  2. In a separate small bowl, mix together the brown sugar and olive oil. Set aside.
  3. Melt the coconut oil in a large pot over medium heat. Add 3-4 popcorn kernels and cover with the lid. Once they pop, add the rest of the kernels and cover, shaking every 10 seconds, until they begin pop. Once the pops are more than 3 seconds apart, turn off the heat and let sit for 15 seconds to allow any final kernels to pop.
  4. Uncover and drizzle the brown sugar mixture over the popcorn. Carefully toss to coat.
  5. Sprinkle the spice mixture over the popcorn and stir to coat evenly.
  6. Transfer to a bowl and eat immediately, or spread in a single layer on a baking sheet and let cool completely before storing in a sealed container for up to 2 days.
  7. Enjoy!

Watch the recipe video here:

Who's ready for THIS kind of movie night? ??Get the recipes:…

Posted by Tasty on Tuesday, April 2, 2019

Dessert

4-Flavor Cheesecake

4-Flavor Cheesecake
4-Flavor Cheesecake
Author:
Cuisine: American
Recipe type: Dessert
Ingredients
  • CRUST
  • 20 graham crackers, crushed, plus 4 whole
  • 2 tablespoons sugar
  • 10 tablespoons unsalted butter, melted
  • CHEESECAKE FILLINGS
  • 2 tablespoons gelatin powder, 2 packets
  • 4 tablespoons water
  • 24 oz cream cheese (680 mg)
  • 1 cup sugar (200 g)
  • 3 cups heavy whipping cream, divided (720 mL)
  • ½ teaspoon vanilla extract
  • ⅔ cup lemon curd, divided (165 g)
  • ½ cup dulce de leche, warmed, plus more for garnish (150 g)
  • ½ cup chocolate hazelnut spread (145 g)
  • 1 tablespoon raspberry jam
  • 8 fresh raspberries, for garnish
  • 5 chocolate hazelnut truffles, for garnish
  • 10 pecans, roughly charged, for garnish
  • 5 candied lemon slice, optional, halved, garnish
Instructions
  1. In a large bowl, mix together the graham cracker crumbs, sugar, and melted butter until combined.
  2. Pour the crust mixture into a 9-inch (23 cm) springform cake pan. Press crumbs down firmly with the bottom of a small ramekin or glass to form an even base.
  3. Carefully break the remaining graham crackers in half, so that you have 8 squares.
  4. Push the graham crackers into the crust with the split line facing upwards to form an X shape, dividing the crust into four equal sections.
  5. Press down on the crust one more time to ensure the graham crackers are secure. Cover and chill in the freezer for at least 10 minutes while preparing the fillings.
  6. In a small bowl, dissolve the gelatin in the water. Set aside to bloom.
  7. In a large bowl, beat together the cream cheese and sugar until smooth.
  8. Add 2½ cups (720 ml) whipping cream and beat until the batter is light and fluffy.
  9. Warm the gelatin in the microwave for about 15 seconds so that it’s fluid, and incorporate into the batter.
  10. Divide the cheesecake batter evenly between 4 medium bowls.
  11. In the first bowl, whisk in the vanilla extract and remaining whipping cream.
  12. In the second bowl, whisk in ⅓ cup (80 grams) lemon curd.
  13. In the third bowl, whisk in the dulce de leche.
  14. In the fourth bowl, whisk in the chocolate hazelnut spread.
  15. To assemble the cheesecake, slowly pour the contents of bowl #1 into a quarter of the pan. Repeat with remaining flavors. Use a spatula to smooth the tops.
  16. Carefully dollop the raspberry jam in small circles on top of the vanilla cheesecake. Use a toothpick or knife to carefully swirl it into the filling. Garnish the outer border with fresh raspberries.
  17. Garnish the outer border of the chocolate hazelnut cheesecake with the chocolate hazelnut truffles.
  18. Garnish the outer border of the dulce de leche cheesecake with the chopped pecans and drizzle with dulce de leche
  19. Pour the remaining lemon curd on top of the lemon cheesecake and smooth with an offset spatula or spoon. Garnish the outer border with candied lemon slices.
  20. Cover the top of the pan tightly with plastic wrap and chill for 4 hours or overnight in the fridge before slicing and serving.
  21. Enjoy!

Watch the recipe video here:

Watch how Kiano mastered her famous 4 flavor cheesecake! Get the recipe: https://tasty.co/recipe/4-flavor-cheesecake

Posted by Tasty on Wednesday, March 27, 2019

Main dish

Beef Stroganoff for Instant Pot®

Beef Stroganoff for Instant Pot®
Serve this restaurant-quality chicken dish over rice or pasta to round out your meal.
Author:
Cuisine: American
Recipe type: Main dish
Ingredients
  • 1½ lbs boneless skinless chicken breasts, sliced into cutlets
  • 2 tablespoons olive oil
  • Salt and pepper, to taste
  • 1 cup heavy cream
  • ½ cup chicken broth
  • 1 teaspoon garlic powder
  • 1 teaspoon Italian seasoning
  • ½ cup parmesan cheese
  • 1 cup spinach, chopped
  • ½ cup sun dried tomatoes
Instructions
  1. ) Season chicken with salt and pepper, then saute in a large skillet on medium high heat for 3-5 minutes on each side, until browned and thoroughly cooked. Set chicken aside on a plate.
  2. ) Bring the heat down to medium. In the same skillet, whisk in the heavy cream, chicken broth, garlic powder, Italian seasoning, and parmesan cheese for a few minutes until mixture thickens slightly.
  3. ) Add spinach and sundried tomatoes. Simmer for a minute or two, until spinach wilts. Return chicken to pan and flip a few times, so that it is thoroughly coated in sauce.

Watch the recipe video here:

Beef Stroganoff for Instant Pot®: https://trib.al/qXrAAN5

Posted by Allrecipes on Wednesday, March 27, 2019

Main dish

Creamy Tuscan Garlic Chicken

Creamy Tuscan Garlic Chicken
Serve this restaurant-quality chicken dish over rice or pasta to round out your meal.
Author:
Cuisine: American
Recipe type: Main dish
Ingredients
  • 1½ lbs boneless skinless chicken breasts, sliced into cutlets
  • 2 tablespoons olive oil
  • Salt and pepper, to taste
  • 1 cup heavy cream
  • ½ cup chicken broth
  • 1 teaspoon garlic powder
  • 1 teaspoon Italian seasoning
  • ½ cup parmesan cheese
  • 1 cup spinach, chopped
  • ½ cup sun dried tomatoes
Instructions
  1. ) Season chicken with salt and pepper, then saute in a large skillet on medium high heat for 3-5 minutes on each side, until browned and thoroughly cooked. Set chicken aside on a plate.
  2. ) Bring the heat down to medium. In the same skillet, whisk in the heavy cream, chicken broth, garlic powder, Italian seasoning, and parmesan cheese for a few minutes until mixture thickens slightly.
  3. ) Add spinach and sundried tomatoes. Simmer for a minute or two, until spinach wilts. Return chicken to pan and flip a few times, so that it is thoroughly coated in sauce.

Watch the recipe video here:

Creamy Tuscan Garlic Chicken is super easy and super tasty! Try it tonight!Get the written recipe here: http://bit.ly/2u5FqRQ

Posted by Cooking Panda on Wednesday, March 27, 2019

Dessert

Shaved Fennel Salad with Orange, Green Olives, and Pistachios

Shaved Fennel Salad with Orange, Green Olives, and Pistachios
A mandoline is great for shaving the fibrous fennel bulbs into delicate, thin slices.
Author:
Cuisine: American
Recipe type: Dessert
Ingredients
  • 1 tablespoon grated orange rind
  • ¾ cup orange sections (about 2 large oranges)
  • ¾ cup coarsely chopped pitted green olives (about 3 ounces)
  • 2 tablespoons extra-virgin olive oil
  • 1 tablespoon fresh lemon juice
  • ¼ teaspoon freshly ground black pepper
  • ⅛ teaspoon kosher salt
  • 2 medium fennel bulbs with stalks (about 2 pounds)
  • 1 cup shelled unsalted dry-roasted pistachios
Instructions
  1. Combine first 7 ingredients in a large bowl; toss gently to combine.
  2. Step 2
  3. Trim the tough outer leaves from fennel, and mince feathery fronds to measure 2 tablespoons. Remove and discard stalks. Cut fennel bulb in half lengthwise, and discard core. Thinly slice fennel bulbs. Add fennel slices to juice mixture, and toss gently to combine. Sprinkle with fennel fronds and nuts.

Watch the recipe video here:

Shaved Fennel Salad: Is it springtime yet? (via Well Done)GET THE RECIPE: http://trib.al/WRdNclB

Posted by MyRecipes on Wednesday, March 27, 2019

Main dish

Northern Italian Beef Stew

Northern Italian Beef Stew
This hearty beef and vegetable stew that can be made in the slow-cooker is a family favorite. It is also the backbone for an excellent beef soup, if you actually find yourself with leftovers.
Author:
Cuisine: American
Recipe type: Main dish
Ingredients
  • 2 tablespoons olive oil
  • 2 pounds lean top round, trimmed and cut into 1-inch cubes
  • 2 large sweet onions, diced
  • 2 cups large chunks of celery
  • 4 large carrots, peeled and cut into large rounds
  • 1 pound crimini mushrooms, sliced
  • 2 tablespoons minced garlic
  • 2 cups dry red wine
  • 4 large tomatoes, chopped
  • 1½ pounds red potatoes (such as Red Bliss), cut into 1-inch chunks
  • 1 tablespoon dried basil
  • 1 teaspoon dried thyme
  • 1 teaspoon dried marjoram
  • ½ teaspoon dried sage
  • 1 quart beef stock
  • 2 cups tomato sauce
Instructions
  1. Heat olive oil in a large skillet over medium-high heat. Cook beef in batches in hot oil until browned completely, about 5 minutes per batch. Remove browned beef cubes to a plate lined with paper towels, keeping skillet over heat and retaining the beef drippings.
  2. Cook and stir onion, celery, and carrots in the retained beef drippings until just softened, 2 to 3 minutes. Stir mushrooms and garlic into the onion mixture.
  3. Pour red wine into the pan; bring to a boil while scraping the browned bits of food off the bottom of the pan with a wooden spoon. Continue cooking the mixture until the wine evaporates, 7 to 10 minutes. Stir tomatoes into the mixture.
  4. Return beef to skillet with potatoes, basil, thyme, marjoram, and sage. Pour beef stock and tomato sauce over the mixture. Bring the liquid to a simmer.
  5. Reduce heat to low and simmer until the beef is very tender and the sauce is thick, 4 to 6 hours.

Watch the recipe video here:

Northern Italian Beef Stew: https://trib.al/cUrl15q

Posted by Allrecipes on Wednesday, March 27, 2019

Dessert

LEMON CHEESECAKE IN A JAR

LEMON CHEESECAKE IN A JAR
Author:
Cuisine: American
Recipe type: Dessert
Ingredients
For the Crust
  • 12 Newtons Lemon Fruit Thins (see notes section for substitution)
  • 3 tablespoons unsalted butter, melted
For the Cheesecake
  • ½ cup plus granulated sugar
  • zest of one lemon
  • 2 packages cream cheese, 8 oz each; room temperature
  • 2 large eggs; room temperature
  • ¼ cup heavy cream
  • 1 teaspoon pure vanilla extract
For the Garnish
  • ½ cup homemade lemon curd
  • fresh whipped cream
  • fresh berries
Instructions
  1. Preheat the oven to 350°F.
  2. Place the Newtons Lemon Fruit Thins into the bowl of a food processor, attach the lid and pulse the machine until you have fine cookie crumbs.
  3. In a medium bowl, stir together cookie crumbs and melted butter. Evenly divide the crumbs between your individual serving, oven-safe dishes and lightly press the crumbs into the bottoms of each dish to form a crust layer. Place the prepared cheesecake crusts on a baking sheet and bake the crusts in preheated oven for 6 minutes, carefully remove them to a wire rack to cool.
  4. Begin to boil a large pot of water for the water bath.
  5. In the bowl of your stand mixer fitted with your paddle attachment, combine the sugar and lemon zest and mix until the sugar is moistened and fragrant. Add in the cream cheese and cream together until smooth. Add eggs, one at a time, fully incorporating each before adding the next. Make sure to scrape down the bowl in between each egg. Add heavy cream and vanilla and mix until smooth.
  6. Pour batter into serving dishes , directly onto the prebaked crusts, until about ¾ of the way full. Place jars into a larger pan with high sides and pour boiling water into the larger pan until halfway up the sides of the jars.
  7. Bake 25 to 30 minutes, the edges will appear to be set, but the center will still have a little jiggle to it.
  8. Carefully remove the cheesecake jars from the water bath and place on a cooling rack to cool completely. Once the cheesecakes are completely cooled, place them into the refrigerator for at least 5 hours. Before serving, top each cheesecake with lemon curd, fresh whipped cream and berries.

Watch the recipe video here:

Lemon Cheesecake in a Jar is the perfect summertime dessert! ?RECIPE HERE –> https://www.mybakingaddiction.com/lemon-cheesecake-in-a-jar/

Posted by My Baking Addiction on Wednesday, March 27, 2019

Dessert

Frozen Margarita Pie

Frozen Margarita Pie
Your favorite cocktail in pie form—what's not to love? Just keep in mind that you'll need to freeze the pie at least 8 hours, preferably overnight, for the ideal texture, so be sure to plan ahead.
Author:
Cuisine: American
Recipe type: Dessert
Ingredients
  • 6 Tbsp. unsalted butter
  • 10 graham crackers
  • 3 Tbsp. sugar
  • ½ tsp. kosher salt. divided
  • ¾ cup chilled heavy cream
  • 5 limes, divided
  • 1 14-oz. can sweetened condensed milk
  • 3 Tbsp. tequila blanco
Instructions
  1. Melt 6 Tbsp. butter in a small saucepan over medium heat. Let cool slightly.
  2. Crumble 10 graham crackers into the bowl of a food processor. Add 3 Tbsp. sugar, ¼ tsp. salt, and melted butter to bowl and process until mixture resembles wet sand.
  3. Transfer graham cracker mixture to a shallow 9" pie pan. Using a measuring cup, press firmly into bottom and up sides of dish. Freeze 20 minutes.
  4. Meanwhile, whisk ¾ cup heavy cream in a medium bowl until cream begins to thicken to the point you see ripples and stiff peaks begin to form, 3–5 minutes.
  5. Cut 4 limes in half and juice into a fine-mesh sieve set over a glass measuring cup (you should have about ½ cup juice). Pour lime juice into another medium bowl and whisk in 14 oz. condensed milk, 3 Tbsp. tequila, and remaining ¼ tsp. salt until smooth.
  6. Fold half of whipped cream into lime juice mixture, carefully folding under and over while turning the bowl. Add remaining whipped cream and continue to fold until no streaks remain.
  7. Remove pie pan from freezer and pour in filling. Using the back of a spoon, gently spread filling to edge of crust.
  8. Using a microplane, zest half of the remaining lime over pie.
  9. Freeze pie at least 8 hours, or preferably overnight.

Watch the recipe video here:

Your favorite cocktail in pie form—what's not to love?Make it: http://bonap.it/F1utDNN

Posted by Bon Appétit Magazine on Wednesday, March 27, 2019

Breakfast

SLOW COOKER APPLE BUTTER

SLOW COOKER APPLE BUTTER
Slow Cooker Apple Butter will make your entire house smell like Autumn. It also makes a great gift for the holidays, or a hostess gift at Thanksgiving. YUMMO!
Author:
Cuisine: American
Recipe type: Breakfast
Ingredients
  • 6½ pounds apples - peeled, cored and sliced
  • 1 cup granulated sugar
  • 1 cup light brown sugar, lightly packed
  • 1 tablespoon ground cinnamon
  • ½ teaspoon freshly grated nutmeg
  • ¼ teaspoon ground cloves
  • ¼ teaspoon salt
  • 1 tablespoon pure vanilla extract
Instructions
  1. Place the apples in a slow cooker. In a medium bowl, combine sugars, cinnamon, nutmeg cloves and salt. Pour the mixture over the apples and mix well.
  2. Cook in slow cooker on low for about 10 hours, stirring occasionally, until the mixture is thickened and dark brown.
  3. Uncover, stir in vanilla and continue cooking uncovered on low for about 2 hours.
  4. Use an immersion blender to puree the apple butter until smooth.
  5. Spoon the mixture into sterile containers, cover and refrigerate for up to two weeks or freeze.
  6. Serve on breads, muffins, pork chops or just eat it with a spoon.
NOTES
  1. I used a combination of Granny Smith, Fuji and Honey Crisp apples for this recipe.
  2. The sweetness of your apples will depend on how much sugar you will need to add. Adjust according to your apples and preferences.
  3. I have not canned this recipe.

Watch the recipe video here:

Slow Cooker Apple Butter – one of my most popular recipes is now a video. You'll love this! PRINTABLE RECIPE: https://www.mybakingaddiction.com/crock-pot-slow-cooker-apple-butter-recipe/

Posted by My Baking Addiction on Thursday, March 28, 2019

Main dish

Enlist the Kids in Welcoming Spring and Make These Pretty M&Ms Spring Flower Pops!

Enlist the Kids in Welcoming Spring and Make These Pretty M&Ms Spring Flower Pops!
Easter is coming, which means spring is also fast on its way! Why not make these adorable M&Ms Spring Flower Pops with the kids to celebrate?! It’s so simple to whip these up, and they’re so fun once they’re done! Made with easy Rice Krispie treats cut into circles with cookie cutters, candy melts and spring chocolate candies, you’ll love decorating and customizing these with your favorite colors! Use your finished flowers to dress up an Easter basket, or eat ‘em up right away!
Author:
Cuisine: American
Recipe type: Main dish
Ingredients
  • 3 tablespoons butter
  • 5½ cups mini marshmallows
  • 6 cups crispy rice cereal
  • 4-6 ounces white chocolate candy melts
  • M&Ms spring candies, in varying sizes if possible
Instructions
  1. Spray a 9 x 13 pan with non-stick cooking spray. Set aside.
  2. In a large microwave safe bowl, melt the butter in the microwave for 45-60 seconds. Add the marshmallows and toss gently in the melted butter. Microwave the marshmallows for 1 minute and 30 seconds. Stop to stir. Melt for another 30-60 seconds until marshmallows are completely melted. Add the rice cereal to the melted marshmallows, and combine completely. Pour mixture into the prepared pan, and press evenly. Let the cereal treats set to cool completely, for at least 1 hour.
  3. Once cereal treats have cooled, begin cutting out round cereal treat shapes with round cookie or biscuit cutters. Use any size desired.
  4. Melt the white chocolate candy melts according to package directions. Using paper straws and/or lollipop sticks, dip the end into the melted chocolate, and then insert into the round cereal treat, about half way into the side of the treat.
  5. Use the remainder of the melted chocolate, coat the top sides of the pops, and decorate with the M&M’s using a variety of color combinations. Let cereal treats cool completely, at least 1 hour, before moving. Store in an airtight container for up to one week.

Watch the recipe video here:

M&Ms Spring Flower Pops are the perfect way to get ready for Spring! Directions: http://sha.red/hftZl

Posted by Shared Food on Monday, March 18, 2019