Bubble Pop Electric Cake
Bubble Pop Electric Cake
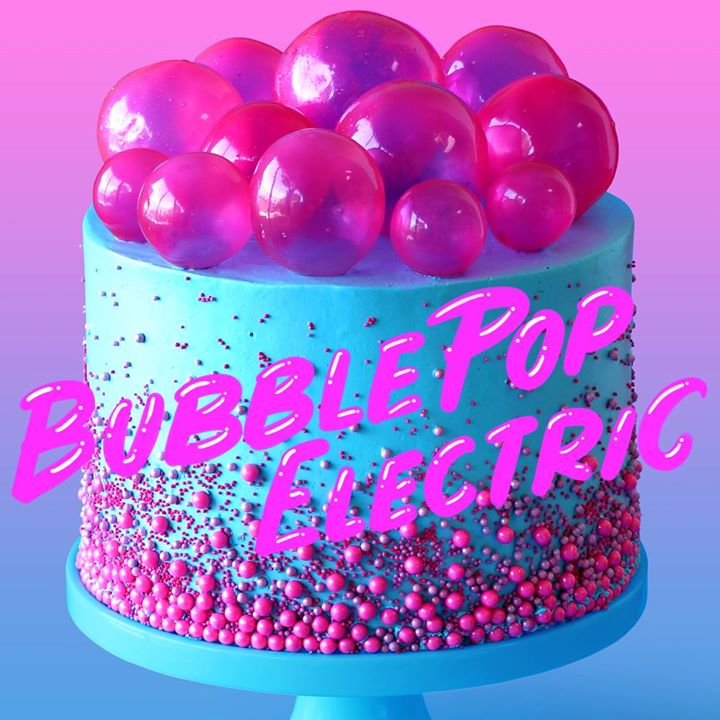
Make a cake fit for a pop star with this strawberry bubblegum flavored cake with gelatin bubbles on top.
Author: The Chef
Cuisine: American
Recipe type: Cake
Ingredients
- 850g all-purpose flour
- 530g caster (superfine) sugar
- 1 tsp salt
- 2 tbsp baking powder
- 750 ml of milk
- 250ml vegetable oil
- 250g unsalted butter, softened
- 4 tbsp Greek yogurt (can substitute with sour cream)
- 2 tsp vanilla extract
- 4 large eggs
- 4 drops deep pink Americolor food gel
- 2 tsp strawberry essence
- 2 tsp bubblegum essence
- Pink sprinkles. I used 4 different sizes or pink round sprinkles. But you can achieve the same gradient sprinkle effect with just one type of pink sprinkles! :0)
- Gelatine Bubbles
- x20 small balloons
- 28g powdered gelatin
- 1 or 2 drops Americolour Deep Pink gel colour
- 8 tablespoons cold water
- Frosting
- 2 batches Swiss meringue buttercream frosting.
- 1 tsp boysenberry essence
- 2 tsp bubblegum essence
- 4 drops sky blue Americolor food gel
Instructions
Gelatine Bubbles
- (Please note: these are food safe but are purely for decoration and no edible. I mean you could try eating them, but you’d be chewing for months and it’s like eating plastic!) You’ll also need to prepare these on the same day you bake the cake as making this entire cake is a two day process.
- Blow up about 20-25 food safe water balloons at about the same size, but do some little ones too. Attach blown up balloons to paper straw or cake pop sticks with tape. Gently coat each balloon with a little oil spray over each balloon and wipe it down with a paper towel. I didn’t show doing this in the video but you’ll need to do it.
- Add water and gelatin to a microwave safe bowl. Mix until well combined. Allow it to bloom (rest) for 5 min before you place it in the microwave for 10-15 seconds, or until melted. Add pink food gel and mix until well combined.
- Dip balloons into gelatin liquid making sure they’re coated evenly leaving the bit where the balloon meets the stick free of gelatin. You may want to coat these twice. Let the gelatin set on the first coat for 5 min, and then coat again. If the gelatin stiffens you can melt again in the microwave for 10 seconds.
- Place the coated balloons standing upright in a cup or in a Styrofoam block and allow to dry completely- about 24 hours.
- To remove balloon, cut away from the stick and pull the balloon out from the bubble. You’ll need to cut away the bottom of the bubbles so they sit evenly on top of the cake. You can do this using a pair of scissors.
Frosting
- To prepare frosting add blue food gel, boysenberry and bubblegum essence. Mix until well combined.
Cake
- Preheat a fan-forced oven to 160C (320F) or 180C (356F) for a conventional oven. Spray an 8” cake tin with oil spray and line the bottom with baking paper.
- In the bowl of a stand mixer fitted with the paddle attachment, add the flour, baking powder, caster sugar and salt. Turn mixer on low speed and allow it to mix for a couple minutes to help everything combine well (alternatively you may do this by sifting the ingredients together). Add the softened butter and mix until it resembles a fine sand like texture.
- Add the milk, oil, Greek yogurt, eggs, pink food gel, strawberry essence, bubblegum essence and vanilla extract into the bowl with the dry ingredients and mix on medium speed until no dry ingredients are visible. Scrape down the bowl and mix for another 20 seconds.
- Fill three 8” cake tins with batter.
- Bake for 30 min or until a toothpick inserted comes out clean. Allow the tins to cool for 2 min and then carefully flip the cake tins over on to a cooling wrack to cool completely before using.
- Using a large serrated knife, carefully trim the top off each layer of cake to make even and flat layers. Try to aim to get them all the same height. An easy way to do this is to find the lowest height of the cake, place a skewer or toothpick next to that point and mark it. As you go around each side of the cake cutting it, use the marked skewer to make sure each cut is at the same height.
- To prepare crumb coat, add a dab of frosting onto an 8” cake board or serving plate. Add first cake layer. Use a small offset to add a layer of frosting and smoothen out and layer the frosting on each layer before adding the next layer of cake. Add more frosting around the outside to fill the grooves between each layer. This should just be a neat thin layer of frosting which is aimed at trapping any cake crumbs so that random bits of cake crumbs don’t show up on the outside of the cake.
- Add a fresh layer of frosting using a small offset spatula. Use a cake scraper to smoothen out the frosting around the sides. Then smoothen out the top using a the cake scraper. Chill.
- Carefully add sprinkles to the bottom of the cake. I resorted to creating a huge mess by throwing them onto the cake. I didn’t want to touch my precious frosting with my warm hands and risk giant fingerprints in the cake. I didn’t lose that many sprinkles and I swept up whatever fell on the floor and ate them. Kidding! I threw them in the bin lol.
- I started with my bigger round sprinkles at the bottom and worked my way up using smaller ones with the big sprinkles and then less and less sprinkles as I got to the top of the cake.
- Finish off the cake by carefully placing the small gelatin bubbles around the outside of the top of the cake and the bigger ones in the centre.
Watch the recipe video here:
Make a cake fit for a pop star with this strawberry bubblegum flavored cake with gelatin bubbles on top. via The Scran LineFull Recipe: taste.md/2wOELX9
Posted by Sweeten on Thursday, October 12, 2017