Showing 126 Result(s)
Main dish

Chickpea and Chorizo Tostadas

Chickpea and Chorizo Tostadas
Crunchy, creamy, chorizo-y—these quick tostadas hit all the notes. If you normally throw the stems from a bunch of cilantro or parsley straight into the garbage...DON'T! They're delicious, and can be diced finely and stirred into all kinds of things—like the lime yogurt in this recipe—to add herb-y flavor and crunch.
Author:
Cuisine: American
Recipe type: Main dish
Ingredients
  • 1 15-oz. can chickpeas
  • 1 lime
  • ¼ cup plain whole milk Greek yogurt
  • 1 tsp. kosher salt, divided
  • 8 sprigs cilantro
  • 2 links fresh chorizo (about 8 oz. total)
  • 4 tostada shells
Instructions
  1. Rinse and drain 15 oz. chickpeas in a colander. Measure out ½ cup; reserve remaining chickpeas for another use.
  2. Finely grate zest of 1 lime with a microplane or grater into a small bowl.
  3. Cut lime in half and squeeze juice from one half into bowl with zest. Cut remaining half into 2 wedges; set aside for serving.
  4. Gather 8 cilantro sprigs on cutting board. Starting at the stem end, finely chop stems until you get to the leaves; reserve leaves for serving. Add stems to bowl with lime.
  5. Add ¼ cup yogurt and ½ tsp. salt to bowl and mix with a spoon to combine.
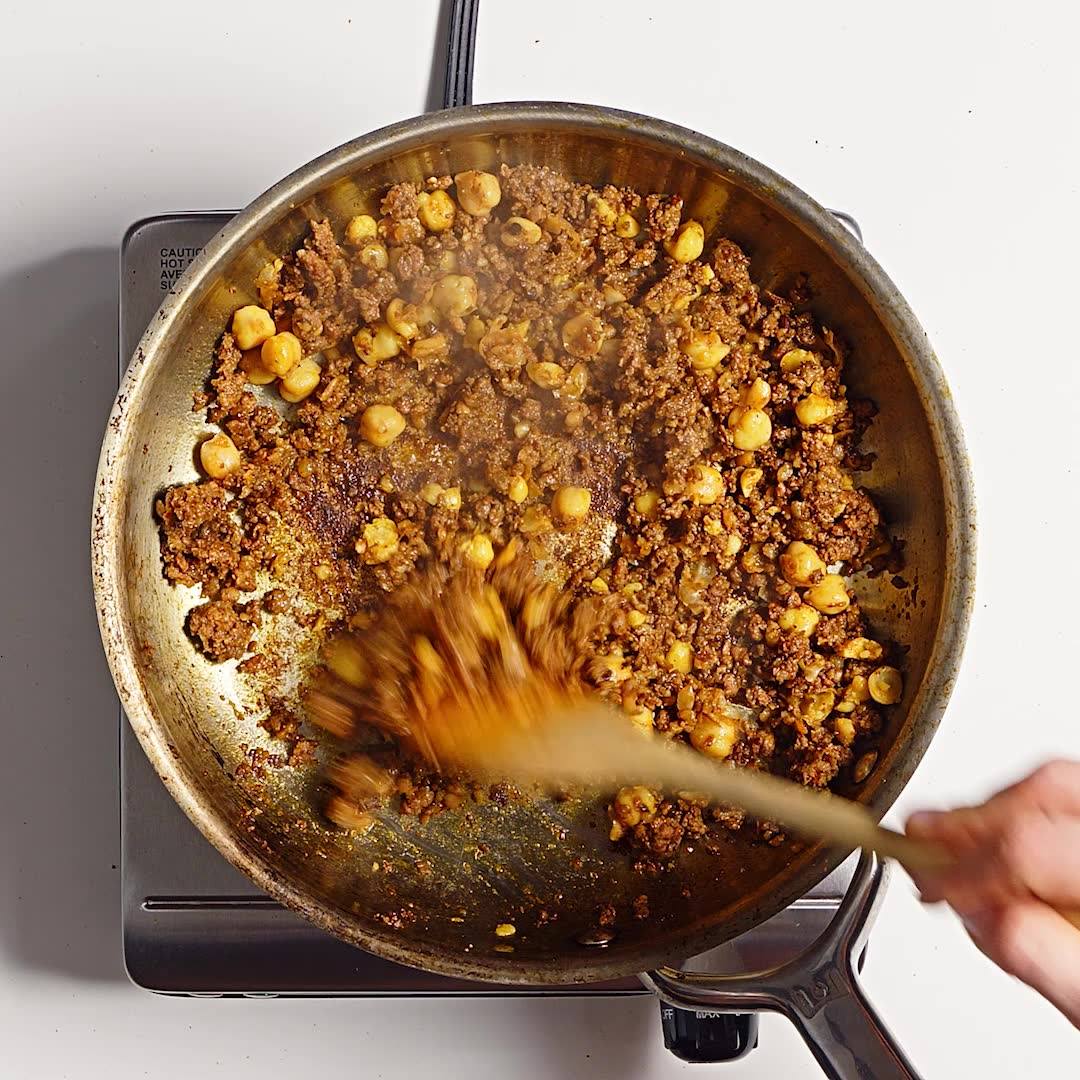
  6. Remove casing from 2 chorizo links; discard. Heat a medium nonstick skillet over medium-low. Cook chorizo, breaking it up with a wooden spoon, until partially cooked, about 3 minutes.
  7. Add reserved chickpeas and remaining ½ tsp. salt and mash together with back of spoon until chorizo is cooked through and crispy, 7–10 minutes. Remove from heat.
  8. Spread reserved crema over 4 tostada shells.
  9. Top crema with chorizo mixture.
  10. Top with reserved cilantro leaves and serve with reserved lime wedges alongside.

Watch the recipe video here:

Crunchy, creamy, chorizo-y—these quick tostadas hit all the notes.Make it: http://bonap.it/o9rK8lz

Posted by Bon Appétit Magazine on Friday, May 24, 2019

Dessert

Cheesy Sesame Phyllo Bites

Cheesy Sesame Phyllo Bites
Not feeling the squares in this phyllo bites recipe? Use a pizza cutter to cut crackers into any shape you like!
Author:
Cuisine: American
Recipe type: Dessert
Ingredients
  • 6 sheets fresh phyllo pastry or frozen, thawed
  • 4 tablespoons unsalted butter, melted, slightly cooled
  • 1 large egg white, room temperature, lightly beaten
  • ⅓ cup mixed black and white sesame seeds, divided
  • ½ teaspoon smoked paprika, divided
  • Kosher salt, freshly ground pepper
  • 4 ounces Gruyère, finely grated (about 2 cups), divided
Instructions
  1. Preheat oven to 375°. Place a sheet of phyllo on a parchment-lined baking sheet. Brush lightly with butter and top with a second sheet of phyllo, pressing gently to adhere. Brush with butter and top with another sheet, pressing gently again; brush with egg white. Sprinkle half of sesame seeds and half of paprika over phyllo; season with salt and pepper. Scatter half of Gruyère over top. Using a pizza cutter or sharp knife, cut phyllo into 2" squares. Bake crackers until golden brown, 8–10 minutes. Let cool on baking sheet 3 minutes before serving. Repeat with remaining phyllo, butter, egg white, sesame seeds, paprika, Gruyère, and more salt and pepper, building on another parchment-lined baking sheet.
Do Ahead:
  1. Crackers can be made 8 hours ahead. Store airtight at room temperature.

Watch the recipe video here:

Yes, it's actually this easy to make crackers from scratch. GET THE RECIPE: http://bonap.it/6T2WjQV

Posted by Bon Appétit Magazine on Saturday, June 1, 2019

Dessert

Monkey Bread

Monkey Bread
No secrets here—the key to the buttery flavor and signature texture of monkey bread is the brioche dough.
Author:
Cuisine: American
Recipe type: Dessert
Ingredients
Dough
  • 1 cup (2 sticks) chilled unsalted butter, cut into 1-inch pieces, plus more for bowl
  • ⅓ cup whole milk
  • 1 ¼-ounce envelope active dry yeast (about 2¼ teaspoons)
  • 3 cups (or more) all-purpose flour
  • 3 tablespoons sugar
  • 1 teaspoon kosher salt
  • 4 large eggs, room temperature
Assembly
  • ¾ cup granulated sugar
  • 1 tablespoon ground cinnamon
  • 6 tablespoons unsalted butter, melted, slightly cooled, plus more for pan
  • Sanding or granulated sugar (for pan)
  • Prepared caramel sauce (for serving)
Special Equipment
  • A 10-inch tube pan or 10-cup Bundt pan
Instructions
Dough
  1. Beat 1 cup butter in the bowl of a stand mixer fitted with the paddle attachment on medium-low speed until butter is smooth and pliable but still cold, about 1 minute. Scrape into a medium bowl; set aside. Save mixer bowl because you’re going to use it again in a minute (no need to wash).
  2. Gently heat milk in a small saucepan over low until warm to the touch but not steaming hot. It should be 110°–115°. Whisk milk and yeast in a small bowl to dissolve yeast, then let sit until foamy, about 5 minutes.
  3. Meanwhile, whisk flour, sugar, and salt in reserved mixer bowl to combine. Add yeast mixture and eggs, fit bowl back onto mixer, and beat on low speed with dough hook, gradually increasing mixer speed to medium as dry ingredients are incorporated, until dough comes together around hook. Continue to mix on medium speed until dough is smooth, elastic, and no longer sticking to the sides of the bowl, about 5 minutes. Add more flour by the tablespoonful as needed if dough isn’t pulling away from bowl cleanly.
  4. With motor running, gradually add reserved butter about a tablespoonful at a time, waiting until it is absorbed before adding more. This process can take several minutes, so be patient. When you’re done adding the butter, the dough will be extremely smooth, soft, and supple but not sticky. Place dough in a large buttered bowl and cover. Let sit in a warm, draft-free spot until nearly doubled in size, 55–65 minutes.
  5. Uncover dough and punch down several times to deflate. Line a 13x9" baking dish with plastic wrap, leaving generous overhang on all sides. Place dough in pan and press into an even layer, working all the way to the sides of the pan. Fold plastic up and over dough, eliminating air pockets between dough and plastic. Chill dough in freezer until firm to the touch, 20–30 minutes.
Do Ahead:
  1. Dough can be made 1 day ahead. After punching down, pat into plastic-lined pan and chill in refrigerator instead of freezer.
Assembly
  1. Mix granulated sugar and cinnamon in a medium bowl to combine. Lightly brush tube pan with butter. Sprinkle with sanding sugar, tapping out excess; set aside. Remove dough from freezer and peel back plastic. Brush entire surface with melted butter and sprinkle generously with some cinnamon sugar. Shake excess sugar back into bowl, then invert baking pan and turn out dough onto work surface sugar side down. Remove plastic; discard. Brush other side of dough with butter and sprinkle with more cinnamon sugar. Use a pizza cutter or a chef’s knife to cut dough into a 12x6 grid.
  2. Working relatively quickly so dough doesn’t become too soft, separate pieces and, working one at a time, roll lightly between your palms into balls, dusting with more cinnamon sugar as needed to prevent sticking. Place in prepared tube pan as you go. Cover pan with plastic wrap and let sit in a warm, draft-free spot until pieces have swelled to nearly doubled in size, 40–50 minutes. Preheat oven to 350° a little before monkey bread is ready to bake.
  3. Remove plastic from pan and bake monkey bread until golden brown, 25–35 minutes. Let cool 10 minutes, then use a small offset spatula to loosen monkey bread from sides of pan. Pull bottom out from pan and use spatula to loosen bread from bottom. Slide bread back into pan; invert onto a plate and remove pan. Place a wire rack over bread and invert right side up onto rack. If using a Bundt pan, just invert directly onto wire rack. Let cool at least 15 minutes before serving.
  4. Pour about ½ cup caramel sauce over monkey bread if desired. Serve with more sauce alongside for dipping.

Watch the recipe video here:

Nothing brings people together quite like a warm, gooey monkey bread.Make it: http://bonap.it/nfrbYll

Posted by Bon Appétit Magazine on Saturday, June 29, 2019

Drink

BA’s Best Piña Colada

BA's Best Piña Colada
Freezing fresh pineapple definitely makes the best impact flavor-wise in this piña colada recipe, but you can use 8 oz. frozen pineapple if you wish. This is part of BA's Best, a collection of our essential recipes.
Author:
Cuisine: American
Recipe type: Drinks
Ingredients
  • ½ fresh pineapple, peeled, cut into 1½-inch pieces
  • 6 ounces sweetened cream of coconut (preferably Coco López)
  • 2 ounces unsweetened coconut milk
  • 8 ounces white rum
  • 2 tablespoons fresh lime juice
  • 2 ounces dark rum (optional)
  • Maraschino cherries and lime wedges (for serving)
Instructions
  1. Place pineapple pieces in a resealable plastic bag, laying them flat. Freeze until solid, at least 3 hours.
  2. Shake cream of coconut and coconut milk in their cans before measuring. Purée pineapple, cream of coconut, coconut milk, white rum, lime juice, and 3 cups ice (about 15 oz.) in a blender until smooth. Transfer blender cup to freezer and freeze until mixture is thickened (it should be the consistency of a milkshake), 25–35 minutes.
  3. Blend again until mixture is the perfect slushy frozen drink consistency. Divide among glasses. Top off each with ½ oz. dark rum, if using, and garnish each with a cherry and lime wedge.
Do Ahead:
  1. Pineapple can be chopped 3 months ahead. Keep frozen.

Watch the recipe video here:

If you like getting caught in the rain. Make em: http://bonap.it/EXqHFnT

Posted by Bon Appétit Magazine on Thursday, June 20, 2019

Main dish

Egg-in-a-Hole Sandwich with Bacon and Cheddar

Egg-in-a-Hole Sandwich with Bacon and Cheddar
Warning: A fork and knife (or a bib, at the very least) may be required to tackle this sandwich.
Author:
Cuisine: American
Recipe type: Main dish
Ingredients
  • 4 slices thick-cut bacon
  • 4 ¾-inch-thick slices sourdough or other country-style bread
  • 4 large eggs
  • Kosher salt, freshly ground pepper
  • 2 tablespoons unsalted butter, divided
  • 4 slices cheddar
  • Hot sauce
Special Equipment
  • 2-inch-diameter cookie cutter
Instructions
  1. Cook bacon in a large skillet over medium heat, turning halfway through, until browned and crisp, 8–10 minutes.
  2. Meanwhile, use cutter to punch out a circle in the center of each piece of bread (save for snacking, now or later).
  3. Transfer bacon to a cutting board; cut in half crosswise. Carefully pour half of bacon drippings into a small bowl. Place 2 slices of bread in skillet and cook over medium-high until bottom sides are golden brown, about 3 minutes.
  4. Crack an egg into each hole in bread (some of the white may pool on top of the bread). Season eggs with salt and pepper and cook until underside is set, about 2 minutes. Using a thin spatula (a fish spatula works best), carefully turn both pieces of bread to briefly cook second side (this helps set the whites, but the yolk should still be runny), about 1 minute. Add 1 Tbsp. butter to skillet and swirl skillet to distribute, encouraging some to get underneath. Carefully turn bread again. Top one slice with half of the cheese. Remove pan from heat and let sit about 1 minute to soften cheese. Top with half of bacon and some hot sauce. Close up sandwich and transfer to a plate. Repeat process with remaining bacon drippings, bread, eggs, butter, bacon, and cheese and more hot sauce to make another sandwich.

Watch the recipe video here:

Not gonna lie, it's the perfect hangover food.Make it: http://bonap.it/qBp4FKN

Posted by Bon Appétit Magazine on Sunday, June 9, 2019

Main dish

Roasted Peppers with Parm Breadcrumbs

Roasted Peppers with Parm Breadcrumbs
Basically just an excuse to eat breadcrumbs by the handful, TBH. Great hot and at room temperature, these make a great, low-stress addition to an antipasti meat and cheese plate.
Author:
Cuisine: American
Recipe type: Main dish
Ingredients
  • 3 bell peppers, any color
  • 4 Tbsp. extra-virgin olive oil, divided
  • ¾ tsp. kosher salt, divided
  • 1 cup panko (Japanese breadcrumbs)
  • ½ cup finely grated Parmesan
  • 1 tsp. garlic powder
  • 1 lemon
  • 4 sprigs parsley
  • 1 tsp. Aleppo-style or other mild red pepper flakes
Instructions
  1. Preheat oven to 450°. Place 3 bell peppers upright on a cutting board. Working around stems and avoiding the seedy center, slice straight downward to remove 4 lobes from each pepper.
  2. Arrange pepper lobes skin sides down on a rimmed baking sheet. Drizzle with 1 Tbsp. oil; season with ½ tsp. salt.
  3. Gently mix 1 cup panko, ½ cup Parmesan, 1 tsp. garlic powder, 2 Tbsp. oil, and remaining ¼ tsp. salt with your hands in a medium bowl.
  4. Using your fingertips, pat about 2 Tbsp. breadcrumb mixture into each piece of pepper. Drizzle peppers with remaining 1 Tbsp. oil.
  5. Bake peppers until bottoms are deeply browned and breadcrumbs are golden, 18–22 minutes. Let cool slightly.
  6. Meanwhile, slice 1 lemon into wedges and set aside. Pick leaves from 4 parsley sprigs and coarsely chop.
  7. Transfer peppers to a platter. Top with red pepper and parsley. Serve with lemon wedges alongside.

Watch the recipe video here:

Basically just an excuse to eat breadcrumbs by the handful, TBH.Make it: http://bonap.it/yNiBF7p

Posted by Bon Appétit Magazine on Sunday, June 9, 2019

Main dish

Steak with Lemon Butter and Jammy Lemon Halves

Steak with Lemon Butter and Jammy Lemon Halves
Often only the rind of preserved lemons gets used, but we’ve learned that the flesh is just as good—as long as you remove the seeds.
Author:
Cuisine: American
Recipe type: Main dish
Ingredients
Lemon Butter
  • ½ preserved lemon, seeds removed, finely chopped
  • ½ cup (1 stick) unsalted butter, room temperature
  • 1 teaspoon finely grated lemon zest
  • 1 teaspoon kosher salt
  • ½ teaspoon freshly ground black pepper
  • 2 tablespoons fresh lemon juice
Steak and Assembly
  • 2 1¼–1½-inch-thick bone-in New York strip steaks (about 3 pounds total)
  • 1 tablespoon vegetable oil
  • Kosher salt
  • 1 lemon, halved
Instructions
Lemon Butter
  1. Process preserved lemon, butter, lemon zest, salt, and pepper in a food processor, scraping down sides as needed, until smooth. (Alternatively, you can whisk together in a large bowl.) With motor running, add lemon juice in a steady stream. Process until completely incorporated.
  2. If not using right away, transfer lemon butter to a sheet of parchment paper and roll into a cylinder. Or scoop it into a small bowl and cover.
Do Ahead: Lemon butter can be made 3 days ahead. Chill.
Steak and Assembly
  1. Let steaks sit at room temperature about 1 hour before cooking.
  2. Preheat oven to 350°. Heat oil in a large ovenproof skillet over medium-high. Season steaks with salt. Add steaks to skillet and arrange lemon halves, cut side down, around. Cook, turning steaks every 2 minutes or so, until steaks are well browned and cut sides of lemon are very dark, 6–8 minutes. Transfer lemon halves to a plate.
  3. Place skillet in oven and roast steaks until an instant-read thermometer inserted into the thickest part registers 120°, about 4 minutes. Transfer steaks to a wire rack set inside a rimmed baking sheet and top with some lemon butter. Let steaks rest at least 10 minutes before slicing.
  4. Top steaks with more butter and serve with cooked lemon halves for squeezing over.

Watch the recipe video here:

Your week just got infinitely better due to this Steak with Lemon Butter.RECIPE: http://bonap.it/3swwSno

Posted by Bon Appétit Magazine on Wednesday, July 3, 2019

Main dish

Blackberry Icebox Cake

Blackberry Icebox Cake
This creamy, dreamy icebox cake—built in a bowl for maximum ease—is the no-bake dessert you'll be making all summer.
Author:
Cuisine: American
Recipe type: Main dish
Ingredients
  • 2 pints blackberries, divided
  • ½ cup blackberry jam
  • 1 lemon
  • 2 cups chilled heavy cream
  • ¼ cup powdered sugar
  • Pinch of kosher salt
  • 8 oz. vanilla wafers, divided
Instructions
  1. Measure out 2 cups blackberries from 2 pints. Slice berries in half lengthwise and transfer to a medium bowl. (Save remaining berries for decorating later.)
  2. Add ½ cup blackberry jam to bowl with berries. Using a citrus juicer, juice 1 lemon over berry mixture. Let sit 10 minutes.
  3. Using an electric mixer, beat 2 cups heavy cream in a large bowl, starting on low speed and increasing to high, until soft peaks form.
  4. Beat in ¼ cup powdered sugar and a pinch of salt just to combine.
  5. Line a medium bowl (6-cup capacity) with plastic wrap, pressing into bottom and up sides and leaving plenty of overhang. Line the bottom of bowl with a layer of vanilla wafers.
  6. Spoon about ¼ cup berry mixture over wafers. Scoop 1½ cups whipped cream into a small bowl; cover and save in fridge for later. Spread ½ cup of the remaining whipped cream evenly over wafer and berry layers. Repeat layers with wafers (breaking to fit as needed—no one will know), blackberry mixture, and whipped cream, using more for each layer as the bowl gets wider, until you run out of all the components.
  7. Bring up plastic overhang to cover and chill at least 24 hours.
  8. Unwrap plastic from top of cake and place a large cake stand or platter firmly over it. Flip over and lift bowl away; peel away plastic wrap. (Ta-da!)
  9. Using a whisk, beat reserved whipped cream back to soft peaks, then use a spoon to dollop cream all over cake and spread around evenly.
  10. Cut reserved berries in half lengthwise and arrange them on top.
  11. Slice cake into 8 pieces to serve.
  12. Do Ahead: Cake can be assembled 2 days ahead and can also be unmolded and covered in cream 1 hour ahead; either way, keep in the fridge until the last minute.

Watch the recipe video here:

This is the no-bake dessert you'll be making all summer.Make it: http://bonap.it/EJHnzze

Posted by Bon Appétit Magazine on Thursday, July 4, 2019

Breakfast

Hasselback Butternut Squash with Bay Leaves

Hasselback Butternut Squash with Bay Leaves
For this holiday-worthy recipe, roasting the butternut with several bay leaves slipped between the slices results in a subtle aromatic backdrop for the chile glaze.
Author:
Cuisine: Italian
Recipe type: Breakfast
Ingredients
  • 1 large butternut squash or 2–3 small honeynut squash (about 3 pounds total)
  • 1 tablespoon olive oil
  • Kosher salt, freshly ground pepper
  • 1 Fresno chile, thinly sliced
  • ¼ cup pure maple syrup, preferably grade B
  • 3 tablespoons unsalted butter
  • 2 tablespoons apple cider vinegar
  • 6–8 dried bay leaves
Instructions
  1. Place a rack in upper third of oven; preheat to 425°. Halve squash lengthwise and scoop out seeds with a large spoon. Using a peeler, remove skin and white flesh below (you should reach the deep orange flesh). Rub all over with oil; season with salt and pepper. Roast in a baking dish just large enough to hold halves side by side until beginning to soften (a paring knife should easily slip in only about ¼"), 15–18 minutes.
  2. Meanwhile, bring chile, maple syrup, butter, and vinegar to a simmer in a small saucepan over medium-high, stirring occasionally and removing chile as soon as desired heat level is reached (set aside for serving), until just thick enough to coat spoon, 6–8 minutes. Reduce heat to very low and keep glaze warm.
  3. Transfer squash to a cutting board and let cool slightly. Using a sharp knife, score rounded sides of squash halves crosswise, going as deep as possible but without cutting all the way through. Return squash to baking dish, scored sides up, and tuck bay leaves between a few of the slices; season with salt and pepper.
  4. Roast squash, basting with glaze every 10 minutes or so and using pastry brush to lift off any glaze in dish that is browning too much, until tender and glaze forms a rich brown coating, 45–60 minutes. Serve topped with reserved chiles.
Do Ahead: Squash can be roasted 4 hours ahead. Let cool until just warm; cover and store at room temperature. Reheat before serving.

Watch the recipe video here:

The most photogenic. Make it: http://bonap.it/QmgQtjA

Posted by Bon Appétit Magazine on Monday, May 6, 2019

Breakfast

Plum-Rosemary-Crisp with Oat-Spelt Topping

Plum-Rosemary-Crisp with Oat-Spelt Topping
Double up on the topping and save half for later. Baked on its own, it’s great with yogurt. As an alternative, try the topping with an oat-quinoa flour mixture here. This recipe is from Tandem in Portland, ME.
Author:
Cuisine: American
Recipe type: Breakfast
Ingredients
Filling
  • 1 tablespoon unsalted butter, melted
  • 3 pounds ripe plums, cut into wedges
  • 2 teaspoons finely chopped rosemary
  • 1 tablespoon plus ⅓ cup raw sugar or (packed) dark brown sugar
  • 1 tablespoon apple cider vinegar
  • 2 teaspoons finely grated lemon zest
  • Pinch of kosher salt
  • 3 tablespoons all-purpose flour
Topping and Assembly
  • 1 cup old-fashioned oats
  • ¾ cup spelt flour
  • ¼ cup raw sugar or (packed) dark brown sugar
  • ¼ teaspoon kosher salt
  • ¼ teaspoon ground cinnamon
  • Pinch of ground cardamom
  • 6 tablespoons unsalted butter, melted, slightly cooled
Instructions
Filling
  1. Brush inside of a shallow 2-qt. baking dish with butter. Toss plums, rosemary, and 1 Tbsp. raw sugar in a large bowl. Let sit, tossing once or twice, until plums release their juices, 15–20 minutes.
  2. Add vinegar, zest, salt, and remaining ⅓ cup raw sugar to plums and toss to combine. Sprinkle flour evenly over top and toss until flour is no longer visible.
  3. Transfer filling to prepared baking dish and spread out to make an even layer; set aside.
Topping and Assembly
  1. Preheat oven to 350°. Whisk oats, spelt flour, raw sugar, salt, cinnamon, and cardamom in a medium bowl. Drizzle butter over mixture, tossing with a fork to incorporate. As soon as all the butter has been added, work with your hands until no dry spots remain and mixture holds together in clumps. Scatter over a rimmed baking sheet and let sit uncovered at room temperature until slightly dried out (this will help it crisp in the oven when baking), 10–15 minutes.
  2. Scatter topping evenly over reserved filling. Bake crisp on a foil-lined rimmed baking sheet until topping is golden and crisp and fruit juices are bubbling around the edges, 35–45 minutes. Let cool at least 15 minutes before serving.
Do Ahead:
  1. Topping can be made 2 days ahead; after drying out, cover and chill. Crisp can be baked 8 hours ahead; let cool, then tent with foil. Reheat, uncovered, in 350° oven 10–15 minutes.

Watch the recipe video here:

It isn't summer without a fruit crisp. We checked. RECIPE: http://bonap.it/kFgYIQ4

Posted by Bon Appétit Magazine on Saturday, July 6, 2019