Showing 388 Result(s)
Main dish

Baileys Chocolate Hot Cross Buns

Baileys Chocolate Hot Cross Buns
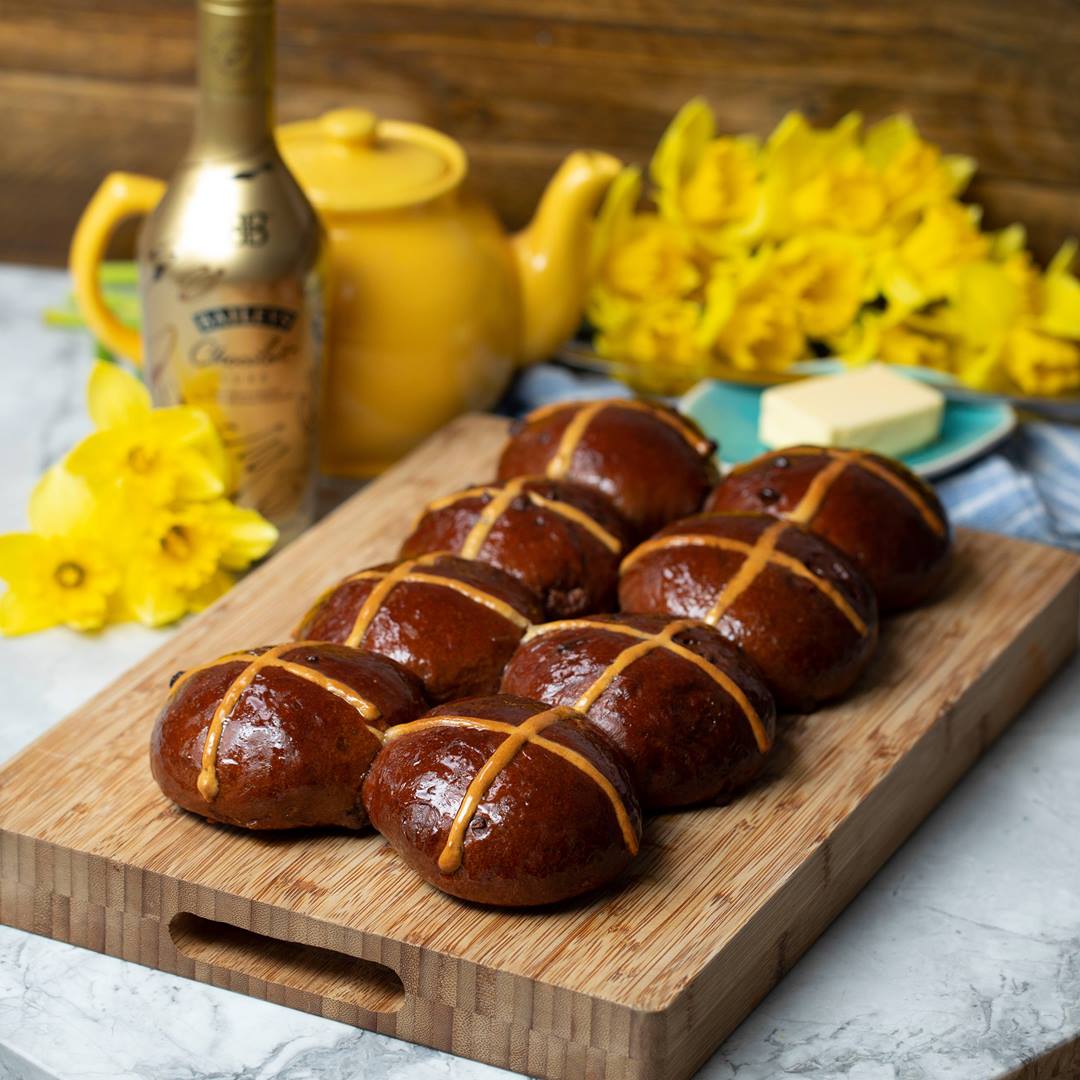
These delicious and more-ish buns are a wonderful twist on an Easter classic, made smooth and luxurious by copious use of Baileys Chocolat Luxe.
Author:
Cuisine: American
Recipe type: Main dish
Ingredients
  • 100ml milk
  • 100ml Baileys Chocolat Luxe
  • 6g dried yeast
  • 1 tsp sugar
  • 420g bread flour
  • 30g cocoa powder
  • 100g cold butter, cut into small cubes
  • ½ tsp salt
  • 45g sugar
  • 2 eggs
  • 150g milk chocolate chips
  • 4 tbsp plain flour
  • 3 tbsp Baileys Original
  • Sugar syrup, to glaze
Instructions
  1. Heat the oven to 200C/400C.
  2. Add the milk and Baileys Chocolat Luxe to a jug and heat in the microwave for 1 min. Leave to cool to blood temperature, then add the yeast and 1 tsp of the sugar and stir to combine. Leave the yeast to bloom for 5 mins.
  3. Add the flour, cocoa, salt and butter to a large mixing bowl and rub in the butter until the mixture has the texture of fine breadcrumbs. Add the sugar, then make a well in the middle and add the 2 eggs and the milky yeast mixture. Bring the mixture together into a soft dough, then turn out onto a floured work surface and knead for 10 mins until the dough is smooth and stretchy. Place in a lightly greased bowl, cover in cling film and leave to proof somewhere warm for a couple of hours, or until the dough has doubled in size.
  4. Tip the dough out onto a floured surface and spread out into a rectangle. Sprinkle with the chocolate chips and knead again so that they are evenly dispersed.
  5. Divide the dough into 8 equal pieces, shape into buns, place on a lined tray and cover with cling film until doubled in size again, about another hour.
  6. Mix the flour with enough Baileys Original to form a stiff paste. Score the top of each bun with a cross and pipe the flour paste into the crosses. Bake for 20-25 mins until risen and smelling lovely and chocolately. Place on a wire rack and brush with sugar syrup, then leave to cool.
  7. Serve halved and toasted with lots of butter and enjoy!

Watch the recipe video here:

Baileys Chocolate Hot Cross Buns

Posted by Twisted on Thursday, April 18, 2019

Dessert

No Bake Lemon Meringue Mousse Cake

No Bake Lemon Meringue Mousse Cake
A lemon meringue pie is a thing of wonder, but we decided to elevate it by making our lemon filling beautifully airy, keeping it nice and light. This is the kind of classy dessert you would be happy to take home and meet your parents.
Author:
Cuisine: American
Recipe type: Dessert
Ingredients
  • 400g digestive biscuits, crushed
  • 350g melted butter
  • 350g sugar
  • 4 tsp cornflour
  • 160ml lemon juice
  • 1 lemons, zest
  • 4 eggs
  • 4 egg yolks
  • 150g butter, cut in cubes
  • 75ml water
  • 4 tsp gelatin powder
  • 5 egg whites
  • 170g sugar
  • 375ml double cream
  • 3 egg whites
  • 150g sugar
Instructions
  1. Put your sugar and cornstarch in a saucepan and stir to combine. Gradually pour in the lemon juice, whisking all the while so it smoothly dissolves the cornstarch. Add the eggs, yolks and butter then turn up the heat to medium and stir until the mixture thickens. Pour into a sieve set over a bowl and set aside to cool.
  2. Combine your digestives with your melted butter, then press into the bottom and edges of a lightly greased springform cake tin. Pop in the fridge to set up for an hour.
  3. Pour your water into a small saucepan and sprinkle the surface evenly with gelatin. Leave it to stand for 10 mins whilst it softens.
  4. Gently warm your lemon curd in one pan and your gelatine in another. Once the gelatine has dissolved, whisk it into the lemon curd until fully combined. Pour into a large bowl.
  5. Whisk your double cream until it can hold itself in peaks, then set aside.
  6. Set your egg whites in a heatproof bowl over a gently simmering pan. Whisk to soft peaks, then gradually add your caster sugar and continue whisking until it is mousse and falls in soft-medium peaks.
  7. Fold your egg white mixture into your lemon curd in a few batches, then fold through the cream.
  8. Pour your cheesecake mixture into your biscuit tin. Pop in the fridge to set overnight.
  9. Add your egg whites and sugar to a heatproof bowl set over a pan of gently simmering water. Whisk with an electric whisk on a high heat until the sugar has dissolved.
  10. Remove the pan from the heat and whisk on a medium-high speed until stiff peaks form and the mixture is thick and glossy.
  11. Pour this mixture on top of the lemon curd and arrange in peaks. Torch with a blowtorch to caramelise the meringue, then serve!

Watch the recipe video here:

No Bake Lemon Meringue Mousse Cake

Posted by Twisted on Tuesday, April 9, 2019

Breakfast

Giant Jalapeño Popper Stuffed Burger Wellington

Giant Jalapeño Popper Stuffed Burger Wellington
This enormous, beautiful thing will astound all of your dinner guests!
Author:
Cuisine: American
Recipe type: Breakfast
Ingredients
  • 14 rashers of bacon, diced
  • 2 tbsp olive oil
  • 1 onion, diced
  • 2 cloves of garlic, chopped
  • 2 jalapenos, chopped
  • 100g sour cream
  • 100g cheddar
  • 100g mozzarella
  • 1.8kg beef mince
  • 1 tbsp salt
  • 1 tbsp pepper
  • 1kg puff pastry
  • 2 eggs, beaten
  • 2 tbsp sesame seeds
Instructions
  1. Heat oven to 190C/375F.
  2. Heat a large frying pan on a medium heat and add your bacon. Fry until it is starting to crisp up, then add your onion. Fry until the onion is soft, then add the garlic and cook out for 1 min.
  3. Allow to cool, then add to a bowl with the jalapeños, sour cream, cheddar and mozzarella.
  4. Combine your beef mince, salt and pepper in a bowl. Divide the mixture into two, then press each half into a springform cake tin on baking parchment to form two large discs.
  5. In the centre of one patty, place your cheesy bacon mixture. Press the other patty on top and seal the edges by pressing down.
  6. Heat a large frying pan on a high heat with a little oil. Place the burger in the pan and cook on a high heat for 2 mins until starting to go golden. Flip the burger over and cook for another 2 mins on the other side.
  7. Out of the puff pastry, cut two large discs about 2 inches larger than the burger. Place one on a parchment lined baking tray and place the burger in the centre. Brush the edge with egg wash, then place the other disc of pastry on top. Press to seal the edge and crimp with a fork. Brush the top with egg wash and sprinkle with sesame seeds.
  8. Place in the oven to bake for 30 mins, until the pastry is crisp and golden. Serve immediately!

Watch the recipe video here:

Giant Jalapeño Popper Stuffed Burger Wellington

Posted by Twisted on Sunday, April 7, 2019

Main dish

Cheese-Stuffed Spaghetti Wrapped Meatballs

Cheese-Stuffed Spaghetti Wrapped Meatballs
CHEESE-STUFFED SPAGHETTI WRAPPED MEATBALLS
Author:
Cuisine: American
Recipe type: Main dish
Ingredients
  • 500g beef mince (5%)
  • 400g sausage meat
  • ½ cup breadcrumbs
  • 1 egg, whisked
  • 1 tbsp finely chopped parsley
  • 2 cloves garlic, minced
  • 1 tbsp tomato paste
  • ½ tsp salt
  • ½ tsp freshly ground pepper
  • 200g pizza mozzarella, in 1.5cm cubes
  • 350g spaghetti, cooked
  • 2 tsp italian seasoning,
  • 2 eggs
  • ½ cup grated parmesan
  • Salt and freshly ground black pepper, to taste
  • Neutral oil, for deep-frying
  • Grated parmesan, to serve
  • Finely chopped parsley, to serve
Instructions
  1. Add the beef, sausage meat, breadcrumbs, eggs, parsley, tomato paste, garlic, salt and pepper to a large bowl and mix well until homogenous and smooth.
  2. Using an ice cream scoop to portion, flatten a piece of the meat mix in your palm then place a cube of mozzarella in the centre and wrap the meat around to seal.
  3. Brown all the meatballs in a lightly oiled frying pan set over a medium heat. Set aside to cool slightly.
  4. In a separate bowl, add the 2 eggs, italian seasoning, parmesan and salt and pepper, to taste. Add the cooked spaghetti and mix thoroughly to coat evenly.
  5. Place a small amount of dressed spaghetti on a piece of cling film and place a browned (cooled) meatball in the centre. Gather the edges of the piece of cling film in order to enclose the meatball around the parcel of spaghetti. Wrap the parcel tightly and place in a muffin tin to retain its shape. Repeat with the rest of the two mixes until you have 12 spaghetti parcels. Set in the freezer for at least 1 hour.
  6. Heat the oil to 175°C, unwrap the nests and fry until golden brown, crisp and cooked through.
  7. Serve with lashings of marinara, lots of grated parmesan and fresh parsley.
  8. Enjoy!

Watch the recipe video here:

Cheese-Stuffed Spaghetti Wrapped Meatballs

Posted by Twisted on Saturday, March 16, 2019

Dessert

WARBURTONS TOFFEE APPLE CRUMBLE CRUMPETS

WARBURTONS TOFFEE APPLE CRUMBLE CRUMPETS
Improving the ultimate dessert is never easy, but stuffing it on top of a crumpet isn’t a bad place to start. Sticky, fruity and just as decadent as every good pud should be, these Toffee Apple Crumble Crumpets take the best of breakfast and make them sweeter than ever. Say hello to your new family favourite.
Author:
Cuisine: American
Recipe type: Dessert
Ingredients
  • 4 Warburtons crumpets
  • 25g butter
  • 50g sugar
  • 4 cooking apples, peeled and cored and cut into chunks
  • 30ml golden syrup
  • ¼ tsp cinnamon
  • 50g flour
  • 40g cold butter, diced
  • 25g oats
  • 50g brown sugar
  • Vanilla ice cream, to serve
  • Caramel sauce, to serve
Instructions
  1. Heat oven to 200C/400F.
  2. Put the flour and butter into a large bowl. Rub together with your finger tips to break up the butter and mix it in with the flour, until the mixture looks like yellow breadcrumbs and is starting to clump together. Add the brown sugar and oats and bring together with your hands to combine.
  3. Spread the mixture on a baking tray and bake for 15-20 mins, until the crumble is crisp and golden. Set aside to keep warm.
  4. In a large saucepan, melt your butter. When it starts to foam, tip in the sugar. Cook on a low heat until the sugar starts to go a caramel colour. Add the apples, golden syrup and cinnamon then cook on a medium heat until the apples have softened and the sauce has thickened.
  5. Toast your crumpets. Top with your toffee apple compote and your crumble. Top with ice cream and drizzle with caramel sauce.
  6. Serve and enjoy!

Watch the recipe video here:

https://www.facebook.com/1045035215535674/posts/2311461335559716/

Main dish

One Pot BBQ Chicken Penne

One Pot BBQ Chicken Penne
An easy midweek dinner for the BBQ sauce lovers in your life, you can practically do it in your sleep.
Author:
Cuisine: American
Recipe type: Main dish
Ingredients
  • 4 chicken breasts, cut into small chunks
  • 10 rashers of streaky bacon, chopped
  • 1 onion, diced
  • 2 cloves of garlic, chopped
  • 2 tsp fajita seasoning
  • 800ml chicken stock
  • 400g penne
  • 1 tbsp tomato puree
  • 1 tsp salt
  • 1 tsp pepper
  • 300ml barbecue sauce
  • 200g red cheddar
  • 2 tbsp chives, chopped
Instructions
  1. Heat some oil in a large pan over a high heat. Put the chicken chunks in the pan and cook for a couple of minutes to brown the outside, turning over so that they cook evenly. Remove from the pan.
  2. Turn the pan down to a medium-high heat and add the bacon bits. Cook for a few minutes until the fat has rendered and they are starting to crisp up, stirring occasionally. Turn the heat down to medium and add the onion. Cook for 5 mins until it has softened and started to take on colour. Add the garlic and fajita spices and cook out for 1 min.
  3. Add the stock, penne, tomato puree, salt and pepper to the pan and stir to combine. Cook for 5 mins, stirring occasionally to prevent the pasta from sticking and to ensure all pieces are covered in water. Add 200ml extra boiling water, the chicken and the barbecue sauce to the pan and stir to combine. Cook for another 3 mins until the pasta is tender and coated in a shiny sauce. Turn off the heat, add the cheddar and stir to combine.
  4. Scatter with chopped chives, serve and enjoy!

Watch the recipe video here:

One Pot BBQ Chicken Penne

Posted by Twisted on Monday, March 11, 2019

Breakfast

Jalapeño Popper Mac and Cheese Lasagna

Jalapeño Popper Mac and Cheese Lasagna
Sometimes we like to layer our lasagna with bechamel, sometimes we kick it up a notch like this Jalapeño popper mac and cheese lasagna.
Author:
Cuisine: American
Recipe type: Breakfast
Ingredients
  • 1 onion diced
  • 8 rashers bacon, chopped finely
  • 2 cloves garlic, minced
  • ? ? cup tomato paste
  • 750g beef mince
  • ½ cup red wine
  • ½ cup passata
  • 1 ½ cups chicken stock
  • ¼ up heavy cream
  • ½ tsk oregano
  • ½ tsp chili flakes
  • Salt and pepper
  • 40 g butter
  • 6 jalapeños diced finely
  • 40g flour
  • 500ml whole milk
  • 1 cup grated gruyere
  • 1 cup grated mozzarella
  • 1 cup grated red cheddar
  • 450g macaroni, cooked
  • Fresh lasagna sheets
  • Sliced mozzarella cheese
Instructions
  1. In a large pan, cook bacon until fat has started to render and just slightly golden. Add oil and onions. Cook until onions are softened. Add garlic and cook until aromatic.
  2. Add tomato paste and stir to coat well. Cook for 2 minutes.
  3. Crumble in beef and cook until browned and juices have reduced. Add wine and let reduce by half.
  4. Add passata, cream, oregano and chilli flakes. Str to combine. Bring to a simmer, cover and let simmer for 30 minutes, stirring often. (Add a bit of water if it thickens too much). Season with salt and pepper. Remove from heat and let cool slightly.
  5. In a large pot, melt butter over medium heat. Add jalapeños and cook until just softened. Sprinkle in flour and mix to incorporate. Cook for 2 minutes.
  6. Gradually add milk, whisking constantly until smooth. Add all three kinds of cheese and stir until melted through. Stir in cooked macaroni.
  7. Preheat oven to 180ºC.
  8. In a large casserole pan, spread a bit of the ragu on the bottom. Top with lasagna sheets, followed by more ragu, jalapeño macaroni and cheese and sliced cheese. Repeat with remaining, finishing with a layer of macaroni and cheese topped with cheese.
  9. Cover with parchment and foil. Bake for 30 minutes until bubbling, remove foil and parchment and grill for 5 minutes until golden.
  10. Slice and enjoy!

Watch the recipe video here:

Jalapeño Popper Mac and Cheese Lasagna

Posted by Twisted on Sunday, March 3, 2019

Main dish

Jalapeno Popper Chicken Swirl Pie

Jalapeno Popper Chicken Swirl Pie
JALAPENO POPPER CHICKEN SWIRL PIE
Author:
Cuisine: American
Recipe type: Main dish
Ingredients
  • 2 tsp oil
  • 4 chicken breasts
  • Salt and Pepper to taste
  • 1 tsp oil
  • 1 small white onion, chopped
  • 8 rashers bacon, chopped
  • 2 cloves garlic, minced
  • 6 jalapeños, sliced into rings
  • 40g butter
  • 40g flour
  • 500ml chicken stock
  • 225ml heavy cream
  • 100g cream cheese
  • Salt and pepper to taste
  • 300g self-raising flour
  • 1 tsp salt
  • 50g, butter grated
  • 180ml whole milk
  • 1 cup grated red cheddar
  • 2-3 tbsp diced jalapeños
  • Egg wash
Instructions
  1. Heat oil in a large skillet over medium heat. Add the chicken breasts, seasoning on both sides. Sear on both sides and cook through. Remove to a dish and shred. Set aside while making the sauce.
  2. In the same pan, add 1 tsp oil, onion and bacon. Cook until onions are caramelised and bacon is just crispy.
  3. Add garlic and jalapeños. Cook until aromatic.
  4. Make the roux, add the butter and melt. Sprinkle over the flour and stir to combine. Gradually add the chicken stock, stirring in between until smooth. Stir in the heavy cream.
  5. Add the cream cheese and mix until melted. Bring to a simmer and cover. Simmer for about 5 minutes then add the shredded chicken. Stir and set aside.
  6. Pre-heat oven to 180ºC.
  7. In a large bowl, mix together flour and butter. Until small pebbles are formed. Add the milk and mix well. Transfer to a floured surface and knead until smooth.
  8. Roll out into a large rectangle.
  9. Sprinkle cheese over the dough leaving about ½ bare edge to seal. Sprinkle with jalapeños. Brush the bare edge with egg wash.
  10. Roll into a tight log. Cut into ½” spirals. Arrange on top of the chicken skillet.
  11. Bake for about 20 minutes until golden brown.
  12. Enjoy!

Watch the recipe video here:

Jalapeno Popper Chicken Swirl Pie

Posted by Twisted on Friday, February 22, 2019

Main dish

Giant Crispy Chicken Cordon Bleu

Giant Crispy Chicken Cordon Bleu
GIANT CRISPY CHICKEN CORDON BLEU
Author:
Cuisine: American
Recipe type: Main dish
Ingredients
  • 10 chicken breasts
  • Salt & pepper
  • 20 x Emmental slices
  • 20x slices thin ham
  • 100g seasoned plain flour
  • 6 eggs, beaten with a little water and salt
  • 300g fine panko breadcrumbs
  • 100ml vegetable oil
  • 50g butter
  • 50g plain flour
  • 500g whole milk
  • 200g grated emmental
  • 1 tbsp dijon mustard
Instructions
  1. Preheat the oven to 180°C.
  2. Butterfly the chicken breasts and bash them, using a meat tenderiser (or a rolling pin) gently bash them as thinly as you can. It helps to place clingfilm on either side of the breast as you do this.
  3. Get two equal sized loaf tins and line them with clingfilm. Lay two chicken breasts at the bottom of each - the edges should be larger than the tin so you can fold them over a little bit. Top with ham and emmental and season, then repeat around 3 or four times in each tin, layering up and folding the sides over the ham and cheese as you go. Finally, take one of the tins and stick it top down on top of the other to create your massive chicken brick. Wrap in clingfilm and freeze for around two hours - don't be tempted to freeze the whole thing or it'll take forever to cook.
  4. When it's hardened up, place your flour, eggs and panko in some deep sided baking trays. Carefully cover the whole thing in flour then shake off any excess. Dip it in the egg, letting it drip back into the bowl, and finally into the panko. If there are any patches missing then paint them with egg and press the panko into place.
  5. In a wide, heavy bottomed skillet heat the vegetable oil to 170°C and carefully fry the chicken brick on all sides until golden. Place on a baking tray and bake until the internal temperature reads 71°C.
  6. Meanwhile, make the cheese sauce - heat the butter until foaming then add the flour and cook for 30 seconds or so, then gradually whisk in the milk. Take off the heat and add the cheese a handful at a time until you've got a smooth sauce - add dijon and salt (if necessary).
  7. Serve the giant chicken cordon bleu in slices, with chips, covered in cheese sauce

Watch the recipe video here:

Giant Crispy Chicken Cordon Bleu

Posted by Twisted on Sunday, February 17, 2019

Main dish

WARBURTONS GLUTEN FREE MINI CHEESEBURGER TACOS

WARBURTONS GLUTEN FREE MINI CHEESEBURGER TACOS
Make your next gluten free meal fun and family friendly with our latest twist on the awesomely indulgent Cheeseburger Taco. Perfect for all occasions to share with friends, all you need are mini burger patties, melted cheese and Warburtons Gluten Free High Protein Wraps, and you’ll have instantly upped your snack game! It’s gluten-free, made easy.
Author:
Cuisine: American
Recipe type: Main dish
Ingredients
  • 3 Warburtons Gluten Free High Protein Wraps with Super Seeds
  • 20g sesame seeds
  • 1 egg, beaten
  • 500g beef mince
  • 1 tsp salt
  • 1 tsp pepper
  • 1 tsp onion powder
  • ½ tsp garlic powder
  • 6 slices of cheddar cheese
  • Shredded iceberg lettuce, to serve
  • Pickled red onions, to serve
Instructions
  1. Cut each wrap into 3 discs using a circle cutter. Brush with beaten egg, then sprinkle with sesame seeds. Turn a muffin tray upside down and slot each disc between the trivets to create a taco shape. Bake at 170C/400F for 6-8 mins until firm and golden.
  2. Combine beef mince, onion powder, garlic powder, salt and pepper in a bowl. Shape into 6 patties and push into a metal ring the same size as the one used to cut the tacos.
  3. Heat a frying pan on a medium-high heat. Put a little oil in the pan, then fry the burgers until they are nicely caramelised on one side, about 2 mins.
  4. Flip over and cook for 1 min, then pop a slice of cheddar on each one and put a lid on the pan. Steam the burgers until the cheese is nice and melted.
  5. Slice each burger patty in half and slot into the mini taco shell. Top with shredded lettuce and pickled red onions and serve.

Watch the recipe video here:

Warburtons Gluten Free Mini Cheeseburger Tacos

Posted by Twisted on Monday, February 11, 2019